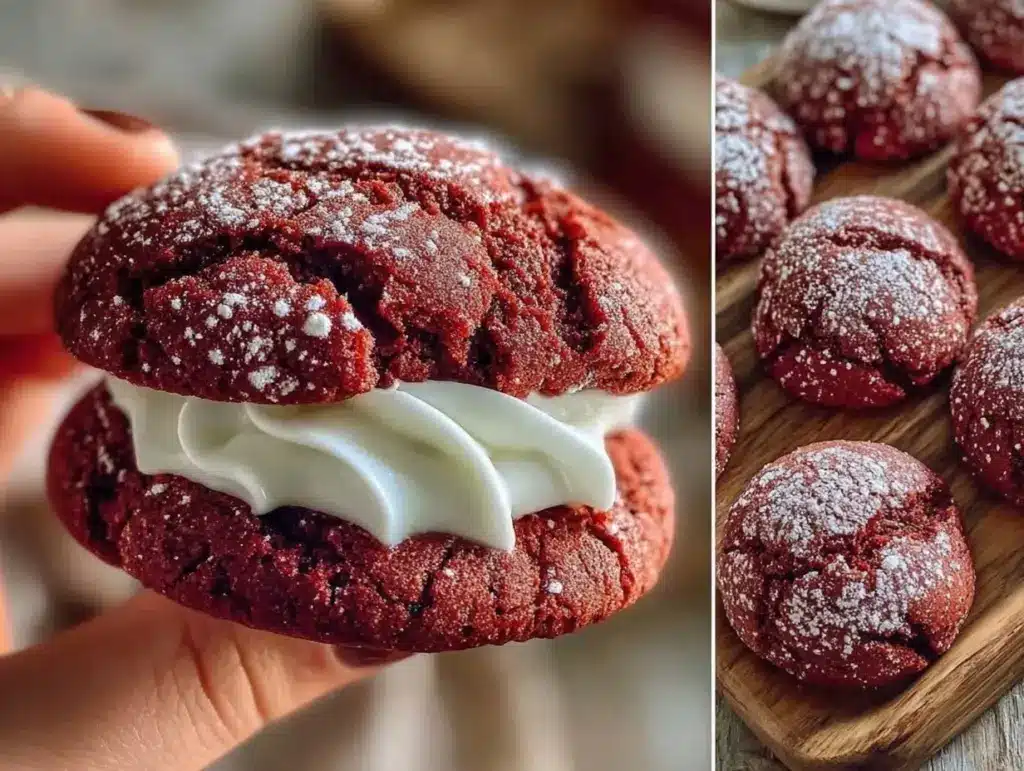
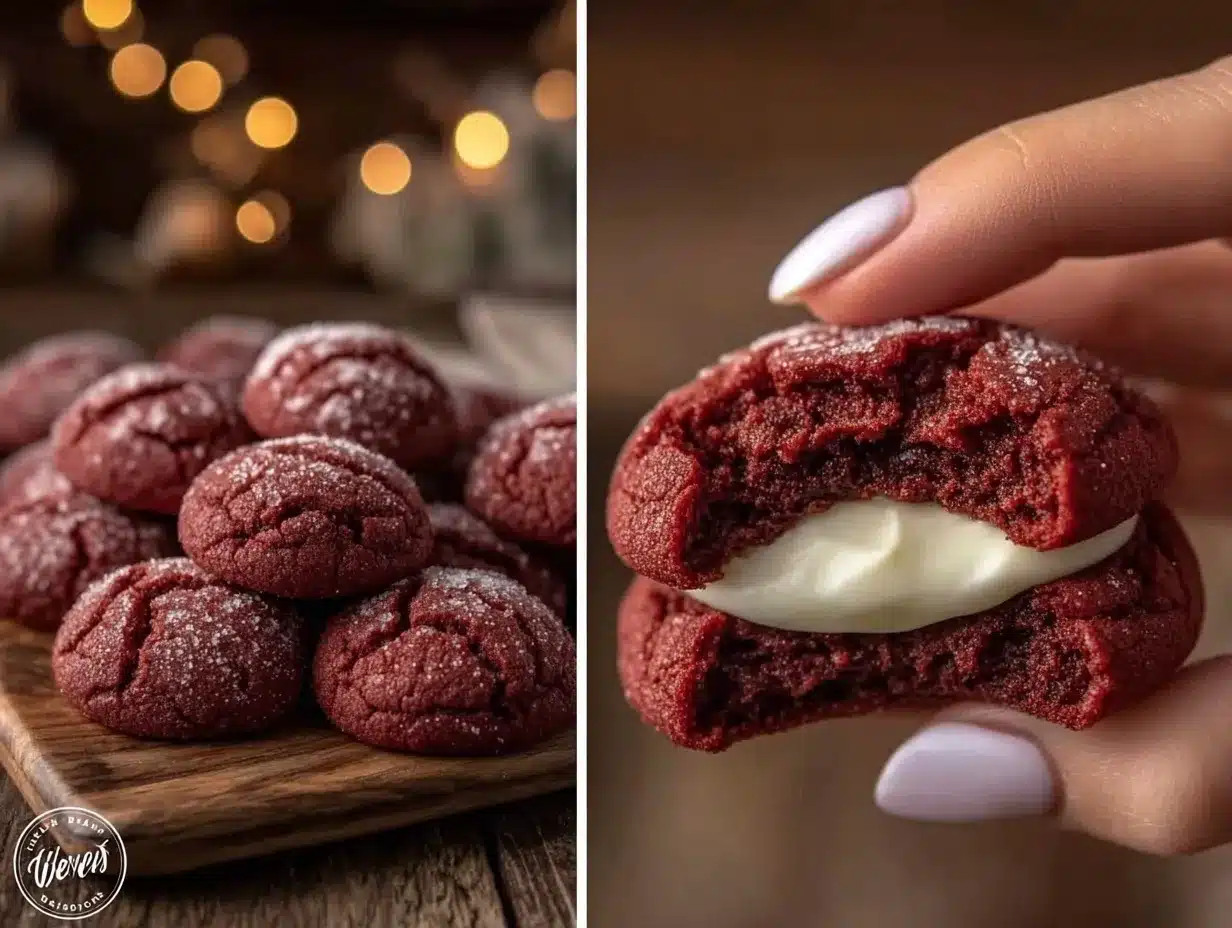
“Are you sure these aren’t from a bakery?” my friend asked, eyeing the plate of red velvet crinkle cookies I’d just pulled from the oven. Honestly, I was half-surprised myself. This recipe started on a chaotic afternoon when I’d planned a simple cookie batch but ended up mixing in cream cheese on a whim—because, well, I had some sitting in the fridge that needed using. What happened next was pure magic: these red velvet crinkle cookies with cream cheese centers turned out so soft, fudgy, and downright addictive that I found myself making them three times in one week.
The kitchen smelled like a cozy, sweet escape, rich with chocolate and that subtle tang from the cream cheese center. The cracked powdered sugar exterior? Beautifully rustic, inviting you to break right in. I remember sitting down with a warm cookie, the cream cheese melting into the soft red velvet crumb, and thinking, “This is exactly the kind of homemade treat I needed.”
What’s funny is how a simple, almost accidental twist turned these cookies from ordinary to utterly irresistible. They’ve since become my go-to when I want to impress without fuss—like the way I rely on the creamy one-pot Tuscan chicken pasta for quick comfort dinners or the brown butter banana bread when baking for friends. These cookies aren’t just sweet bites; they’re little moments of joy baked into every batch.
After making them so often, I realized this recipe wasn’t just about satisfying a sweet tooth—it became a quiet reminder that the best treats often come from a little kitchen play and trusting your instincts. So, if you’re curious about a cookie recipe that’s both stunning and surprisingly simple, keep reading. I promise these red velvet crinkle cookies with cream cheese centers will find a permanent spot in your cookie jar (and your heart).
Why You’ll Love This Recipe
Honestly, these red velvet crinkle cookies with cream cheese centers have a way of winning over even the toughest cookie critics. I’ve put them through the test many times, tweaking and tasting until I hit the perfect balance of soft, chewy, and creamy. Here’s why I think you’ll fall for them too:
- Quick & Easy: Ready in under 30 minutes of active prep, they’re perfect for last-minute cookie cravings or baking with kids on a rainy afternoon.
- Simple Ingredients: No need for fancy or hard-to-find stuff—most of these ingredients are pantry staples you probably already have on hand.
- Perfect for Celebrations: Whether it’s Valentine’s Day, a birthday, or just a cozy night in, these cookies bring a festive pop of color and flavor.
- Crowd-Pleaser: From kids to adults, everyone loves the tender crumb and that surprise cream cheese center that adds richness without being overwhelming.
- Unbelievably Delicious: The texture contrast—the slight crispness on the outside, the fudgy red velvet inside, and the silky cream cheese filling—makes these cookies unforgettable.
What sets this recipe apart? It’s the little details—folding the batter gently to keep it light, chilling the dough just long enough to handle the crinkle effect, and the trick of rolling the dough in powdered sugar right before baking. Plus, the cream cheese center isn’t just dolloped on top; it’s wrapped inside each cookie, so every bite has that luscious surprise.
This isn’t just another red velvet cookie. It’s the one you’ll want to make again and again, the kind that makes you close your eyes after the first bite and smile. So, whether you’re baking for a crowd or a quiet night treat, these cookies bring the kind of comfort and joy that’s worth every minute in the kitchen.
What Ingredients You Will Need
This recipe is all about straightforward, wholesome ingredients coming together to deliver big flavor without the fuss. Most are probably hanging out in your pantry or fridge right now, and a few simple tips will help you pick the best ones.
- Red Velvet Cookie Dough:
- All-purpose flour (2 ½ cups / 315g) – The backbone of the cookie, providing structure.
- Cocoa powder (2 tbsp) – Use unsweetened, preferably from a trusted brand like Hershey’s for best flavor.
- Baking powder (1 tsp) – Helps the cookies rise just right.
- Salt (½ tsp) – Balances the sweetness.
- Unsalted butter (1 cup / 227g), softened – Adds richness and tenderness.
- Granulated sugar (1 ½ cups / 300g) – Sweetens and helps with the crinkle effect.
- Large eggs (2), room temperature – For moisture and binding.
- Vanilla extract (1 tsp) – Enhances the overall flavor.
- Red food coloring (2 tbsp) – This is what gives the cookies their signature deep red hue. Gel food coloring works best to avoid thinning the dough.
- Buttermilk (2 tbsp) – Adds subtle tang and moistness.
- Cream Cheese Filling:
- Cream cheese (8 oz / 225g), softened – Use full-fat for the creamiest center.
- Powdered sugar (½ cup / 60g) – Sweetens and smooths the filling.
- Vanilla extract (½ tsp) – Adds depth to the filling flavor.
- Finishing Touch:
- Powdered sugar (for rolling) – Creates the signature crinkle look and adds a delicate sweetness on the outside.
Substitution notes: If you want a dairy-free option, swap the butter with a plant-based spread and use dairy-free cream cheese. Almond flour isn’t recommended here, as it changes the texture too much. Also, if you don’t have buttermilk, a quick substitute is to mix 2 tbsp milk with 1 tsp lemon juice and let it sit for 5 minutes.
Equipment Needed
- Mixing bowls (medium and large) – For combining the dough and filling separately.
- Electric mixer or stand mixer – Makes creaming butter and sugar much easier; a hand whisk works but takes more elbow grease.
- Measuring cups and spoons – Precision helps these cookies turn out perfect every time.
- Rubber spatula – For folding ingredients gently without deflating the dough.
- Baking sheets – Preferably heavy-duty for even heat distribution.
- Parchment paper or silicone baking mats – Prevents sticking and helps with cleanup.
- Cookie scoop or tablespoon – For uniform cookie sizes; I love using a medium cookie scoop for this recipe.
- Cooling rack – To cool cookies evenly and avoid sogginess.
In a pinch, you can use a wooden spoon for mixing and a standard spoon to portion the dough, but the mixer and cookie scoop really streamline the process. I keep my baking sheets in good shape by seasoning them lightly with oil and cleaning gently with a sponge—helps avoid that stubborn baked-on residue that messes with cookie bottoms.
Preparation Method
- Prep the Filling (10 minutes): In a medium bowl, beat 8 oz (225g) softened cream cheese with ½ cup (60g) powdered sugar and ½ tsp vanilla extract until smooth and creamy. Cover and chill while you work on the dough. This chilling step helps the filling hold its shape when baked.
- Mix Dry Ingredients (5 minutes): In another bowl, sift together 2 ½ cups (315g) all-purpose flour, 2 tbsp unsweetened cocoa powder, 1 tsp baking powder, and ½ tsp salt. Set aside.
- Cream Butter and Sugar (5 minutes): Using a stand or hand mixer, beat 1 cup (227g) softened unsalted butter with 1 ½ cups (300g) granulated sugar on medium speed until light and fluffy—about 3-4 minutes. This step is crucial for the cookie’s tender crumb.
- Add Eggs and Flavorings (3 minutes): Beat in 2 large eggs one at a time, ensuring each is fully incorporated. Then add 1 tsp vanilla extract, 2 tbsp red gel food coloring, and 2 tbsp buttermilk. Mix until the color is evenly distributed and the batter is smooth.
- Combine Wet and Dry (3 minutes): Gradually fold in the dry ingredients with a rubber spatula, mixing gently until just combined. Overmixing can make cookies tough — so stop when you don’t see any flour streaks.
- Chill the Dough (30-45 minutes): Cover the dough and refrigerate for at least 30 minutes. This helps the dough firm up, making it easier to handle and preserving the crinkle effect during baking.
- Preheat Oven and Prepare Baking Sheets (5 minutes): Heat your oven to 350°F (175°C). Line baking sheets with parchment paper or silicone mats.
- Assemble Cookies (15-20 minutes): Using a tablespoon or cookie scoop, portion about 1 ½ tablespoons of red velvet dough per cookie. Flatten slightly in your palm, place about 1 teaspoon of chilled cream cheese filling in the center, then fold the dough around the filling and roll into a ball. Roll each ball generously in powdered sugar.
- Bake (12-14 minutes): Place the cookies 2 inches apart on the baking sheets. Bake until the cookies have puffed and the powdered sugar is cracked — usually 12 to 14 minutes. They’ll look set but still soft in the center.
- Cool (10 minutes): Let cookies cool on the baking sheet for 5 minutes before transferring to a cooling rack. This prevents them from breaking apart while warm.
Common hiccup: If your cream cheese filling oozes out too much, try chilling it longer or reducing the amount slightly. Dough that’s too warm can also spread too much, so don’t skip that chill step. You want that perfect balance where the cookie crinkles beautifully but still holds its shape with a gooey center.
Cooking Tips & Techniques
Getting these red velvet crinkle cookies just right involves a few little tricks I picked up after some trial and error. First, don’t rush the butter-sugar creaming. It might feel like a small step, but it’s the secret to those tender, melt-in-your-mouth bites.
Another tip: using gel food coloring instead of liquid keeps your dough from getting too wet and sticky, helping maintain that gorgeous deep red color without affecting the texture. And yes, chilling the dough is non-negotiable here. I once tried to skip that step (impatience strikes again), and the cookies spread like crazy, losing that signature crinkle and cream cheese surprise.
When rolling the dough balls in powdered sugar, be generous. This not only creates the classic crackled look but also adds a subtle sweetness and a slight texture contrast. I like to roll the cookies twice in sugar for an extra snowy effect.
One mistake I learned the hard way: don’t overcrowd your baking sheet. Give the cookies plenty of space to spread and crack properly. Baking one sheet at a time often yields the best results, especially if your oven has hot spots.
Lastly, multitasking tip: while the cookies bake, use the downtime to clean your bowls or prepare a warm drink. It’s a small thing but helps keep the kitchen calm and the process enjoyable.
Variations & Adaptations
Playing around with this recipe can be a blast, and I’ve tried a few variations that might inspire you:
- Chocolate Lovers’ Version: Add mini chocolate chips into the cookie dough for bursts of melty chocolate alongside the cream cheese center.
- Gluten-Free Adaptation: Swap the all-purpose flour for a 1:1 gluten-free baking flour blend. The texture is slightly different but still delicious.
- Seasonal Twist: Mix a teaspoon of orange zest into the cream cheese filling for a citrusy surprise that brightens the rich red velvet flavor.
- Spiced Up: Add a pinch of cinnamon or chili powder to the dough for a subtle warmth that pairs wonderfully with the cream cheese center.
I once made these cookies for a holiday party and swapped out the cream cheese center for a dollop of raspberry jam. It was a hit, but honestly, I prefer the classic cream cheese surprise myself. Feel free to experiment but keep in mind the filling needs to be thick enough to hold shape during baking.
Serving & Storage Suggestions
These cookies are best enjoyed slightly warm when the cream cheese center is soft and indulgent. Serve them with a cold glass of milk or a cup of coffee for a cozy treat. They’re perfect on a festive cookie platter or as a sweet finish to a comforting meal, like the moist homemade meatloaf I love making on busy weeknights.
Store leftover cookies in an airtight container at room temperature for up to 3 days. If you want to keep them longer, pop them in the fridge for up to a week or freeze for up to 3 months. Just thaw at room temperature, then warm gently in the microwave for 10-15 seconds to bring back that gooey cream cheese center.
Interestingly, the flavors deepen a bit after resting overnight, making them even more satisfying the next day. So if you want, bake ahead and let those cookies mellow in flavor before serving.
Nutritional Information & Benefits
Each red velvet crinkle cookie with cream cheese center contains approximately 180-210 calories, with a balanced mix of carbs, fats, and protein. The cream cheese adds a dose of calcium and protein, while the cocoa powder contributes antioxidants.
This recipe uses real butter and cream cheese, so it’s a treat to savor rather than an everyday snack. For those watching gluten, the gluten-free flour swap is a great option, though it changes texture slightly. Be mindful of the dairy content if you have allergies.
From a wellness standpoint, these cookies feel indulgent but come together with real ingredients—no artificial fillers or preservatives—so they’re a satisfying homemade alternative to store-bought sweets.
Conclusion
Making these irresistible red velvet crinkle cookies with cream cheese centers is a delightful way to bring a little homemade magic into your kitchen. They’re simple enough for a quick bake yet special enough to impress anyone who tries them. What I love most is how they balance soft, rich, and tangy all in one bite, turning the ordinary cookie into something memorable.
Feel free to tweak the filling or add your own spin, but trust me—once you get this recipe down, it’s going to be one you return to again and again. And hey, if you ever want a savory dinner to pair with your sweet treats, the easy flavor-packed salmon bowls are a fantastic match for keeping meals balanced and exciting.
Can’t wait to hear how you make these cookies your own. Drop a comment, share your variations, or just tell me if they made your day a little sweeter!
Frequently Asked Questions
Can I make these cookies ahead of time?
Absolutely! The dough can be chilled overnight before baking, and baked cookies keep well stored in an airtight container for several days. You can also freeze baked cookies for longer storage.
What’s the best way to prevent the cream cheese filling from leaking?
Make sure the cream cheese filling is well chilled and firm before wrapping it in dough. Also, don’t overfill the cookies and handle the dough gently to avoid tearing.
Can I use liquid food coloring instead of gel?
You can, but gel food coloring is preferred because it doesn’t thin out the dough. Using liquid coloring might make the dough too soft and affect the texture.
Are these cookies gluten-free?
The original recipe uses all-purpose flour, but you can substitute a gluten-free flour blend for a gluten-free version. Results may vary slightly in texture.
Can I replace the cream cheese filling with something else?
Yes! Some people enjoy swapping the filling with fruit jam, chocolate ganache, or even Nutella. Just ensure the filling is thick enough to hold its shape during baking.
Pin This Recipe!

Irresistible Red Velvet Crinkle Cookies with Cream Cheese Centers
Soft, fudgy red velvet crinkle cookies with a luscious cream cheese center, perfect for celebrations or cozy treats. These cookies feature a cracked powdered sugar exterior and a surprise creamy filling.
- Prep Time: 30 minutes
- Cook Time: 14 minutes
- Total Time: 44 minutes
- Yield: 24 cookies 1x
- Category: Dessert
- Cuisine: American
Ingredients
- 2 ½ cups (315g) all-purpose flour
- 2 tbsp unsweetened cocoa powder
- 1 tsp baking powder
- ½ tsp salt
- 1 cup (227g) unsalted butter, softened
- 1 ½ cups (300g) granulated sugar
- 2 large eggs, room temperature
- 1 tsp vanilla extract
- 2 tbsp red gel food coloring
- 2 tbsp buttermilk
- 8 oz (225g) cream cheese, softened
- ½ cup (60g) powdered sugar (for filling)
- ½ tsp vanilla extract (for filling)
- Powdered sugar (for rolling)
Instructions
- Prep the Filling (10 minutes): In a medium bowl, beat 8 oz (225g) softened cream cheese with ½ cup (60g) powdered sugar and ½ tsp vanilla extract until smooth and creamy. Cover and chill while you work on the dough.
- Mix Dry Ingredients (5 minutes): In another bowl, sift together 2 ½ cups (315g) all-purpose flour, 2 tbsp unsweetened cocoa powder, 1 tsp baking powder, and ½ tsp salt. Set aside.
- Cream Butter and Sugar (5 minutes): Using a stand or hand mixer, beat 1 cup (227g) softened unsalted butter with 1 ½ cups (300g) granulated sugar on medium speed until light and fluffy—about 3-4 minutes.
- Add Eggs and Flavorings (3 minutes): Beat in 2 large eggs one at a time, ensuring each is fully incorporated. Then add 1 tsp vanilla extract, 2 tbsp red gel food coloring, and 2 tbsp buttermilk. Mix until the color is evenly distributed and the batter is smooth.
- Combine Wet and Dry (3 minutes): Gradually fold in the dry ingredients with a rubber spatula, mixing gently until just combined. Stop when no flour streaks remain.
- Chill the Dough (30-45 minutes): Cover the dough and refrigerate for at least 30 minutes to firm up and preserve the crinkle effect.
- Preheat Oven and Prepare Baking Sheets (5 minutes): Heat oven to 350°F (175°C). Line baking sheets with parchment paper or silicone mats.
- Assemble Cookies (15-20 minutes): Portion about 1 ½ tablespoons of dough per cookie. Flatten slightly, place about 1 teaspoon of chilled cream cheese filling in the center, fold dough around filling, and roll into a ball. Roll each ball generously in powdered sugar.
- Bake (12-14 minutes): Place cookies 2 inches apart on baking sheets. Bake until puffed and powdered sugar is cracked, about 12 to 14 minutes. Cookies will look set but remain soft in the center.
- Cool (10 minutes): Let cookies cool on baking sheet for 5 minutes before transferring to a cooling rack.
Notes
Use gel food coloring to avoid thinning the dough. Chill dough for at least 30 minutes to maintain crinkle effect and prevent spreading. Roll dough balls generously in powdered sugar for classic crackled look. Avoid overcrowding baking sheets. For dairy-free, substitute butter and cream cheese with plant-based alternatives. Buttermilk can be substituted with 2 tbsp milk plus 1 tsp lemon juice, rested 5 minutes.
Nutrition
- Serving Size: 1 cookie
- Calories: 195
- Sugar: 15
- Sodium: 120
- Fat: 10
- Saturated Fat: 6
- Carbohydrates: 25
- Fiber: 1
- Protein: 3
Keywords: red velvet cookies, crinkle cookies, cream cheese center, homemade cookies, festive cookies, soft cookies, easy cookie recipe


