“You really think you can pull off a cheesecake dessert that looks like a flag and tastes like summer all rolled into one?” my sister teased over the phone that afternoon. I was juggling a half-packed picnic basket, a distracted toddler, and a stubbornly sticky countertop when I stumbled onto this idea. Honestly, the thought started as a last-minute scramble—something quick yet festive for the upcoming Fourth of July gathering. I was skeptical at first, wondering if anyone would care beyond the usual red, white, and blue gimmick.
But as I layered those creamy swirls of cheesecake with the fresh, juicy strawberries and the flaky crust, a familiar scent filled the kitchen. It reminded me of years ago, sneaking bites of whatever dessert my mom whipped up for our backyard cookouts. The kind of dessert that makes you pause, smile, and just enjoy the moment. Turns out, these Easy Patriotic Strawberry Cheesecake Flag Bars became that moment for me—a simple recipe that somehow felt like a small, sweet celebration all on its own.
There’s something quietly satisfying about serving a dessert that’s both visually charming and downright delicious, without driving you crazy in the kitchen. These bars are that recipe for me. They stuck around because they turned a chaotic day into a memory, and because they honestly taste like summer on a plate, without the fuss. That’s why I keep making them, and why I think you’ll appreciate them too.
Why You’ll Love This Recipe
After testing this recipe multiple times, I can say it’s perfect for those moments when you want to impress without stress. Here’s why these Easy Patriotic Strawberry Cheesecake Flag Bars have become a go-to in my kitchen:
- Quick & Easy: Ready in under 45 minutes, including prep and bake time—ideal for busy summer afternoons or last-minute parties.
- Simple Ingredients: No hunting for unusual items here, just staples like cream cheese, strawberries, and a buttery crust.
- Perfect for Summer Gatherings: Whether it’s a picnic, barbecue, or holiday brunch, these bars bring a festive vibe and fresh flavor.
- Crowd-Pleaser: Kids love the bright colors, and adults appreciate the creamy texture with just the right touch of sweetness.
- Unbelievably Delicious: The balance of creamy cheesecake, sweet strawberries, and buttery crust is genuinely comforting and addictive.
This isn’t your average cheesecake bar. The secret lies in the layering technique and the slight swirl of cream cheese that keeps each bite smooth and luscious. Plus, using fresh strawberries (instead of jam or canned fruit) gives a clean, vibrant taste that really stands out on a summer dessert table. If you’ve ever tried my fresh Lebanese fattoush salad, you know I’m all about fresh ingredients that bring life to every bite. These bars have that same fresh appeal but in a sweet package.
What Ingredients You Will Need
This recipe keeps things approachable with pantry staples and fresh produce, making it easy to pull together without a special trip to the store. Each ingredient plays a key role, from the buttery crust to the creamy cheesecake and the bright strawberry topping.
- For the crust:
- 1 ½ cups graham cracker crumbs (I prefer using a fine texture like Nabisco Honey Maid for best binding)
- ⅓ cup unsalted butter, melted (adds richness and helps hold the crust)
- 3 tablespoons granulated sugar (balances the buttery flavor)
- For the cheesecake layer:
- 16 ounces cream cheese, softened (room temperature to avoid lumps)
- ⅔ cup granulated sugar
- 2 large eggs, room temperature
- 1 teaspoon pure vanilla extract (adds depth)
- 2 tablespoons all-purpose flour (helps stabilize the cheesecake)
- ½ cup sour cream (for tanginess and creaminess; plain Greek yogurt works as a substitute)
- For the strawberry topping:
- 2 cups fresh strawberries, sliced (choose firm, ripe berries for best texture)
- 2 tablespoons granulated sugar (to macerate the berries and bring out sweetness)
- 1 teaspoon lemon juice (brightens the flavor)
Feel free to swap the graham cracker crumbs with gluten-free almond flour if you’re avoiding gluten, or try coconut sugar instead of granulated sugar for a slightly different sweetness profile. I’ve also made these bars with frozen strawberries thawed overnight—just be sure to drain excess liquid to avoid sogginess.
Equipment Needed
- 9×13-inch baking pan (glass or metal works fine; I personally like glass for even baking and easy cleanup)
- Mixing bowls (a medium and a large one to keep things organized)
- Electric mixer or stand mixer (helps whip the cheesecake filling smooth and creamy)
- Measuring cups and spoons (accuracy is key for baking)
- Spatula (for folding ingredients and smoothing layers)
- Sharp knife (for slicing strawberries and the finished bars)
- Cooling rack (optional but recommended to cool the bars evenly)
If you don’t have an electric mixer, a sturdy whisk and a bit of elbow grease will do the trick, though it might take a little longer to get that silky cheesecake texture. For those on a budget, a simple hand mixer and a glass baking dish will cover everything you need.
Preparation Method
- Preheat your oven to 325°F (163°C). Grease your 9×13-inch pan lightly with butter or non-stick spray to avoid sticking.
- Make the crust: In a medium bowl, combine 1 ½ cups graham cracker crumbs, ⅓ cup melted butter, and 3 tablespoons sugar. Stir until the mixture resembles wet sand. Press firmly and evenly into the bottom of your prepared pan—think of packing it down like making a firm base for the bars. Bake for 10 minutes, then remove and let cool slightly while you prepare the filling.
- Prepare the cheesecake filling: In a large bowl, beat 16 ounces softened cream cheese with ⅔ cup sugar until smooth and creamy—no lumps! Add 2 eggs, one at a time, mixing well after each. Stir in 1 teaspoon vanilla extract, 2 tablespoons flour, and ½ cup sour cream until just combined. The batter should be thick but pourable.
- Pour the cheesecake layer over the baked crust and smooth out evenly with a spatula. Try not to overwork it; gentle smoothing keeps the texture tender.
- Make the strawberry topping: In a small bowl, toss 2 cups sliced strawberries with 2 tablespoons sugar and 1 teaspoon lemon juice. Let sit for about 10 minutes to macerate and release juices.
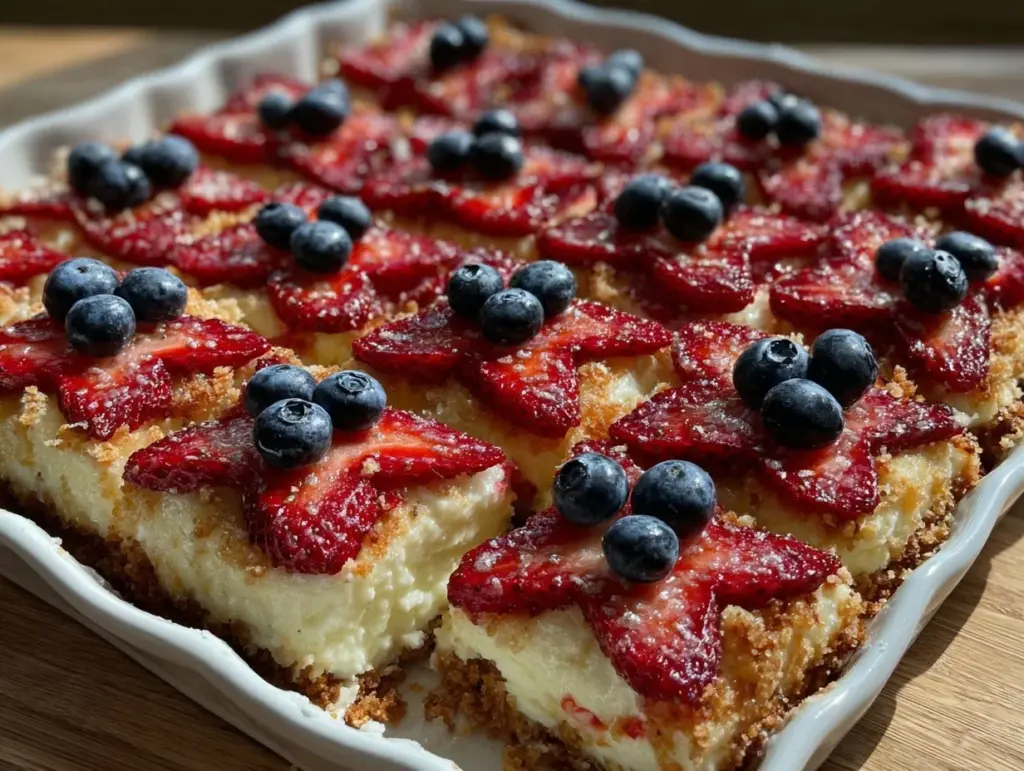
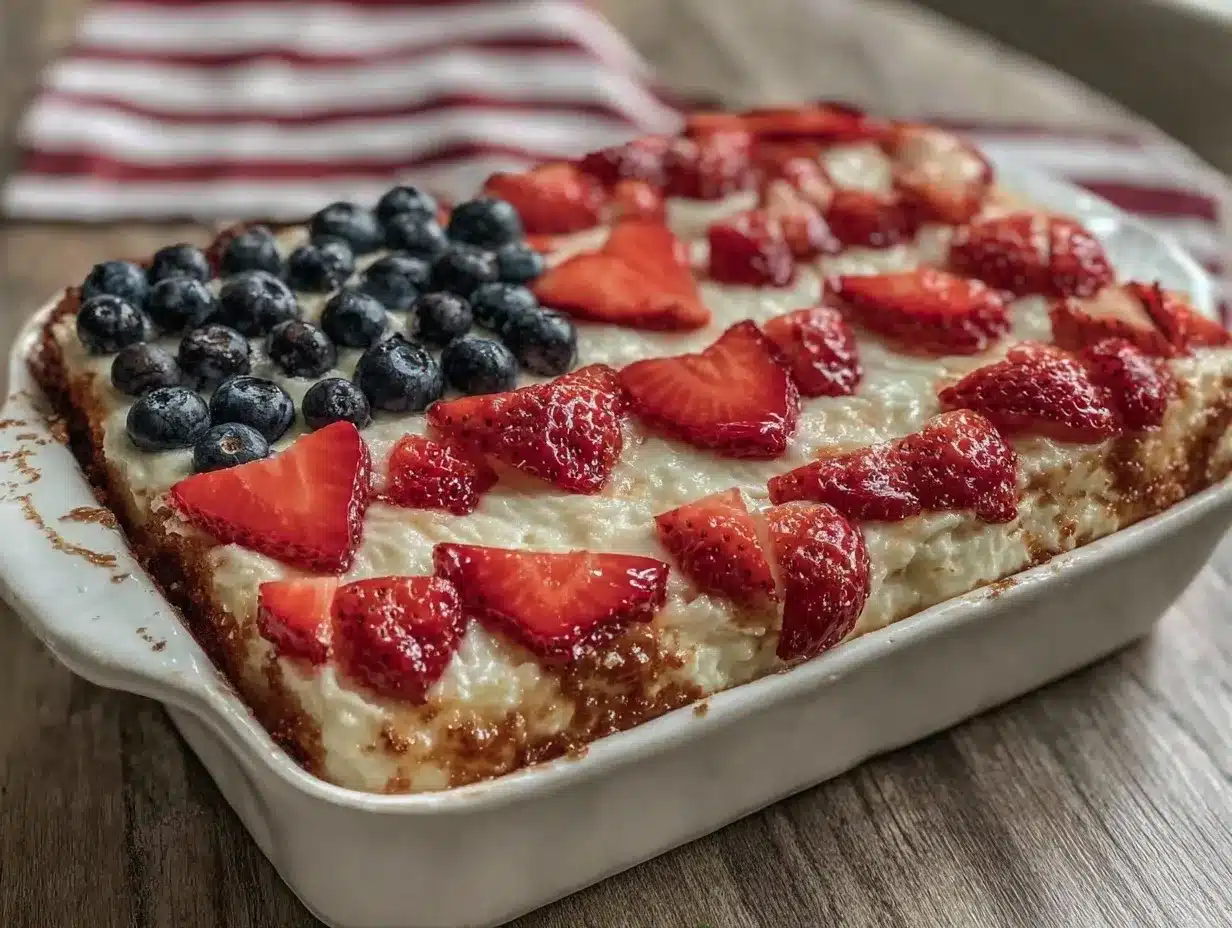
- Arrange the strawberries on top of the cheesecake layer carefully, creating the pattern of a flag—rows of strawberries for the stripes and a small cluster in the corner for the “stars” section. Feel free to get creative here; the imperfect flag shape adds charm! If you want a cleaner look, slice strawberries thinner and overlap them.
- Bake the whole pan at 325°F (163°C) for 25-30 minutes, or until the cheesecake is mostly set but still slightly jiggly in the center. Avoid overbaking to keep it creamy.
- Cool completely at room temperature, then refrigerate for at least 3 hours or overnight. This helps the bars firm up and flavors meld beautifully.
- Slice into squares and serve chilled. Use a sharp knife dipped in hot water for clean cuts.
Quick tip: If your strawberries release too much juice, blot gently with a paper towel before arranging to prevent soggy bars. And if you notice cracks forming as the cheesecake cools, that’s normal—covering the pan with plastic wrap helps keep moisture in and cracks minimal.
Cooking Tips & Techniques
Cheesecake bars can be a little temperamental, but a few tricks make this recipe fail-proof. First, always use room temperature cream cheese and eggs. Cold ingredients lead to lumps and uneven texture, which nobody wants. I learned this the hard way after one bumpy batch that had me re-mixing for nearly 10 minutes trying to smooth it out.
Pressing the crust firmly is key. If it’s too loose, the crust crumbles when cutting bars. I usually press with the bottom of a measuring cup to get an even, compact layer that holds together well. Also, don’t skip the short pre-bake for the crust—it stops it from turning soggy once the cheesecake topping goes on.
Baking at a low temperature (325°F/163°C) and watching the cheesecake’s jiggle is the best way to keep it creamy yet set. Overbaked cheesecake is dry and crumbly, so check it a few minutes before the timer goes off. I often open the oven door slightly to peek without letting too much heat escape.
Finally, chilling overnight is a must for flavor and texture. The bars firm up nicely and slice cleanly, which is important if you’re bringing them to a party or picnic. I often prep these the day before, so I’m not rushed on the day of the event.
Variations & Adaptations
While these Easy Patriotic Strawberry Cheesecake Flag Bars shine as-is, there’s room to tweak depending on your taste or dietary needs:
- Dairy-Free: Substitute cream cheese and sour cream with vegan alternatives like cashew-based cream cheese and coconut yogurt. The texture shifts slightly but still delicious.
- Flavor Twist: Add a tablespoon of lemon zest to the cheesecake batter for a zesty kick that complements the strawberries beautifully.
- Berry Combo: Try mixing blueberries with strawberries for a more colorful flag or switch in raspberries if you prefer a tart contrast.
- Low-Sugar: Use a sugar substitute like erythritol in both crust and filling to reduce sweetness without compromising texture.
- Crust Swap: Use crushed pretzels or digestive biscuits instead of graham crackers for a salty-sweet twist. I once used crushed Italian sausage and peppers party snacks for a savory-sweet combo that surprised everyone!
Serving & Storage Suggestions
These cheesecake bars are best served chilled, straight from the fridge. The cool, creamy texture feels so refreshing after a sun-soaked afternoon. For presentation, arrange the bars on a simple white platter to let the flag colors pop, or line them up on a rustic wooden board for a picnic vibe.
Pair with light beverages like iced tea or a sparkling lemonade to balance the sweetness. If you’re looking for a fuller meal, these bars go surprisingly well with savory dishes like my creamy loaded baked potato soup, which offers a cozy contrast to the fresh dessert.
Store leftovers covered tightly in the refrigerator for up to 4 days. These bars also freeze well—wrap individual pieces in plastic wrap and place in a freezer-safe container for up to 2 months. Thaw overnight in the fridge before serving. The flavors actually deepen after a day or two, making them even tastier the next day.
Nutritional Information & Benefits
Each bar (based on 12 servings) contains approximately 280 calories, 15 grams of fat, 30 grams of carbohydrates, and 5 grams of protein. The strawberries provide a good dose of vitamin C and antioxidants, while the cream cheese contributes calcium and protein.
This dessert is gluten-containing due to the graham cracker crust, but swapping in almond flour can make it gluten-free. It’s moderate in sugar, so it’s best enjoyed as an occasional treat. The fresh fruit topping adds natural sweetness and fiber, making it feel a bit lighter than traditional cheesecake.
I appreciate this recipe because it balances indulgence with freshness—something that fits nicely with a health-conscious but realistic approach to summer desserts.
Conclusion
These Easy Patriotic Strawberry Cheesecake Flag Bars are more than just a festive dessert; they’re a reminder that simple ingredients and a little creativity can create something memorable. Whether you’re bringing them to a holiday barbecue or serving a casual family dessert, they bring a bit of joy and color without the fuss.
I love how customizable they are and how they invite you to slow down and savor a sweet summer moment. Give them a try, tweak them to your liking, and share your own adaptations—nothing makes me happier than hearing how a recipe finds a new home in your kitchen.
Here’s to sweet, simple celebrations and plenty of delicious memories ahead.
FAQs
Can I make these strawberry cheesecake bars ahead of time?
Absolutely! They actually taste better after chilling overnight, which helps the flavors meld and the bars to firm up for clean slices.
What if I don’t have fresh strawberries? Can I use frozen?
Yes, but be sure to thaw them completely and drain any extra liquid to prevent sogginess. Pat dry with paper towels before using.
How do I avoid cracks in the cheesecake layer?
Mix the batter gently to avoid incorporating too much air, and don’t overbake. The center should jiggle slightly when done. Cooling slowly also helps prevent cracks.
Can I substitute the graham cracker crust with something else?
Definitely! Crushed pretzels, digestive biscuits, or almond flour are great alternatives depending on your taste and dietary needs.
Are these bars gluten-free?
Not if you use graham crackers, but swapping in almond flour or a gluten-free cracker crust makes this recipe gluten-free friendly.
Pin This Recipe!

Easy Patriotic Strawberry Cheesecake Flag Bars
A quick and festive cheesecake bar recipe featuring a buttery graham cracker crust, creamy cheesecake layer, and fresh strawberry topping arranged like a patriotic flag. Perfect for summer gatherings and holidays.
- Prep Time: 15 minutes
- Cook Time: 40 minutes
- Total Time: 55 minutes plus chilling time
- Yield: 12 servings 1x
- Category: Dessert
- Cuisine: American
Ingredients
- 1 ½ cups graham cracker crumbs
- ⅓ cup unsalted butter, melted
- 3 tablespoons granulated sugar
- 16 ounces cream cheese, softened
- ⅔ cup granulated sugar
- 2 large eggs
- 1 teaspoon pure vanilla extract
- 2 tablespoons all-purpose flour
- ½ cup sour cream (or plain Greek yogurt)
- 2 cups fresh strawberries, sliced
- 2 tablespoons granulated sugar
- 1 teaspoon lemon juice
Instructions
- Preheat your oven to 325°F (163°C). Grease a 9×13-inch pan lightly with butter or non-stick spray.
- Make the crust: In a medium bowl, combine graham cracker crumbs, melted butter, and 3 tablespoons sugar. Stir until mixture resembles wet sand. Press firmly and evenly into the bottom of the prepared pan. Bake for 10 minutes, then remove and let cool slightly.
- Prepare the cheesecake filling: In a large bowl, beat softened cream cheese with ⅔ cup sugar until smooth and creamy. Add eggs one at a time, mixing well after each. Stir in vanilla extract, flour, and sour cream until just combined.
- Pour the cheesecake layer over the baked crust and smooth out evenly with a spatula.
- Make the strawberry topping: Toss sliced strawberries with 2 tablespoons sugar and lemon juice. Let sit for about 10 minutes to macerate.
- Arrange the strawberries on top of the cheesecake layer to create a flag pattern.
- Bake the whole pan at 325°F (163°C) for 25-30 minutes, until cheesecake is mostly set but slightly jiggly in the center.
- Cool completely at room temperature, then refrigerate for at least 3 hours or overnight.
- Slice into squares and serve chilled. Use a sharp knife dipped in hot water for clean cuts.
Notes
Use room temperature cream cheese and eggs to avoid lumps. Press crust firmly and pre-bake to prevent sogginess. Bake at low temperature and watch for slight jiggle to keep cheesecake creamy. Chill overnight for best flavor and texture. If using frozen strawberries, thaw and drain excess liquid to avoid soggy bars. For clean slices, dip knife in hot water before cutting.
Nutrition
- Serving Size: 1 bar (1/12th of rec
- Calories: 280
- Fat: 15
- Carbohydrates: 30
- Protein: 5
Keywords: strawberry cheesecake bars, patriotic dessert, summer dessert, Fourth of July dessert, cheesecake bars, easy cheesecake recipe, flag dessert


