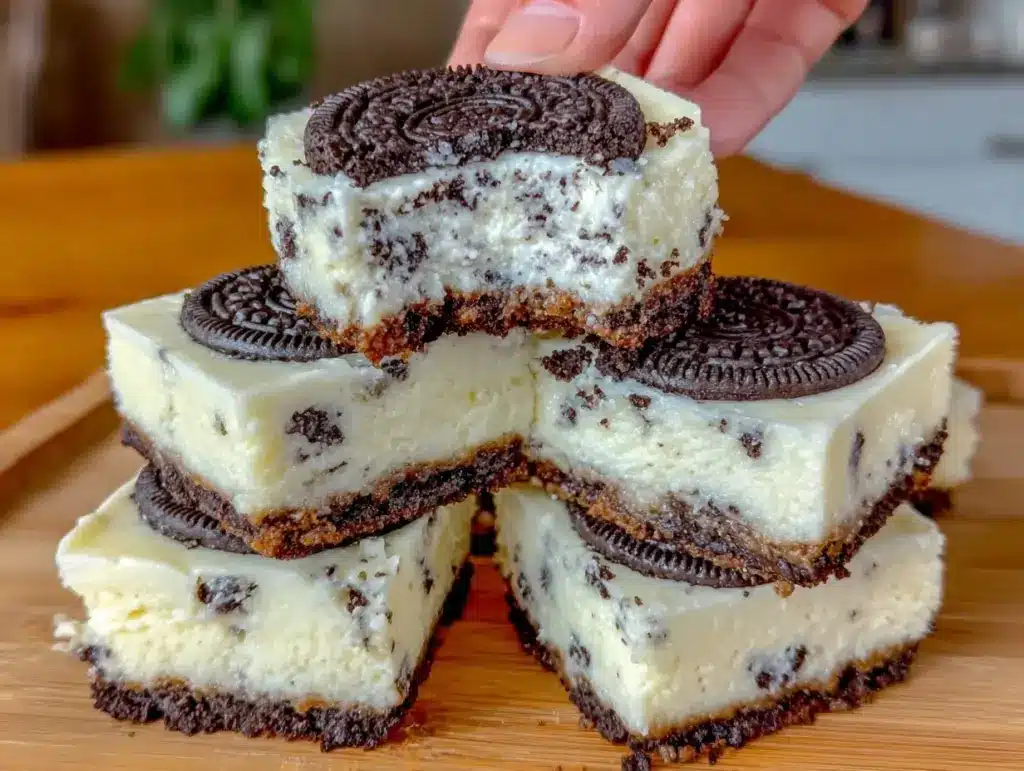
“You really should try these bars,” my coworker insisted during an afternoon slump at the office. Honestly, I was skeptical—no-bake desserts always seemed too simple to be truly satisfying. But after one bite of those creamy no-bake Oreo cheesecake bars, I was hooked. The texture was just right—not too dense, not too airy—and the crushed Oreos gave a perfect crunch that reminded me of childhood treats, but with grown-up indulgence.
That day, as rain pattered softly against the window, these bars became my unexpected comfort. They were quick to whip up, no oven required, and the fridge did all the heavy lifting while I savored a much-needed break. Since then, I’ve made this recipe more times than I can count—sometimes as a last-minute crowd-pleaser for friends, other times just for a cozy night in.
What stuck with me is how effortlessly these creamy no-bake Oreo cheesecake bars manage to balance nostalgia and ease. No fancy gadgets or hours of baking, just simple ingredients coming together with a smooth, luscious finish. It’s one of those recipes you pull out when you want to impress without the stress, or when you just need a sweet reset after a long day. And honestly, that’s pretty priceless.
Why You’ll Love This Recipe
Having tested this recipe multiple times (yes, it’s been a regular for weekend treats), I can confidently say it nails that perfect mix of creamy and crunchy every single time. Here’s why it stands out:
- Quick & Easy: Ready in just 5 simple steps and chilling time, this dessert fits right into busy schedules or spontaneous dessert cravings.
- Simple Ingredients: No strange or hard-to-find items here. Just cream cheese, Oreos, whipped topping, and a few pantry staples.
- Perfect for Gatherings: Whether it’s a potluck, casual dinner, or an impromptu party, these cheesecake bars always get devoured fast.
- Crowd-Pleaser: Kids love the cookie crunch, adults appreciate the smooth richness — it’s a win-win.
- Unbelievably Delicious: The crushed Oreos in the crust and throughout the filling create a delightful textural contrast that feels indulgent but not heavy.
What really sets this recipe apart is the way it uses crushed Oreos both in the base and folded into the creamy filling, giving it a layered Oreo flavor that’s more dynamic than your usual no-bake cheesecake. Also, by folding in whipped topping rather than heavy cream, it keeps the bars light and airy. I’ve found that using a trusted brand of cream cheese, like Philadelphia, makes the texture extra smooth and reliable.
Honestly, this isn’t just a dessert — it’s that little moment of joy when you close your eyes after the first bite, knowing you nailed something simple but perfect. If you’re looking for a sweet fix that doesn’t require a full baking session like the comfort-food classics you love, these bars might just become your go-to.
What Ingredients You Will Need
This recipe keeps things uncomplicated, relying on a handful of familiar ingredients that work together to create a creamy, crunchy, dreamy dessert. Most are pantry staples, so you can whip this up anytime.
- Oreo cookies: About 24 cookies, crushed (reserve a few for garnish) — classic Oreos work best for that iconic flavor and crunch.
- Unsalted butter: 6 tablespoons (85g), melted — binds the crust and adds richness.
- Cream cheese: 16 ounces (450g), softened — the star ingredient for that creamy cheesecake texture. I recommend Philadelphia for consistent smoothness.
- Granulated sugar: ½ cup (100g) — balances the tang of cream cheese with just enough sweetness.
- Vanilla extract: 1 teaspoon — enhances the overall flavor without overpowering.
- Whipped topping: 1½ cups (about 360ml), thawed (like Cool Whip) — folded in for lightness and fluff.
If you want to make it gluten-free, you can swap the Oreos for gluten-free sandwich cookies. For a dairy-free option, try a dairy-free cream cheese and whipped topping substitute, though texture may vary slightly.
Keep an eye out for firm, fresh cream cheese that’s not too soft or icy cold, as that will help the filling come together more easily. Also, if you want to experiment, swapping half the Oreos for chocolate wafer cookies adds a slight twist I’ve enjoyed during the holidays.
Equipment Needed
- 8×8-inch (20×20 cm) square baking pan — this size works perfectly for the bars’ thickness.
- Mixing bowls — one large for the filling, a smaller one for the crust.
- Electric mixer or hand mixer — makes blending cream cheese smooth and folding in whipped topping easier.
- Food processor or plastic bag and rolling pin — for crushing Oreos finely (I usually use a bag and rolling pin when I’m short on time).
- Rubber spatula — essential for folding without deflating the whipped topping.
You don’t need fancy gadgets here. I’ve made these bars with just a fork for crushing and a whisk for mixing in emergencies! If you want to keep things budget-friendly, any basic mixer will do; just be careful not to overmix.
Preparation Method
- Prepare the crust: Crush 20 Oreos until fine crumbs form — about 1½ cups (150g). Combine with the melted butter in a medium bowl and stir until well mixed. Press the mixture firmly into the bottom of your 8×8-inch pan, creating an even layer. Chill in the fridge while you make the filling. (This step usually takes about 10 minutes.)
- Make the filling: In a large bowl, beat the softened cream cheese and granulated sugar together until completely smooth and creamy, about 2-3 minutes with an electric mixer. Add the vanilla extract and mix just to combine.
- Fold in whipped topping: Gently fold in the thawed whipped topping using a rubber spatula. Take your time so the mixture stays light and fluffy — this should take about a minute.
- Add crushed Oreos: Roughly chop the remaining 4 Oreos and fold them into the filling mixture, distributing them evenly without overmixing.
- Assemble and chill: Spread the filling evenly over the chilled Oreo crust. Smooth the top with a spatula. Cover with plastic wrap and refrigerate for at least 4 hours, preferably overnight, to let the bars set firmly.
If you want to speed up the chilling, you can pop the pan in the freezer for about 90 minutes, but watch closely so the bars don’t freeze solid. When ready, slice into bars with a sharp knife, wiping it clean between cuts for neat edges.
Cooking Tips & Techniques
One thing I’ve learned is that the key to these creamy no-bake Oreo cheesecake bars is patience — especially during mixing and chilling. Overmixing the cream cheese and whipped topping can make the filling too dense, so folding gently is your friend.
Also, don’t skip softening the cream cheese properly. Cold cream cheese lumps make the filling uneven and harder to spread. I usually leave mine out for about 30 minutes or zap it in 10-second bursts in the microwave if I’m in a rush.
When pressing the crust, use the bottom of a measuring cup to get a compact, even layer. This crunch base holds everything together better and is less likely to crumble apart when you cut the bars.
Finally, chilling time is crucial. I once tried to rush it and the bars were too soft to cut cleanly. Giving them time in the fridge makes slicing easier and the flavors more melded. Multitasking by prepping a quick dinner like the creamy Tuscan chicken pasta while the bars chill is a life saver.
Variations & Adaptations
These cheesecake bars are pretty versatile, and I’ve played around with a few twists to keep things interesting:
- Mint Oreo Bars: Swap the classic Oreos for mint-flavored ones for a refreshing, cool dessert.
- Peanut Butter Swirl: Gently swirl in ½ cup of smooth peanut butter into the filling before chilling for a nutty surprise.
- Berry Topping: Add a layer of fresh strawberries or raspberries on top before chilling for a fruity contrast to the rich filling.
If you prefer a lighter option, try replacing half the cream cheese with Greek yogurt, which adds a subtle tang and cuts calories. For a no-sugar-added version, use sugar-free Oreos and a sugar substitute compatible with baking.
One personal favorite is folding in chopped salted caramel candies for a sweet-salty twist — a total crowd-pleaser at holiday gatherings. Plus, these bars can also be made in a 9×13 pan for larger groups, just adjust chilling time accordingly.
Serving & Storage Suggestions
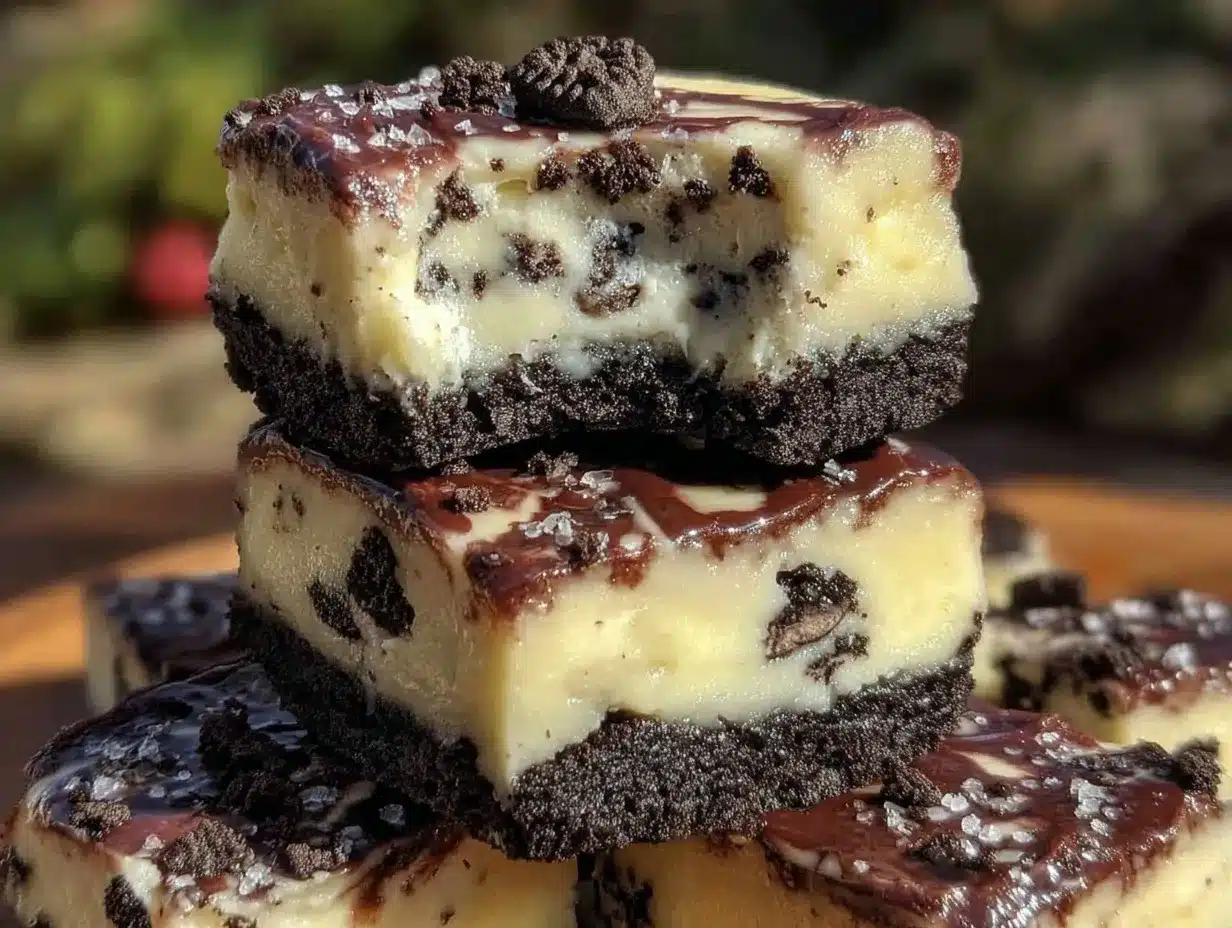
These creamy no-bake Oreo cheesecake bars are best served chilled straight from the fridge. You can sprinkle a few extra crushed Oreos or even a drizzle of chocolate syrup on top for a pretty presentation.
They pair wonderfully with a cup of strong coffee or a cold glass of milk for balance. If you want a lighter side, a crisp salad like the fresh Greek cucumber salad complements the richness nicely.
Store leftover bars tightly covered in the refrigerator for up to 4 days. They also freeze well — wrap individual bars in plastic wrap and foil, then thaw overnight in the fridge before enjoying. Just a heads-up, freezing might soften the cookie crunch a bit, but the creamy texture stays delightful.
Over time, the flavors meld even more, making the bars taste like they’ve been lovingly prepared for days. Perfect for making ahead when planning a get-together.
Nutritional Information & Benefits
Each creamy no-bake Oreo cheesecake bar (based on 12 servings) contains roughly 250 calories. The dessert provides a moderate amount of protein from the cream cheese and some calcium from both the cream cheese and whipped topping.
While it’s definitely a treat, the recipe uses simple ingredients without artificial additives or excessive fats. Oreo cookies bring in some sugar and carbs, so keep portion sizes in mind if you’re watching intake.
For those with gluten sensitivities, swapping Oreos for gluten-free sandwich cookies keeps this dessert accessible. And if you’re looking for a make-ahead indulgence that won’t weigh you down, this recipe fits the bill better than many traditional cheesecakes requiring baking and heavy cream.
Conclusion
These creamy no-bake Oreo cheesecake bars have become a staple in my recipe box for good reason. They’re ridiculously simple, wonderfully creamy, and have just enough crunch to keep things interesting. Whether you’re short on time, avoiding the oven, or just craving a sweet treat that’s guaranteed to satisfy, this recipe delivers without fuss.
Feel free to tweak the flavors or add your own twist—the basic formula is forgiving and flexible. I love how these bars bring a little joy after hectic days and have earned their spot alongside other favorites like homemade meatloaf in my rotation. Give them a try, and I hope they become a go-to dessert for you too.
If you make this recipe, drop a comment below sharing your favorite variations or any tips you discover!
FAQs About Creamy No-Bake Oreo Cheesecake Bars
Can I make these bars ahead of time?
Absolutely! They chill well in the fridge for up to 4 days and actually taste even better after sitting overnight.
Do I have to use store-bought whipped topping?
You can use homemade whipped cream if you prefer, but store-bought whipped topping like Cool Whip is easier and helps maintain the right texture.
How do I prevent the crust from getting soggy?
Make sure to press the crust firmly and chill it before adding the filling. This helps it stay crisp longer.
Can I use a different cookie instead of Oreos?
Yes, chocolate wafer cookies or gluten-free sandwich cookies work well. Just make sure to crush them finely for the crust.
Is it possible to make these dairy-free?
Yes, using dairy-free cream cheese and whipped topping substitutes will work, though the texture might be a little different.
Pin This Recipe!

Creamy No-Bake Oreo Cheesecake Bars
These creamy no-bake Oreo cheesecake bars combine a crunchy Oreo crust with a smooth, luscious filling, perfect for quick and easy indulgence without baking.
- Prep Time: 15 minutes
- Cook Time: 0 minutes
- Total Time: 4 hours 15 minutes
- Yield: 12 servings 1x
- Category: Dessert
- Cuisine: American
Ingredients
- 24 Oreo cookies, crushed (reserve a few for garnish)
- 6 tablespoons (85g) unsalted butter, melted
- 16 ounces (450g) cream cheese, softened
- ½ cup (100g) granulated sugar
- 1 teaspoon vanilla extract
- 1½ cups (about 360ml) whipped topping, thawed (like Cool Whip)
Instructions
- Prepare the crust: Crush 20 Oreos until fine crumbs form (about 1½ cups or 150g). Combine with melted butter in a medium bowl and stir until well mixed. Press firmly into the bottom of an 8×8-inch pan to create an even layer. Chill in the fridge while making the filling (about 10 minutes).
- Make the filling: In a large bowl, beat softened cream cheese and granulated sugar together until smooth and creamy, about 2-3 minutes with an electric mixer. Add vanilla extract and mix to combine.
- Fold in whipped topping: Gently fold in the thawed whipped topping using a rubber spatula, taking care to keep the mixture light and fluffy (about 1 minute).
- Add crushed Oreos: Roughly chop the remaining 4 Oreos and fold them into the filling evenly without overmixing.
- Assemble and chill: Spread the filling evenly over the chilled Oreo crust. Smooth the top with a spatula. Cover with plastic wrap and refrigerate for at least 4 hours, preferably overnight, to set firmly.
Notes
Use softened cream cheese for smooth filling. Fold whipped topping gently to keep mixture light. Press crust firmly to avoid crumbling. Chill bars at least 4 hours or overnight for best results. For gluten-free, substitute Oreos with gluten-free sandwich cookies. Dairy-free options possible with suitable substitutes.
Nutrition
- Serving Size: 1 bar (1/12th of rec
- Calories: 250
- Sugar: 18
- Sodium: 210
- Fat: 16
- Saturated Fat: 9
- Carbohydrates: 26
- Fiber: 1
- Protein: 4
Keywords: no-bake, Oreo, cheesecake bars, easy dessert, creamy, quick dessert, no oven, crowd-pleaser


