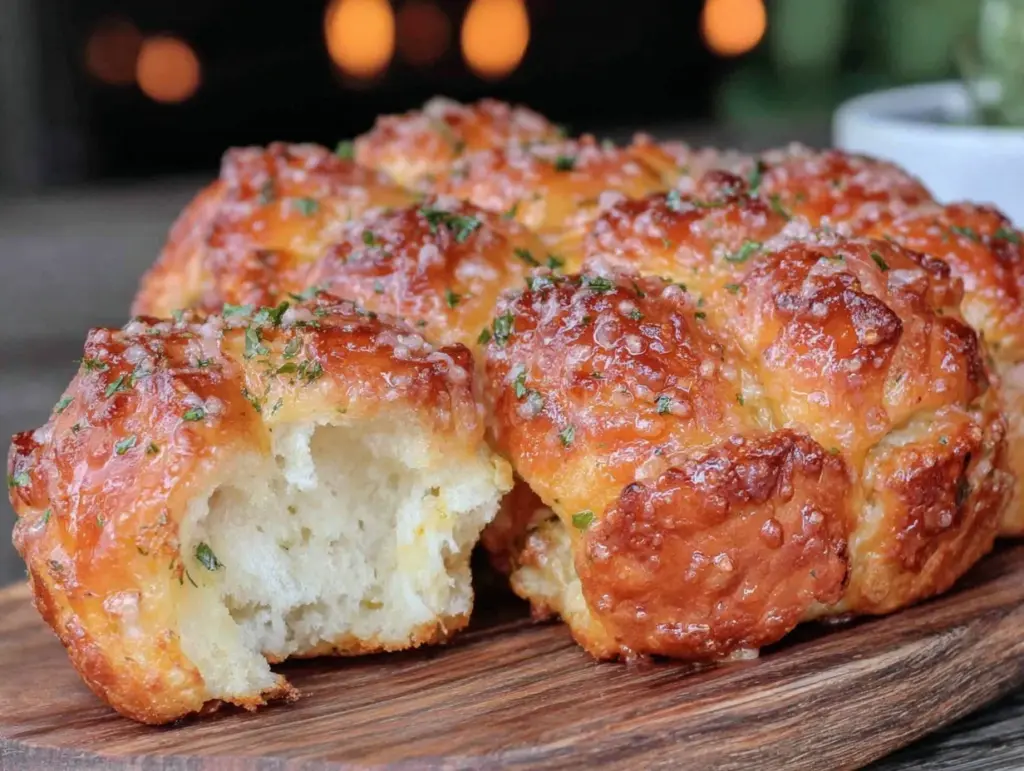
“Are you seriously telling me those are homemade?” my friend gasped, eyes wide as she reached for the golden, buttery rolls cooling on the counter. Honestly, I could barely believe it myself when I first whipped up these crispy pull-apart garlic butter rolls. It started one evening when I was juggling dinner prep with a phone call and a toddler demanding snacks—chaos, basically. I grabbed a simple biscuit dough from the fridge, slathered it with a quick garlic butter mix, and popped it in the oven, half-expecting a so-so side.
But then came this irresistible aroma—warm, buttery, garlicky—that filled the kitchen and brought a quiet pause over the madness. When I pulled them out, the rolls had that perfect crisp crust and pillowy soft interior you dream about. I ended up making them three times in one week. My skeptical self couldn’t get over how something so easy became the highlight of our cozy dinners.
They’re the kind of rolls that get asked for again and again—comfort food that feels a little fancy but really isn’t. Whether it’s a hectic weeknight or a laid-back weekend, these garlic butter rolls bring a little moment of calm and joy. And, you know, if you ever want to impress without stress, these have your back.
Some recipes promise a lot but don’t deliver. This one? It’s stuck with me because it’s honest, simple, and downright delicious. No gimmicks, just buttery, crispy, pull-apart goodness that feels like a hug on a plate.
Why You’ll Love This Recipe
After testing many bread recipes, I can say with confidence that these crispy pull-apart garlic butter rolls strike the perfect balance between ease and flavor. Here’s why they stand out:
- Quick & Easy: Ready in under 40 minutes, ideal for those busy nights when you want comfort food without the wait.
- Simple Ingredients: Uses pantry staples, so no extra grocery runs needed. I usually have everything on hand.
- Perfect for Cozy Dinners: These rolls pair beautifully with everything from a hearty stew to a creamy pasta, making them a versatile side.
- Crowd-Pleaser: Kids love pulling the rolls apart, and adults appreciate the crispy edges and garlic butter flavor.
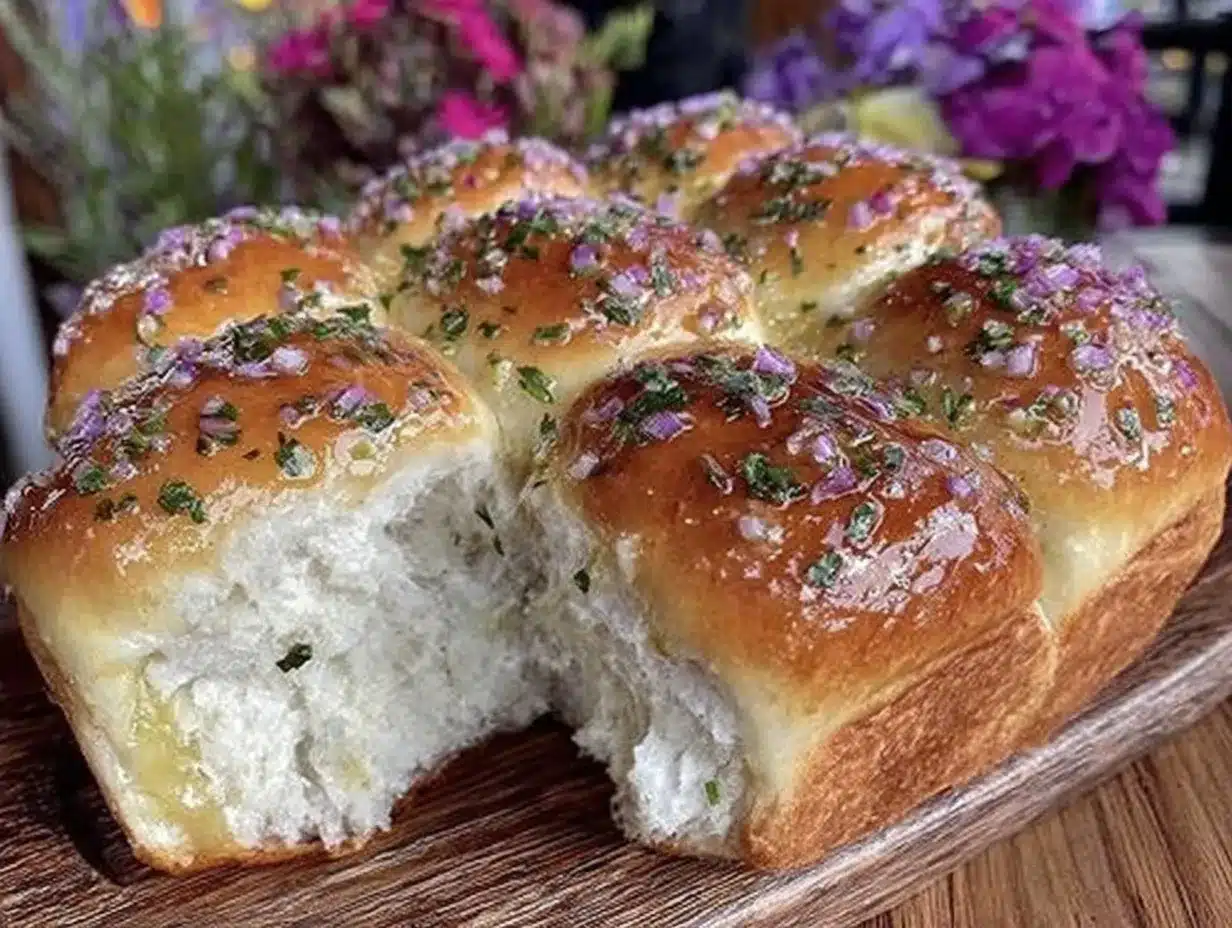
- Unbelievably Delicious: The crispy, golden crust contrasts perfectly with the soft, fluffy inside—plus that buttery garlic kick.
What makes this recipe different from others? The secret is in the layering of garlic butter between the rolls before baking, which seeps into every nook and cranny, creating pockets of flavor that keep the rolls moist yet crispy on the outside. I also like to sprinkle a bit of fresh parsley after baking for a pop of color and freshness.
This recipe isn’t just another garlic roll; it’s the one I reach for when I want to turn a simple dinner into something memorable and comforting. Honestly, it’s the kind of bread that makes you pause and savor each bite, the kind that turns regular weeknights into little celebrations around the table.
What Ingredients You Will Need
This recipe relies on simple, wholesome ingredients to create those irresistible flavors and textures. Most are everyday kitchen staples, and where substitutions are possible, I’ve noted them below.
- For the Dough:
- All-purpose flour (3 cups / 360 g) – I prefer King Arthur Flour for consistent results.
- Active dry yeast (2 1/4 tsp / 7 g) – fresh yeast works too, just halve the amount.
- Warm water (1 cup / 240 ml) – around 110°F (43°C) to activate yeast.
- Granulated sugar (2 tbsp) – helps feed the yeast and adds a slight sweetness.
- Salt (1 tsp) – balances flavor.
- Unsalted butter (3 tbsp), melted – adds tenderness to the dough.
- Milk (1/4 cup / 60 ml), warmed – use dairy-free milk if preferred.
- For the Garlic Butter:
- Unsalted butter (6 tbsp), softened – I like Kerrygold for richness.
- Garlic cloves (4 large), minced – fresh garlic is a must here.
- Fresh parsley (2 tbsp), finely chopped – optional but adds a fresh note.
- Grated Parmesan cheese (2 tbsp) – optional, but adds a nice umami touch.
- Salt and freshly ground black pepper, to taste.
For a gluten-free version, you can swap the all-purpose flour with a 1-to-1 gluten-free baking flour blend. If you want a dairy-free option, replace butter with a plant-based spread, and use almond or oat milk instead of dairy milk.
Equipment Needed
- Large mixing bowl – for combining your dough ingredients.
- Measuring cups and spoons – precise measurements matter for yeast dough.
- Wooden spoon or dough whisk – great for initial mixing before kneading.
- Stand mixer with dough hook (optional) – speeds up kneading but not necessary.
- 9×13-inch baking dish or round cake pan – to bake the pull-apart rolls.
- Pastry brush – for brushing extra garlic butter on top.
- Kitchen towel or plastic wrap – to cover dough while it rises.
If you don’t have a stand mixer, kneading by hand works perfectly fine. Just expect to spend about 8-10 minutes working the dough until smooth and elastic. For budget-friendly options, a simple glass or ceramic baking dish works just as well as stainless steel or non-stick pans.
Preparation Method
- Activate the yeast: In your large mixing bowl, combine warm water (1 cup/240 ml) with sugar (2 tbsp). Sprinkle the active dry yeast (2 1/4 tsp) over the surface. Let it sit for 5-10 minutes until foamy. This tells you the yeast is alive and ready.
- Mix the dough: Add melted butter (3 tbsp), warm milk (1/4 cup/60 ml), and salt (1 tsp) to the yeast mixture. Gradually stir in flour (3 cups/360 g), about half a cup at a time, mixing well after each addition. When the dough starts pulling together, transfer to a floured surface for kneading, or switch to a stand mixer with a dough hook.
- Knead the dough: Knead by hand for 8-10 minutes until the dough is smooth and elastic. If using a mixer, knead for about 5 minutes on medium speed. The dough should be slightly tacky but not sticky; add flour sparingly if too sticky.
- First rise: Shape the dough into a ball, place it in a lightly greased bowl, and cover with a kitchen towel or plastic wrap. Let it rise in a warm spot for 1 to 1.5 hours, or until doubled in size. (Pro tip: I once left it rising near a sunny window with a cup of tea—perfect cozy moment.)
- Prepare the garlic butter: In a small bowl, mix softened butter (6 tbsp), minced garlic (4 cloves), parsley (2 tbsp), grated Parmesan (2 tbsp, if using), salt, and pepper to taste. Set aside.
- Shape the rolls: Once the dough has risen, punch it down gently. Roll it out on a floured surface to about 12×16 inches (30×40 cm). Spread the garlic butter evenly over the dough. Cut the dough into 12 equal squares.
- Assemble: Stack the squares in three stacks of four. Place the stacks side by side in your greased 9×13-inch baking dish. Cover loosely and let them rise for an additional 20-30 minutes until puffy.
- Bake: Preheat your oven to 375°F (190°C). Bake the rolls for 25-30 minutes or until golden brown and crisp on top. For extra crispness, brush with remaining garlic butter halfway through baking.
- Finish and serve: Remove from oven and let cool for 5 minutes before serving. Sprinkle with extra parsley if desired. These rolls are best enjoyed warm, right out of the pan.
If you notice your rolls are browning too quickly, tent loosely with foil after 15 minutes in the oven. Also, remember that fresh garlic flavor intensifies while baking—so don’t shy away from it!
Cooking Tips & Techniques
Making pull-apart garlic butter rolls can seem straightforward, but a few tricks make all the difference between good and unforgettable.
- Yeast activation is key: Always test your yeast by letting it bloom in warm water with sugar. No foam? Your yeast might be old or water too hot/cold.
- Kneading consistency: Dough should be soft and elastic, but not sticky. Resist the urge to add too much flour; a slightly tacky dough yields softer rolls.
- Butter temperature matters: For the garlic butter, softened (not melted) butter spreads more evenly and absorbs better into the dough layers.
- Layering butter and dough: Don’t skimp on the garlic butter spread between dough squares. This is what creates those addictive, crispy edges.
- Baking pan choice: I’ve found that a metal pan gives a crisper crust compared to glass, but both work well.
- Watch the baking time: Oven temps vary, so check your rolls around the 25-minute mark to avoid burning.
Honestly, my first batch was a little dense because I rushed the rising times—lesson learned! Letting the dough fully rise is what gives you that fluffy interior. Also, when brushing the rolls with extra garlic butter mid-bake, use a light hand to avoid sogginess.
Variations & Adaptations
These garlic butter pull-apart rolls are pretty versatile, so you can tweak them to suit your mood or dietary needs.
- Cheesy garlic rolls: Add shredded mozzarella or sharp cheddar between the dough layers for gooey cheesy pockets.
- Herb twist: Swap parsley with rosemary or thyme for an earthy flavor. Fresh herbs work best but dried can be used sparingly.
- Spicy kick: Mix a pinch of red pepper flakes into the garlic butter for a subtle heat that pairs great with soups or chili.
- Vegan version: Use your favorite plant-based butter and non-dairy milk to make these dairy-free and still just as tasty.
- Whole wheat option: Substitute half the all-purpose flour with whole wheat flour for a nuttier, heartier roll.
One time, I added a little caramelized onion to the garlic butter—unexpected, but it became a family favorite twist. Also, if you want to make these in advance, you can assemble the rolls, cover tightly, and refrigerate overnight. Bake fresh the next day for a fresh-baked vibe with less morning stress.
Serving & Storage Suggestions
These rolls are best served warm, ideally straight from the oven. The crispy edges and soft centers are a textural joy that’s hard to beat. They pair wonderfully with rich, savory mains like stews or roasted chicken. For example, they’d be a perfect side to a moist homemade meatloaf or a creamy pasta like the Tuscan chicken pasta I often make on chilly nights.
To store, place cooled rolls in an airtight container at room temperature for up to 2 days. For longer storage, freeze them tightly wrapped for up to 2 months. When reheating, wrap in foil and warm in a 350°F (175°C) oven for 10-15 minutes to revive that crispy crust.
Flavors actually deepen a bit after a day, so if you have leftovers, I recommend giving them a quick toast or warming before serving again. Just be careful not to overheat and dry them out!
Nutritional Information & Benefits
Each serving (about one roll) provides roughly:
| Calories | 180-200 kcal |
|---|---|
| Carbohydrates | 22 g |
| Fat | 8 g |
| Protein | 4 g |
| Fiber | 1 g |
Thanks to the use of yeast and whole food ingredients, these rolls offer a modest protein boost compared to plain bread. Garlic provides natural antioxidants and supports immune health, which is a nice bonus for cozy dinners during chilly seasons.
For gluten-sensitive folks, swapping to gluten-free flour blends works well, but texture will vary slightly. Using unsalted butter also helps control sodium levels, and you can always reduce butter amount or try olive oil for a lighter version.
Conclusion
These crispy pull-apart garlic butter rolls have become my go-to for those nights when I want comfort without fuss. They’re forgiving, flavorful, and honestly a little addictive. What I love most is how they bring people together—everyone reaching in, pulling apart soft, buttery pieces, sharing stories, and savoring simple joy.
Feel free to customize with your favorite herbs, cheeses, or spice blends. Because really, these rolls are a cozy canvas waiting for your personal touch. If you try them, I’d love to hear how you made them your own or what you paired them with!
Here’s to warm kitchens and full bellies.
FAQs About Crispy Pull-Apart Garlic Butter Rolls
Can I use store-bought biscuit dough instead of making dough from scratch?
Yes! Store-bought biscuit dough works as a shortcut. Just spread the garlic butter between the rolled-out dough pieces before stacking and baking. The texture will be slightly different but still tasty.
How do I keep the rolls soft if I want to store them overnight?
Store fully cooled rolls in an airtight container or wrapped tightly in plastic wrap at room temperature. To refresh, warm them wrapped in foil in the oven for about 10 minutes.
What’s the best way to prevent the garlic from burning?
Use fresh minced garlic mixed into softened butter rather than raw garlic pieces on top. The butter protects the garlic during baking and helps it infuse flavor without burning.
Can I make these rolls ahead of time and freeze them?
Absolutely! After assembling the rolls, freeze them before the second rise. When ready, thaw overnight in the fridge, let them rise, then bake as usual.
What can I serve these rolls with for a complete meal?
They pair wonderfully with hearty mains like beef stew, creamy chicken pasta, or even a fresh Greek cucumber salad for a lighter contrast.
Pin This Recipe!
Crispy Pull-Apart Garlic Butter Rolls

These crispy pull-apart garlic butter rolls feature a golden, buttery crust with a soft, pillowy interior, perfect for cozy dinners and easy to make with simple pantry staples.
- Prep Time: 15 minutes
- Cook Time: 30 minutes
- Total Time: 45 minutes
- Yield: 12 rolls 1x
- Category: Side Dish
- Cuisine: American
Ingredients
- 3 cups all-purpose flour (360 g)
- 2 1/4 tsp active dry yeast (7 g)
- 1 cup warm water (240 ml), around 110°F (43°C)
- 2 tbsp granulated sugar
- 1 tsp salt
- 3 tbsp unsalted butter, melted
- 1/4 cup warm milk (60 ml)
- 6 tbsp unsalted butter, softened (for garlic butter)
- 4 large garlic cloves, minced
- 2 tbsp fresh parsley, finely chopped (optional)
- 2 tbsp grated Parmesan cheese (optional)
- Salt and freshly ground black pepper, to taste
Instructions
- Activate the yeast: In a large mixing bowl, combine warm water (1 cup/240 ml) with sugar (2 tbsp). Sprinkle the active dry yeast (2 1/4 tsp) over the surface. Let it sit for 5-10 minutes until foamy.
- Mix the dough: Add melted butter (3 tbsp), warm milk (1/4 cup/60 ml), and salt (1 tsp) to the yeast mixture. Gradually stir in flour (3 cups/360 g), about half a cup at a time, mixing well after each addition. When the dough starts pulling together, transfer to a floured surface for kneading or use a stand mixer with a dough hook.
- Knead the dough: Knead by hand for 8-10 minutes until smooth and elastic, or knead with a mixer for about 5 minutes on medium speed. The dough should be slightly tacky but not sticky; add flour sparingly if too sticky.
- First rise: Shape the dough into a ball, place it in a lightly greased bowl, and cover with a kitchen towel or plastic wrap. Let it rise in a warm spot for 1 to 1.5 hours, or until doubled in size.
- Prepare the garlic butter: In a small bowl, mix softened butter (6 tbsp), minced garlic (4 cloves), parsley (2 tbsp), grated Parmesan (2 tbsp, if using), salt, and pepper to taste. Set aside.
- Shape the rolls: Once the dough has risen, punch it down gently. Roll it out on a floured surface to about 12×16 inches (30×40 cm). Spread the garlic butter evenly over the dough. Cut the dough into 12 equal squares.
- Assemble: Stack the squares in three stacks of four. Place the stacks side by side in a greased 9×13-inch baking dish. Cover loosely and let them rise for an additional 20-30 minutes until puffy.
- Bake: Preheat oven to 375°F (190°C). Bake the rolls for 25-30 minutes or until golden brown and crisp on top. For extra crispness, brush with remaining garlic butter halfway through baking.
- Finish and serve: Remove from oven and let cool for 5 minutes before serving. Sprinkle with extra parsley if desired. Serve warm.
Notes
If rolls brown too quickly, tent loosely with foil after 15 minutes. Use softened (not melted) butter for garlic butter to spread evenly. Let dough fully rise for fluffy rolls. Fresh garlic flavor intensifies during baking. Store cooled rolls in airtight container at room temperature up to 2 days or freeze up to 2 months. Reheat wrapped in foil at 350°F for 10-15 minutes.
Nutrition
- Serving Size: 1 roll
- Calories: 190
- Fat: 8
- Carbohydrates: 22
- Fiber: 1
- Protein: 4
Keywords: garlic butter rolls, pull-apart rolls, crispy rolls, easy dinner rolls, homemade garlic rolls, buttery rolls, yeast rolls


