“You know, I didn’t think a cake named after ballerinas could capture my attention—especially one boasting elegant layers and cappuccino flavor,” I told my friend over the phone last spring. She laughed and insisted I try it anyway, claiming it was the perfect way to turn a restless weekend into something unexpectedly delightful. The first time I baked the Perfect Ballerina Cappuccino Cake with Elegant Layers, I was rushing between work calls and kids’ Zoom classes, barely expecting more than a decent dessert to show for my efforts.
But as the rich coffee aroma filled my kitchen and the delicate layers came together, something shifted. The cake wasn’t just pretty; it was a kind of soft, sophisticated hug that made me pause. Honestly, it quickly became my go-to when I needed a little indulgence without the fuss—just the right balance of sweetness, coffee warmth, and a silky texture that felt classy but approachable.
It’s funny how this recipe stuck with me. Maybe it’s the way the layers peek through like a well-practiced pirouette, or how the cappuccino flavor sneaks in just enough to keep you guessing but never overwhelms. Either way, this cake offers a quiet moment of elegance in an otherwise chaotic day, and that’s why it’s earned a permanent spot in my baking rotation.
Why You’ll Love This Recipe
After several trial runs and tweaks, I can say this Perfect Ballerina Cappuccino Cake stands apart for a few key reasons that make it a winner in my book:
- Quick & Easy: The whole process takes about 1 hour 15 minutes from start to finish, making it perfect for a last-minute celebration or a weekend treat.
- Simple Ingredients: No exotic items here—just pantry staples and a good-quality espresso powder to nail that cappuccino essence.
- Elegant Presentation: The multi-layered design looks impressive but is surprisingly simple to assemble, perfect for those moments when you want to impress without stress.
- Crowd-Pleaser: Whether it’s a cozy tea party or a birthday gathering, guests rave about the moistness and the subtle coffee bite.
- Unbelievably Delicious: The texture is soft and moist, with a creamy cappuccino frosting that melts in your mouth—comfort food with a sophisticated twist.
This cake isn’t just another layered dessert; it’s a carefully balanced play of flavors and textures. The secret lies in folding in just enough espresso powder to give that rich, aromatic kick without overpowering the delicate crumb. Plus, the frosting’s light creaminess is reminiscent of a frothy cappuccino foam—smooth, slightly sweet, and utterly dreamy.
What really makes this recipe stand out is how it brings a café favorite into your own kitchen with ease. It’s the kind of cake that invites you to slow down, savor each bite, and maybe even share a story or two with friends over a cup of coffee. If you’ve enjoyed baking or tasting layered treats like the moist hummingbird cake, you’ll find that this cappuccino cake offers its own unique charm worth savoring.
What Ingredients You Will Need
This recipe uses straightforward, accessible ingredients to deliver a sophisticated and satisfying dessert. Most are pantry staples, but the espresso powder is the star for that cappuccino flair. Feel free to use your favorite brand—I’ve had great luck with Lavazza espresso powder for its rich aroma.
- For the Cake Layers:
- All-purpose flour, 2 ½ cups (315g)
- Baking powder, 2 ½ teaspoons
- Baking soda, ½ teaspoon
- Salt, ½ teaspoon
- Unsalted butter, 1 cup (226g), softened (adds richness)
- Granulated sugar, 1 ¾ cups (350g)
- Large eggs, 3, room temperature
- Buttermilk, 1 cup (240ml), room temperature (for tender crumb)
- Vanilla extract, 2 teaspoons
- Espresso powder, 2 tablespoons (for that cappuccino kick)
- For the Cappuccino Frosting:
- Unsalted butter, 1 cup (226g), softened
- Powdered sugar, 4 cups (480g), sifted (for smooth frosting)
- Heavy cream, 3 tablespoons (45ml)
- Espresso powder, 1 tablespoon, dissolved in 1 tablespoon hot water
- Vanilla extract, 1 teaspoon
- Pinch of salt
If you want to try a gluten-free version, substituting the flour with a 1-to-1 gluten-free baking blend works well. For dairy-free options, swap buttermilk with almond milk mixed with 1 tablespoon lemon juice and use vegan butter in frosting. When summer hits, I sometimes add a handful of fresh raspberries between the layers to add a tart contrast to the cappuccino sweetness—totally worth trying!
Equipment Needed
To create this layered beauty, you’ll need a few basic kitchen tools, nothing too fancy:
- Two 8-inch (20 cm) round cake pans – You can use one pan and bake in batches if needed, but having two pans saves time.
- Mixing bowls – A medium and a large one for wet and dry ingredients.
- Electric mixer or stand mixer – Creaming the butter and sugar is easier and gives a better texture.
- Measuring cups and spoons – Precision matters, especially for baking soda and powder.
- Rubber spatula – For folding in ingredients gently.
- Cooling racks – To cool the cake layers evenly; trust me, patience at this stage pays off.
- Offset spatula – Makes frosting those elegant layers a breeze.
If you don’t have an electric mixer, a sturdy whisk and some elbow grease will do, but the texture might not be quite as light. For budget-friendly pans, I recommend looking for non-stick options with removable bottoms—they make removing the cake so much easier and cleaner. Keeping your pans well-greased and lined with parchment paper also helps prevent any sticking mishaps.
Preparation Method
- Prep your pans and oven: Preheat the oven to 350°F (175°C). Grease and flour two 8-inch cake pans, then line the bottoms with parchment paper for easy release. This step saved me more than once from a frustrating stuck cake.
- Mix dry ingredients: In a medium bowl, whisk together 2 ½ cups (315g) all-purpose flour, 2 ½ teaspoons baking powder, ½ teaspoon baking soda, ½ teaspoon salt, and 2 tablespoons espresso powder until evenly combined.
- Cream butter and sugar: In a large bowl, beat 1 cup (226g) softened unsalted butter with 1 ¾ cups (350g) granulated sugar on medium speed until light and fluffy—about 4 to 5 minutes. This creaming process is crucial for a tender crumb.
- Add eggs and vanilla: Beat in 3 large eggs, one at a time, mixing well after each addition. Stir in 2 teaspoons vanilla extract. The batter should look smooth and glossy now.
- Alternate adding dry ingredients and buttermilk: Reduce mixer speed to low. Add the dry ingredients in three parts, alternating with 1 cup (240ml) room-temperature buttermilk, beginning and ending with the dry mix. Mix just until combined each time—overmixing can make the cake tough.
- Divide and bake: Evenly pour batter into the prepared pans, smoothing the tops with a spatula. Bake for 28-33 minutes or until a toothpick inserted in the center comes out clean. You’ll know the edges are pulling away from the pan when it’s ready.
- Cool layers: Let cakes cool in pans for 10 minutes, then invert onto cooling racks. Peel off parchment, and allow layers to cool completely before frosting. This part is hard to wait for but necessary to avoid melting the frosting.
- Make the cappuccino frosting: Beat 1 cup (226g) softened butter until creamy. Gradually add 4 cups (480g) sifted powdered sugar, mixing well. Add 3 tablespoons heavy cream, 1 tablespoon dissolved espresso powder, 1 teaspoon vanilla extract, and a pinch of salt. Beat on high for 3-4 minutes until fluffy.
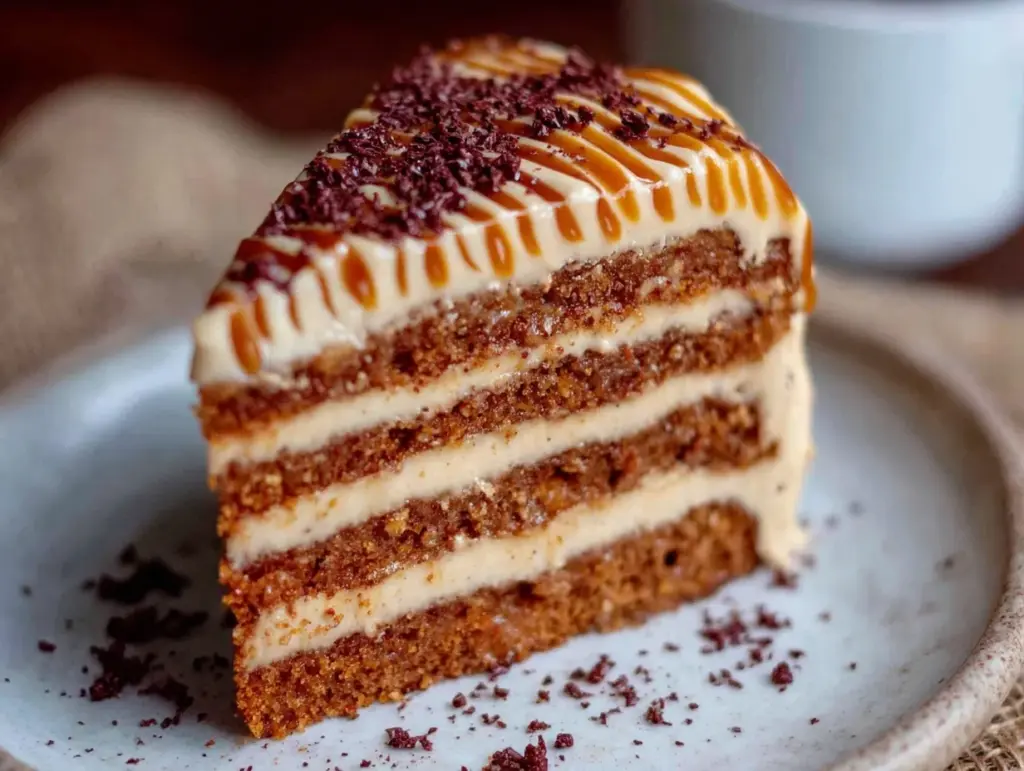
- Assemble the cake: Place one cake layer on your serving plate. Spread a generous layer of frosting (about ⅓ of the total) over the top. Add the second layer, then frost the top and sides evenly. Use an offset spatula to smooth it out and create those elegant, ballerina-worthy edges.
- Chill and serve: Refrigerate the cake for at least 1 hour to let the frosting set and flavors meld. Bring to room temperature before slicing for the best texture and taste.
When I first made this cake, I underestimated the chilling time—cutting it too soon made the frosting a bit messy. Patience is key here, and a quick chill really helps those layers stay put. Also, when dissolving the espresso powder for the frosting, make sure it’s completely dissolved to avoid any gritty spots.
Cooking Tips & Techniques
Getting this Perfect Ballerina Cappuccino Cake just right takes a few insider tips I’ve picked up along the way:
- Butter temperature matters: Softened butter should still feel cool to the touch but yield easily to pressure. Too warm and the batter can become greasy, too cold and it won’t cream properly.
- Measure flour correctly: Scoop flour with a spoon into your measuring cup, then level it off with a knife. Overpacking flour is a common mistake that leads to dense cakes.
- Espresso powder is your friend: It adds depth without bitterness. If you’re nervous, start with 1 tablespoon and adjust to taste in future batches.
- Don’t skip sifting powdered sugar: It prevents lumps in the frosting and gives a smoother finish.
- Use an offset spatula for frosting: It makes layering and smoothing frosting easier and more precise, helping you get that elegant ballerina look.
- Multi-task smartly: While the cakes bake, prepare the frosting so everything’s ready when layers cool.
- Practice patience with cooling: Slicing into a warm cake leads to crumbly layers and melted frosting. Cooling and chilling really pay off.
Early on, I learned the hard way that rushing the frosting stage results in a sad blob rather than graceful layers. Taking your time and working with chilled cake layers is a small step that makes a big difference for presentation and taste.
Variations & Adaptations
This recipe is flexible enough to suit many tastes and occasions. Here are a few ideas I’ve tried or recommend:
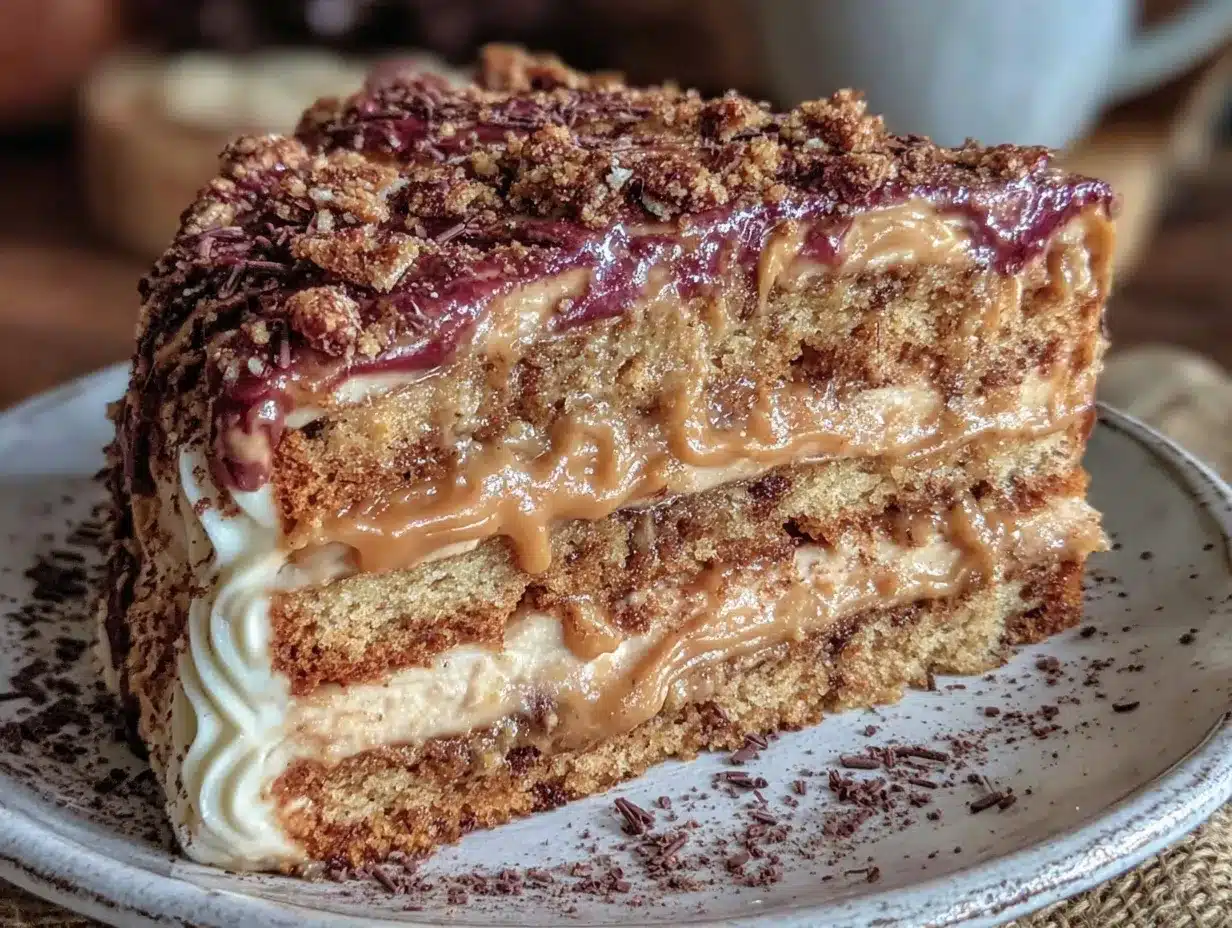
- Mocha Twist: Add 2 tablespoons cocoa powder to the dry ingredients for a chocolate-cappuccino fusion. The layers get a richer color and a hint of chocolate that pairs beautifully with the frosting.
- Almond Flair: Swap ½ cup (50g) of flour for almond flour for a delicate nutty undertone and slightly denser crumb.
- Decaf Version: Simply use decaffeinated espresso powder so everyone can enjoy without jitters.
- Seasonal Berry Layers: Add fresh or frozen berries between the layers during assembly for a pop of color and tartness—especially delightful in spring or summer.
- Dairy-Free Adaptation: Use coconut cream in place of heavy cream and vegan butter substitutes for a plant-based version.
Personally, the mocha twist quickly became a favorite when I was craving something a little more indulgent, and it pairs wonderfully with a hot cup of tea or coffee. For a lighter take, the almond flour version adds a lovely texture and subtle flavor that feels just a bit special.
Serving & Storage Suggestions
This cake shines when served slightly chilled or at room temperature. I like to slice it with a serrated knife dipped in hot water and wiped dry between cuts to keep those layers neat.
For a lovely presentation, serve with a dusting of cocoa powder or a few coffee beans on top. It pairs beautifully with a simple cup of black coffee or a creamy latte—making it a perfect treat for an afternoon indulgence or dessert after dinner.
Store any leftovers in an airtight container in the refrigerator for up to 4 days. The flavors actually meld and deepen after a day, making the cake even more delightful the next day. To reheat, bring slices to room temperature or warm gently in a microwave for about 15 seconds—just enough to soften the frosting without melting it.
If you want to freeze the cake, wrap tightly in plastic wrap and then foil. Freeze for up to 2 months. Thaw overnight in the refrigerator before serving. I’ve found that freezing slightly changes the texture but keeps the flavor intact, so it’s a handy option for preparing ahead.
Nutritional Information & Benefits
This Perfect Ballerina Cappuccino Cake offers a balanced treat that isn’t overly sweet but satisfies your dessert craving. Here’s a rough estimate per serving (1 slice, 1/12th of cake):
| Calories | 320 kcal |
|---|---|
| Fat | 18 g |
| Carbohydrates | 38 g |
| Protein | 4 g |
| Sugar | 27 g |
The espresso powder adds a small caffeine boost, while the butter and cream contribute to a satisfying mouthfeel. For those mindful of gluten, swapping in gluten-free flour blends works well, and the recipe can be adjusted for dairy-free diets as mentioned earlier. Be mindful of allergens like eggs, dairy, and gluten.
From a wellness perspective, this cake is a treat to enjoy in moderation—perfect for those moments when you want something special without feeling weighed down by overly rich desserts. I find it pairs well with lighter meals, like the healthy chicken and veggie bowl, to keep a balanced weeknight menu.
Conclusion
This Perfect Ballerina Cappuccino Cake with Elegant Layers is more than just a pretty dessert. It’s a little bit of grace and indulgence baked into every bite—a recipe that’s approachable enough for busy days but special enough to impress. Whether you’re sharing it with friends or savoring a quiet moment alone, it invites you to slow down and enjoy a slice of sophistication.
Feel free to tweak the flavor or try the variations to make it your own. Honestly, that’s part of the fun—making this recipe fit your style and taste. I love how it brings a café experience home without the hassle, and I hope it becomes a favorite in your kitchen too.
If you’ve tried this recipe or have your own spin on the cappuccino cake, I’d love to hear about it in the comments below. Sharing these moments and ideas makes baking even sweeter.
Happy baking—and here’s to many elegant layers and joyful bites ahead!
FAQs
Can I make this cake ahead of time?
Yes! The cake can be baked and frosted a day ahead. Store it covered in the refrigerator and bring to room temperature before serving for the best texture.
What if I don’t have espresso powder?
You can substitute with instant coffee granules, but use half the amount to avoid bitterness. Dissolve it in hot water before adding to the batter or frosting.
How do I get perfectly even layers?
Use a cake leveler or a serrated knife to trim the domed tops off the cakes once cooled. This helps layers stack neatly and look professional.
Can I freeze the assembled cake?
It’s best to freeze the unfrosted layers wrapped tightly. Frost after thawing for the freshest look and taste.
Is this recipe suitable for beginners?
Absolutely! The instructions are clear, and the techniques are straightforward. Just take your time with creaming and frosting steps, and you’ll do great.
Pin This Recipe!
Perfect Ballerina Cappuccino Cake
An elegant layered dessert with a soft, moist texture and a creamy cappuccino frosting that offers a sophisticated coffee flavor without overpowering the delicate crumb.
- Prep Time: 20 minutes
- Cook Time: 30 minutes
- Total Time: 1 hour 15 minutes
- Yield: 12 servings 1x
- Category: Dessert
- Cuisine: American
Ingredients
- 2 ½ cups (315g) all-purpose flour
- 2 ½ teaspoons baking powder
- ½ teaspoon baking soda
- ½ teaspoon salt
- 1 cup (226g) unsalted butter, softened
- 1 ¾ cups (350g) granulated sugar
- 3 large eggs, room temperature
- 1 cup (240ml) buttermilk, room temperature
- 2 teaspoons vanilla extract
- 2 tablespoons espresso powder
- For the frosting:
- 1 cup (226g) unsalted butter, softened
- 4 cups (480g) powdered sugar, sifted
- 3 tablespoons (45ml) heavy cream
- 1 tablespoon espresso powder, dissolved in 1 tablespoon hot water
- 1 teaspoon vanilla extract
- Pinch of salt
Instructions
- Preheat the oven to 350°F (175°C). Grease and flour two 8-inch cake pans, then line the bottoms with parchment paper.
- In a medium bowl, whisk together flour, baking powder, baking soda, salt, and espresso powder until combined.
- In a large bowl, beat softened butter and granulated sugar on medium speed until light and fluffy, about 4 to 5 minutes.
- Beat in eggs one at a time, mixing well after each addition. Stir in vanilla extract.
- Reduce mixer speed to low. Add dry ingredients in three parts, alternating with buttermilk, beginning and ending with dry ingredients. Mix just until combined each time.
- Divide batter evenly between prepared pans and smooth tops. Bake for 28-33 minutes or until a toothpick inserted in the center comes out clean.
- Cool cakes in pans for 10 minutes, then invert onto cooling racks. Remove parchment and cool completely before frosting.
- For the frosting, beat softened butter until creamy. Gradually add sifted powdered sugar, mixing well.
- Add heavy cream, dissolved espresso powder, vanilla extract, and salt. Beat on high for 3-4 minutes until fluffy.
- Place one cake layer on a serving plate. Spread about one-third of the frosting over the top.
- Add the second layer and frost the top and sides evenly. Use an offset spatula to smooth the frosting.
- Refrigerate the cake for at least 1 hour to let the frosting set and flavors meld. Bring to room temperature before slicing.
Notes
Use softened butter that is cool to the touch for best creaming results. Measure flour correctly by spooning and leveling to avoid dense cakes. Dissolve espresso powder completely in hot water before adding to frosting to avoid grit. Chill cake before slicing to prevent melting frosting. For gluten-free or dairy-free versions, substitute ingredients as suggested. Use an offset spatula for smooth frosting and elegant edges.
Nutrition
- Serving Size: 1 slice (1/12th of c
- Calories: 320
- Sugar: 27
- Fat: 18
- Carbohydrates: 38
- Protein: 4
Keywords: cappuccino cake, layered cake, coffee cake, elegant dessert, easy cake recipe, ballerina cake, espresso cake


