“You’re telling me this cheesecake was made in the Instant Pot?” My sister’s voice was a mix of disbelief and delight as she took a second bite, crumbs of Oreo crust still clinging to her fingers. Honestly, I was skeptical myself the first time I tried making a cheesecake this way. I mean, cheesecake has always been that delicate dessert I’d only dare bake in the oven, with its gentle water bath and slow, careful timing. But one chaotic weekend—between juggling work calls, the kids’ Zoom classes, and a fridge that looked like a disaster zone—I didn’t have the patience for the usual lengthy bake.
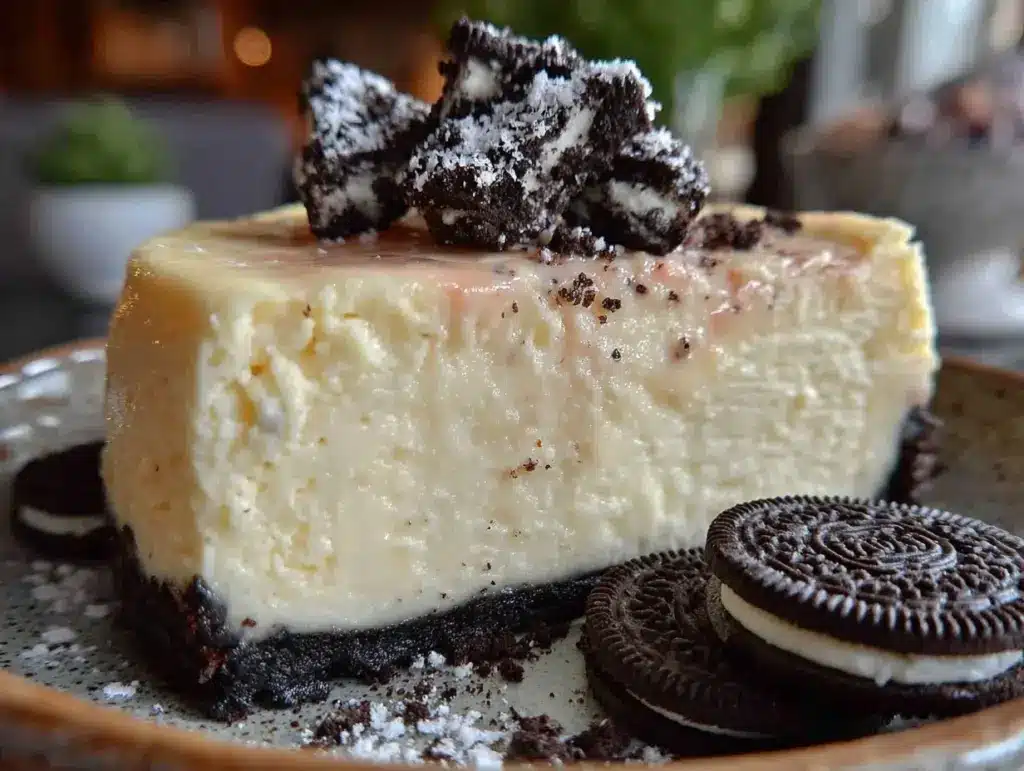
I grabbed a bag of Oreos and some cream cheese, threw everything together, and trusted the Instant Pot to do its magic. The result? A ridiculously creamy cheesecake that sliced like a dream, with a crunchy Oreo crust that held firm and tasted like a cookie dream come true. The kitchen smelled faintly of chocolate and vanilla, the kind of cozy aroma that makes you pause and just breathe it in.
Since then, this creamy Instant Pot cheesecake with Oreo crust has become my go-to dessert fix for unplanned guests or when I just need that little moment of sweet comfort after a hectic day. And honestly, it’s the kind of recipe that surprises everyone—especially those who think cheesecake belongs only in the oven. There’s something quietly satisfying about pulling this cheesecake out of the pot instead of the oven, knowing it took less than an hour from start to finish.
What really sealed the deal for me is how effortlessly it comes together without skimping on that rich, velvety texture I crave. Plus, the Oreo crust adds a playful twist that’s a hit with both kids and adults. So yeah—this recipe stuck around because it’s not just easy; it’s a little bit of indulgence that fits right into my busy life.
If you’re curious about a cheesecake that’s as creamy as it is quick, this one promises to quietly become a favorite in your dessert rotation, too.
Why You’ll Love This Creamy Instant Pot Cheesecake with Oreo Crust
After making this recipe multiple times (sometimes twice a week, not gonna lie), I can confidently say it’s one of the best shortcuts to a classic dessert without the fuss. Here’s why it stands out:
- Quick & Easy: Ready in under 90 minutes including prep and cooking—perfect for last-minute cravings or when you want dessert on the same day.
- Simple Ingredients: Uses everyday pantry staples like cream cheese, sugar, eggs, and Oreos—no fancy or hard-to-find items needed.
- Perfect for Any Occasion: Whether it’s a casual family dinner, a birthday party, or a small get-together, this cheesecake always gets devoured.
- Crowd-Pleaser: The Oreo crust adds a fun crunch, while the creamy filling melts in your mouth—kids and adults alike beg for seconds.
- Unbelievably Delicious: The Instant Pot’s steaming method locks in moisture, giving the cheesecake a silky texture that rivals traditional oven-baked versions.
What really sets this cheesecake apart is the way the Oreo crust holds up. Unlike some crusts that get soggy, this one stays crisp enough to provide contrast but soft enough to blend beautifully with the rich filling. I’ve found that using full Oreo cookies, crushed with the cream, makes the crust extra flavorful (and less crumbly). It’s a little trick I picked up from a food blogger friend who swore by it.
This recipe isn’t just another cheesecake—it’s a dependable, fuss-free dessert that feels a bit fancy but comes together without stress. And if you’re anything like me, that’s the kind of recipe you want in your back pocket for those “I need something sweet but don’t want to wait” moments.
What Ingredients You Will Need
This creamy Instant Pot cheesecake with Oreo crust uses straightforward ingredients, each playing its own role in the flavor and texture magic. You’ll find most of these in your pantry or fridge already.
- For the Oreo Crust:
- 24 Oreo cookies (regular or double-stuffed, crushed finely with filling intact for extra richness)
- 4 tablespoons unsalted butter, melted (adds richness and helps bind the crust)
- For the Cheesecake Filling:
- 16 ounces (450g) cream cheese, softened to room temperature (I prefer Philadelphia brand for its smooth texture)
- ½ cup (100g) granulated sugar
- 2 large eggs, room temperature (helps with smooth consistency)
- ⅓ cup (80ml) sour cream (adds creaminess and slight tang)
- 1 teaspoon pure vanilla extract
- 1 tablespoon all-purpose flour (optional, for a bit more structure)
You can swap the sour cream for Greek yogurt if you want a lighter tang or a bit more protein, and almond flour works well instead of all-purpose for a gluten-free twist on the crust. For some extra flair, I’ve sometimes stirred in mini chocolate chips or a swirl of peanut butter into the filling—trust me, it turns the cheesecake into a secret indulgence.
Equipment Needed
- 6-inch springform pan (fits perfectly in most Instant Pots and makes cheesecake removal easy)
- Instant Pot or electric pressure cooker (the star of the show here)
- Mixing bowls (one large for filling, one for crust)
- Electric mixer or stand mixer (for smooth, lump-free cream cheese)
- Food processor or blender (to crush Oreos finely unless you prefer hand crushing)
- Aluminum foil (to cover the springform pan and prevent water leaks)
- Trivet or steaming rack (to elevate the cheesecake inside the Instant Pot)
If you don’t have a food processor, placing the Oreos in a sealed plastic bag and crushing with a rolling pin works just fine. For the springform pan, I’ve found silicone versions are easier to clean, but a classic metal pan with a removable base works well too. Just wrap the bottom tightly with foil to prevent water from seeping in during pressure cooking.
Preparation Method

- Prep the Crust (10 minutes): Crush the 24 Oreo cookies until fine crumbs form—using a food processor or a rolling pin works well. Mix the crumbs with the melted butter until the mixture feels like damp sand.
- Press into the Pan: Firmly press the Oreo mixture evenly into the bottom of the 6-inch springform pan. Use the bottom of a glass or measuring cup to compact it tightly. Place the pan in the freezer while you prepare the filling to help the crust set.
- Make the Filling (15 minutes): In a large bowl, beat the softened cream cheese with sugar until smooth and creamy—no lumps! Add eggs one at a time, mixing just until incorporated each time. Stir in sour cream, vanilla extract, and flour (if using) until everything is blended well.
- Pour Filling Over Crust: Remove the springform pan from the freezer and pour the cheesecake filling over the chilled Oreo crust. Smooth the top gently with a spatula.
- Prepare the Instant Pot: Pour 1 cup (240ml) of water into the bottom of the Instant Pot. Place the trivet inside and carefully lower the springform pan onto the trivet. Cover the top of the pan loosely with aluminum foil to prevent condensation from dripping onto the cheesecake.
- Pressure Cook: Seal the Instant Pot lid and set to Manual or Pressure Cook on high for 35 minutes. Once cooking finishes, allow a natural pressure release for 15 minutes before carefully releasing any remaining pressure.
- Cool & Chill: Carefully remove the cheesecake from the Instant Pot and let it cool at room temperature for about an hour. Then refrigerate for at least 4 hours or overnight to fully set and develop that creamy texture.
Watch for the cheesecake’s edges to be set but the center to have a slight jiggle—it’s that perfect indicator you’ve nailed the cooking time. If the top cracks a bit, don’t worry; I’ve found covering the pan with foil during cooking helps minimize that.
Cooking Tips & Techniques
Getting the texture just right with an Instant Pot cheesecake can feel a little tricky at first, but here are some pointers I’ve picked up along the way:
- Room Temperature Ingredients: Make sure cream cheese and eggs are at room temp to avoid lumps and cracked surfaces.
- Don’t Overmix: Blend until smooth but avoid whipping in too much air, which causes cracks or bubbles after cooking.
- Seal the Pan Well: Wrapping the springform pan in foil prevents water from seeping in and ruining the crust or filling.
- Natural Pressure Release: Resist the urge to quick-release pressure immediately; the gradual cooling helps prevent cracks and sinking centers.
- Experiment with Flavors: Once you get comfy with the base recipe, try stirring in lemon zest, chocolate chips, or even a swirl of your favorite jam.
Personally, I learned the hard way that skipping the foil wrap leads to a soggy crust — lesson learned! Also, I often multitask by prepping the crust and filling while my Instant Pot heats up for other meals, like the creamy loaded baked potato soup I recently shared, making dinner and dessert happen simultaneously.
Variations & Adaptations
This creamy Instant Pot cheesecake with Oreo crust is a great base for tweaking to your taste or dietary needs. Here are some ideas I’ve tried or recommend:
- Chocolate Lover’s Delight: Add ½ cup of mini chocolate chips to the filling and sprinkle some on top before chilling.
- Gluten-Free Version: Swap Oreos for gluten-free chocolate sandwich cookies or use almond flour crust mixed with cocoa powder.
- Fruit-Topped Cheesecake: After chilling, top with fresh berries or a homemade berry compote for a fresh pop of flavor.
- Dairy-Free Adaptation: Use dairy-free cream cheese and coconut cream in place of sour cream, and check for vegan Oreo options.
- Peanut Butter Swirl: Gently swirl in 2 tablespoons of creamy peanut butter into the filling before cooking for a rich twist.
One variation I adore is mixing in a teaspoon of instant espresso powder for a mocha cheesecake vibe—pairs beautifully with the Oreo crust. If you’re cooking this for a crowd, doubling the recipe in an 8-inch pan works well, but be sure your Instant Pot can fit the larger pan.
Serving & Storage Suggestions
This cheesecake is best served chilled, straight from the fridge, allowing the creamy texture and Oreo crunch to shine. I like to slice it cleanly with a hot, dry knife—wiping between slices helps keep those perfect edges.
For a little extra flair, try topping slices with a dollop of whipped cream or a drizzle of chocolate sauce. It pairs wonderfully with a cup of strong coffee or a glass of cold milk. If you want to keep things bright, a fresh Lebanese fattoush salad (with crunchy pita chips) from my blog makes a nice, light contrast if you’re serving this after a robust meal.
Store leftover cheesecake tightly wrapped in plastic wrap or in an airtight container in the refrigerator for up to 5 days. You can freeze slices individually wrapped for up to 2 months—just thaw overnight in the fridge and serve chilled.
Flavors actually deepen after a day or two, so if you can wait, the next-day cheesecake is often better than fresh. Just remember to keep the crust dry by avoiding condensation or sogginess, which foil wrapping during cooking helps prevent.
Nutritional Information & Benefits
Each slice (assuming 8 slices) offers roughly:
| Calories | 350-400 kcal |
|---|---|
| Protein | 7-8g |
| Fat | 25g (mostly from cream cheese and butter) |
| Carbohydrates | 30g (with sugar and Oreos) |
This cheesecake provides a good source of calcium and protein from the cream cheese and eggs, making it a more satisfying dessert choice than many sugary treats. Using sour cream or Greek yogurt adds a bit of probiotic benefit and tanginess that balances the richness.
For dietary considerations, swapping in almond flour for the crust and using sugar alternatives can tailor this dessert for gluten-sensitive or lower-carb diets. Always keep in mind the Oreo crust does contain gluten and dairy unless substituted.
From my perspective, this recipe strikes a nice balance—it feels indulgent without being overly heavy or complicated, fitting well into a lifestyle that values both taste and practicality.
Conclusion
This creamy Instant Pot cheesecake with Oreo crust is one of those recipes that wins you over with its simplicity and flavor. It’s quick enough for busy days but indulgent enough to feel special—and that Oreo crust? Honestly, it’s the perfect crunchy counterpoint to the smooth filling.
Feel free to play around with the flavors, toppings, or crust to make it your own. I’ve found each time I tweak it, it surprises me again, keeping it fresh and exciting. Plus, the ease of cooking it in the Instant Pot means it’s accessible no matter how chaotic your kitchen gets.
If you try this cheesecake, I’d love to hear how you make it yours, or what unexpected twists you add. Sharing those little discoveries is what makes cooking fun—and who knows, maybe next time you’ll be the one convincing a skeptic that Instant Pot cheesecake really is a thing.
Here’s to sweet moments and creamy slices!
Frequently Asked Questions
- Can I use a different cookie for the crust? Absolutely! Graham crackers, chocolate wafers, or gluten-free cookies work well—just crush finely and mix with melted butter.
- How do I prevent cracks on the cheesecake surface? Use room temperature ingredients, don’t overmix, wrap the pan in foil, and allow natural pressure release for best results.
- Can I double the recipe for a larger cheesecake? Yes, doubling for an 8-inch pan is possible if your Instant Pot can fit the larger pan and you adjust cooking time slightly (usually add 5-10 minutes).
- What’s the best way to remove the cheesecake from the pan? Run a thin knife around the edges before releasing the springform latch, then gently lift the sides away.
- Can I make this cheesecake vegan? With some ingredient swaps—dairy-free cream cheese, flax eggs, and vegan cookies—you can create a similar version, though texture may vary.
Pin This Recipe!

Creamy Instant Pot Cheesecake with Oreo Crust
A quick and easy cheesecake made in the Instant Pot featuring a creamy filling and a crunchy Oreo crust, perfect for busy days and last-minute dessert cravings.
- Prep Time: 25 minutes
- Cook Time: 35 minutes
- Total Time: 1 hour 30 minutes
- Yield: 8 servings 1x
- Category: Dessert
- Cuisine: American
Ingredients
- 24 Oreo cookies (regular or double-stuffed, crushed finely with filling intact)
- 4 tablespoons unsalted butter, melted
- 16 ounces (450g) cream cheese, softened to room temperature
- ½ cup (100g) granulated sugar
- 2 large eggs, room temperature
- ⅓ cup (80ml) sour cream
- 1 teaspoon pure vanilla extract
- 1 tablespoon all-purpose flour (optional)
Instructions
- Crush the 24 Oreo cookies until fine crumbs form using a food processor or rolling pin.
- Mix the Oreo crumbs with melted butter until the mixture feels like damp sand.
- Press the Oreo mixture evenly and firmly into the bottom of a 6-inch springform pan. Place the pan in the freezer to set the crust.
- In a large bowl, beat the softened cream cheese with sugar until smooth and creamy.
- Add eggs one at a time, mixing just until incorporated each time.
- Stir in sour cream, vanilla extract, and flour (if using) until blended well.
- Remove the springform pan from the freezer and pour the cheesecake filling over the chilled Oreo crust. Smooth the top gently.
- Pour 1 cup (240ml) of water into the Instant Pot. Place the trivet inside and lower the springform pan onto the trivet.
- Cover the top of the pan loosely with aluminum foil to prevent condensation from dripping onto the cheesecake.
- Seal the Instant Pot lid and set to Manual or Pressure Cook on high for 35 minutes.
- Allow a natural pressure release for 15 minutes, then carefully release any remaining pressure.
- Remove the cheesecake from the Instant Pot and let it cool at room temperature for about 1 hour.
- Refrigerate for at least 4 hours or overnight to fully set and develop creamy texture.
Notes
Use room temperature cream cheese and eggs to avoid lumps and cracks. Wrap the springform pan in foil to prevent water seepage. Allow natural pressure release to prevent cracks and sinking centers. For variations, try adding mini chocolate chips, peanut butter swirl, or use gluten-free cookies for the crust.
Nutrition
- Serving Size: 1 slice (1/8 of chee
- Calories: 375
- Sugar: 20
- Sodium: 300
- Fat: 25
- Saturated Fat: 15
- Carbohydrates: 30
- Fiber: 1
- Protein: 7.5
Keywords: Instant Pot cheesecake, Oreo crust, creamy cheesecake, easy dessert, pressure cooker cheesecake, no-bake cheesecake, quick cheesecake


