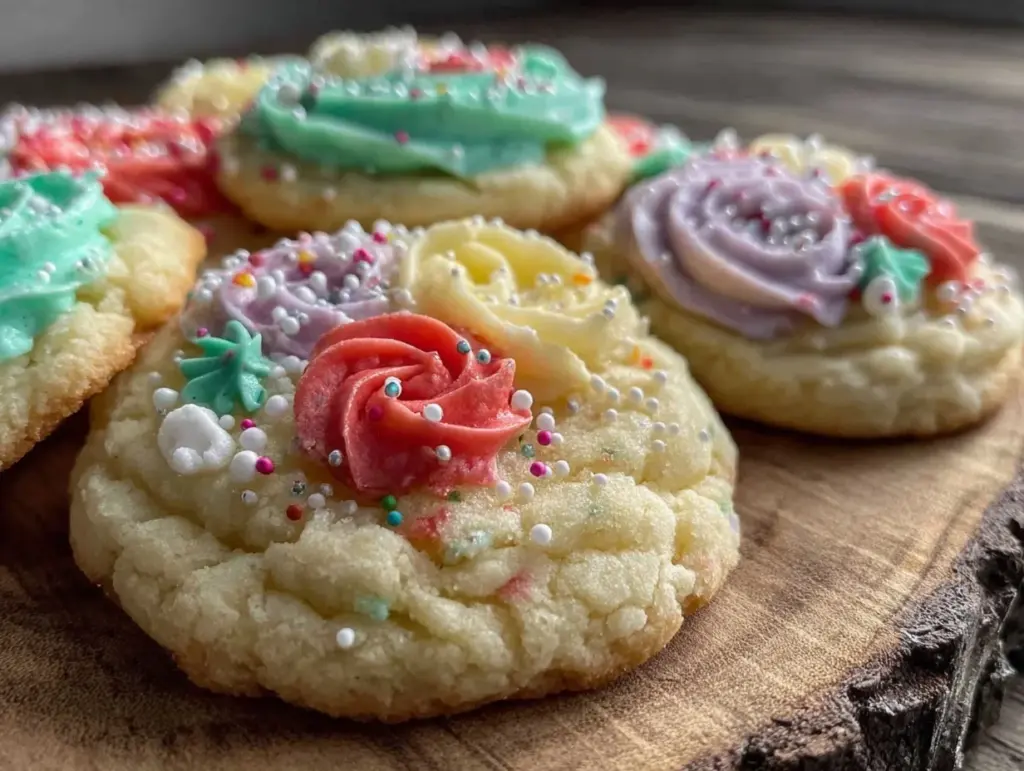
Let me tell you, the scent of buttery sugar cookies baking in the oven, mingled with the delicate aroma of vanilla and a hint of lemon zest, is enough to make anyone’s mouth water. The first time I baked these soft spring sugar cookies with pastel icing designs, I was instantly hooked. It was one of those moments where you pause, take a deep breath, and just smile because you know you’re onto something truly special. I remember when I was knee-high to a grasshopper, my grandma would bake cookies that felt like warm hugs, and these cookies bring back that pure, nostalgic comfort.
I stumbled upon this recipe on a rainy weekend, trying to recreate that exact soft texture and sweet, colorful vibe for an upcoming Easter potluck. Honestly, these cookies turned out dangerously easy to make, and my family couldn’t stop sneaking them off the cooling rack (and I can’t really blame them). They’re perfect for brightening up your Pinterest cookie board or sending as a sweet treat for your kids’ school parties.
After testing the recipe multiple times (in the name of research, of course), it’s become a staple for family gatherings and gifting. The pastel icing designs add that extra touch of spring charm, making these cookies not only delicious but also a feast for the eyes. Trust me, you’re going to want to bookmark this one.
Why You’ll Love This Soft Spring Sugar Cookies Recipe
Having worked through several sugar cookie recipes over the years, this one stands out for all the right reasons. Here’s why it’s a winner, straight from my kitchen experiments and family feedback:
- Quick & Easy: Comes together in under 30 minutes, perfect for busy weeknights or last-minute cravings.
- Simple Ingredients: No fancy grocery trips needed; you likely already have everything in your pantry.
- Perfect for Spring Celebrations: Great for Easter, baby showers, or just adding a splash of color to your cookie jar.
- Crowd-Pleaser: Always gets rave reviews from kids and adults alike, thanks to its soft texture and sweet pastel icing.
- Unbelievably Delicious: The balance of buttery richness and subtle vanilla makes these cookies irresistible.
What sets this recipe apart is the way the dough stays soft and tender even days after baking, and the pastel icing designs that aren’t just pretty but also easy to customize. You can mix up the colors and patterns to suit any occasion or mood. Honestly, this recipe isn’t just good—it’s the kind that makes you close your eyes after the first bite, savoring that perfect softness and sweetness combo. It’s comfort food with a cheerful, springtime twist.
What Ingredients You Will Need
This recipe uses simple, wholesome ingredients to deliver bold flavor and satisfying texture without the fuss. Most are pantry staples, so you can whip these cookies up on a whim.
- All-purpose flour: 2 ¾ cups (345 g) – provides the perfect structure for soft, tender cookies
- Baking powder: 1 teaspoon – helps with a gentle rise
- Salt: ½ teaspoon – balances sweetness
- Unsalted butter: 1 cup (227 g), softened – for rich, buttery flavor (I prefer Land O’Lakes for consistency)
- Granulated sugar: 1 ¼ cups (250 g) – for sweetness and slight crisp on edges
- Large eggs: 2, room temperature – bind everything together
- Pure vanilla extract: 2 teaspoons – adds depth to the flavor
- Lemon zest: From 1 medium lemon (optional) – gives a fresh spring brightness
For the pastel icing:
- Powdered sugar: 2 ½ cups (300 g), sifted – for smooth icing
- Milk: 3-4 tablespoons (45-60 ml) – adjust for desired consistency (use dairy-free milk if needed)
- Light corn syrup: 1 tablespoon (15 ml) – gives the icing a nice shine
- Vanilla extract: ½ teaspoon – subtle flavor enhancer
- Gel food coloring: Pastel shades of pink, blue, yellow, and green – easy to mix and vibrant without watering down the icing
If you want a gluten-free twist, I recommend swapping the all-purpose flour for a 1:1 gluten-free baking flour blend (Bob’s Red Mill works well). For a dairy-free version, use coconut oil instead of butter and a non-dairy milk alternative for the icing. In summer, swapping lemon zest for a splash of orange zest can add a lovely seasonal variation.
Equipment Needed
- Mixing bowls: At least two, one for dry ingredients and one for wet
- Electric mixer: Stand or hand mixer to cream butter and sugar smoothly (though you can hand mix with a sturdy wooden spoon if needed)
- Measuring cups and spoons: Accurate measuring is key for consistent cookies
- Baking sheets: Two standard 9×13-inch pans or similar size
- Parchment paper or silicone baking mats: Prevents sticking and promotes even baking
- Cooling racks: For best cookie texture after baking
- Small bowls or cups: For mixing pastel icing colors
- Plastic squeeze bottles or piping bags: For detailed icing designs; a ziplock bag with a snipped corner works fine too
If you don’t have a stand mixer, a sturdy hand mixer works just fine. When it comes to piping bags, I’ve found reusable silicone bags are easier to clean and last longer. Also, keeping your baking sheets cool between batches helps prevent cookies from spreading too much—trust me, been there, learned that the hard way!
Preparation Method

- Preheat your oven to 350°F (175°C). Line your baking sheets with parchment paper or silicone mats to prevent sticking and promote even baking.
- In a medium bowl, whisk together the dry ingredients: 2 ¾ cups (345 g) all-purpose flour, 1 teaspoon baking powder, and ½ teaspoon salt. Set aside.
- In a large mixing bowl, cream the butter and sugar: Using an electric mixer on medium speed, beat 1 cup (227 g) softened unsalted butter with 1 ¼ cups (250 g) granulated sugar until light and fluffy, about 3-4 minutes. The mixture should look pale and slightly airy — that’s your cue that the air is incorporated, which keeps cookies soft.
- Add eggs and flavorings: Beat in 2 large eggs, one at a time, then mix in 2 teaspoons pure vanilla extract and the zest of one lemon (if using). Scrape down the sides to make sure everything is combined.
- Gradually add dry ingredients: Slowly add the flour mixture to the wet ingredients, mixing on low speed just until combined. Don’t overmix here — the dough should be soft but not sticky. If it feels too sticky, a quick chill in the fridge for 15-20 minutes works wonders.
- Shape the cookies: Using a tablespoon or cookie scoop, drop dough balls onto your prepared baking sheets, spacing them about 2 inches apart. For a more uniform look, gently flatten each ball with the palm of your hand or the bottom of a glass dipped in sugar.
- Bake: Place baking sheets in the oven and bake for 10-12 minutes, or until the edges just start to turn golden but the centers look soft. They’ll firm up as they cool — don’t overbake or you’ll lose that perfect softness.
- Cool: Allow the cookies to cool on the baking sheet for 5 minutes before transferring them to a wire rack to cool completely. This prevents breakage and keeps the bottoms from getting soggy.
- Prepare the pastel icing: In a medium bowl, mix 2 ½ cups (300 g) sifted powdered sugar with 3 tablespoons (45 ml) milk, 1 tablespoon (15 ml) light corn syrup, and ½ teaspoon vanilla extract. Stir until smooth. Adjust the milk to get a spreadable but not runny consistency.
- Divide icing and add colors: Split the icing into small bowls and tint each with a few drops of gel food coloring to create pastel pink, blue, yellow, and green shades. Stir well.
- Decorate: Using piping bags or squeeze bottles, create your spring-inspired designs—think polka dots, stripes, flowers, or simple outlines. Let your creativity shine! Allow icing to set at room temperature for at least 1 hour before stacking or storing.
Pro tip: If your icing starts to dry out while decorating, just add a teaspoon of milk and stir to refresh it. Also, when flattening dough balls, dust your hands with sugar instead of flour to keep the surface smooth and sweet.
Cooking Tips & Techniques
Soft sugar cookies require just the right touch, and here’s what I’ve learned from many batches (some more successful than others):
- Don’t overmix the dough: Once you add the flour, mix just until combined. Overworking develops gluten, making cookies tough.
- Chill if needed: If your dough feels too sticky or warm, pop it in the fridge for 15-20 minutes. It makes shaping easier and reduces spreading.
- Use room temperature eggs and butter: This helps ingredients blend smoothly and traps air for fluffier cookies.
- Watch your baking time closely: Cookies should look slightly underbaked in the center when you pull them out. They continue to cook on the hot sheet.
- Parchment paper or silicone mats are lifesavers: They prevent sticking and make cleanup quick.
- For pastel icing, gel colors are best: They give bright color without thinning the icing; liquid colors can make it runny.
- Practice makes perfect with icing: If you’re new to piping, start with simple dots or lines. It’s less stress and still looks charming.
- Use a toothpick to fix mistakes: A quick swipe with a toothpick can clean up edges or blend colors gently.
Let me be honest: I once tried to rush the icing step by making it too thin, and the colors ran into one another, turning my pastel rainbow into a pastel mud puddle. Lesson learned! Take your time and enjoy the decorating—it’s part of the fun.
Variations & Adaptations
One of the best things about this soft spring sugar cookies recipe is how easy it is to tweak:
- Dietary Substitute: Swap all-purpose flour with almond flour for a low-carb, gluten-free option. The cookies will be a bit more delicate but still delicious.
- Flavor Twists: Add a teaspoon of almond extract instead of vanilla for a nutty note, or mix in finely chopped lavender for a floral hint that screams spring.
- Cooking Method: Try baking these as mini cookie sandwiches with a layer of lemon curd or buttercream in the middle for an elegant twist.
- Color & Design: Use natural food colorings such as beet juice powder for pink or matcha powder for a soft green icing.
- Personal Variation: I once made a batch with a touch of orange zest and dipped half the cookie in melted white chocolate before icing — the family loved the extra zing!
Feel free to play with shapes—bunnies, flowers, or eggs are perfect for spring. And if you’re feeling adventurous, add edible glitter or sprinkles to your pastel icing for a little extra sparkle.
Serving & Storage Suggestions
These cookies are best served at room temperature so you get the soft, melt-in-your-mouth texture. They look adorable arranged on a pastel-themed platter, maybe with a side of fresh berries or a light herbal tea like chamomile or mint.
For storage, keep the cookies in an airtight container at room temperature for up to 4 days. If you want to save them longer, freezing works well—just layer parchment paper between cookies and store in a freezer-safe bag for up to 3 months. Thaw at room temperature before serving.
Reheat gently in a microwave for 5-7 seconds if you want them a little warmer, but honestly, they’re just as delightful straight from the container. The pastel icing designs hold up nicely over time, though they get a bit softer, which some folks actually prefer.
Nutritional Information & Benefits
Each cookie (assuming about 24 cookies per batch) contains approximately 150 calories, 7 grams of fat, 20 grams of carbohydrates, and 2 grams of protein. Keep in mind, this varies a bit depending on the size of your cookies and the amount of icing used.
Key ingredients like butter provide healthy fats and vitamin A, while lemon zest offers a touch of vitamin C and antioxidants. Using real vanilla extract adds flavor without artificial additives. For those watching gluten or dairy, the recipe can be adapted easily, making it a versatile treat.
From a wellness perspective, this recipe strikes a balance—treating yourself without overdoing the sugar or processed ingredients. It’s homemade comfort food that feels like a little celebration of the season.
Conclusion
Soft spring sugar cookies with pastel icing designs are more than just a sweet treat—they’re a way to brighten up your day, your kitchen, and your celebrations. Whether you’re baking to impress guests, delight your kids, or gift to loved ones, this recipe hits all the right notes.
Feel free to customize the icing colors, shapes, and flavors to make it truly your own. I love this recipe because it’s simple, forgiving, and always brings smiles around the table. Now it’s your turn to try it out and make some memories.
If you bake these cookies, I’d love to hear how you decorated them or any fun twists you tried! Drop a comment below or share your photos—I’m always excited to see your creations. Happy baking, friends!
FAQs About Soft Spring Sugar Cookies with Pastel Icing Designs
How do I keep sugar cookies soft instead of crunchy?
Make sure not to overbake them — pull them out when edges are just set but centers still look soft. Also, using slightly more butter and avoiding too much flour helps maintain softness.
Can I make the dough ahead of time?
Absolutely! You can refrigerate the dough tightly wrapped for up to 3 days or freeze for up to 3 months. Just thaw before shaping and baking.
What’s the best way to store iced cookies?
Store them in an airtight container at room temperature for up to 4 days. If stacking, place parchment paper between layers to protect the icing.
Can I use regular liquid food coloring instead of gel?
Gel colors are preferred because they don’t thin the icing. If you must use liquid colors, add very small amounts to avoid watery icing.
How do I fix icing that’s too runny or too thick?
If icing is too runny, add a bit more powdered sugar to thicken. If too thick, stir in a few drops of milk until you get the desired consistency.
Pin This Recipe!
Soft Spring Sugar Cookies with Pastel Icing Designs

Soft, tender sugar cookies with a buttery vanilla flavor and a hint of lemon zest, decorated with vibrant pastel icing perfect for spring celebrations.
- Prep Time: 15 minutes
- Cook Time: 12 minutes
- Total Time: 27 minutes
- Yield: 24 cookies 1x
- Category: Dessert
- Cuisine: American
Ingredients
- 2 ¾ cups (345 g) all-purpose flour
- 1 teaspoon baking powder
- ½ teaspoon salt
- 1 cup (227 g) unsalted butter, softened
- 1 ¼ cups (250 g) granulated sugar
- 2 large eggs, room temperature
- 2 teaspoons pure vanilla extract
- Zest of 1 medium lemon (optional)
- For the pastel icing:
- 2 ½ cups (300 g) powdered sugar, sifted
- 3–4 tablespoons (45–60 ml) milk
- 1 tablespoon (15 ml) light corn syrup
- ½ teaspoon vanilla extract
- Gel food coloring in pastel pink, blue, yellow, and green
Instructions
- Preheat oven to 350°F (175°C). Line baking sheets with parchment paper or silicone mats.
- Whisk together flour, baking powder, and salt in a medium bowl; set aside.
- Cream butter and granulated sugar in a large bowl using an electric mixer on medium speed until light and fluffy, about 3-4 minutes.
- Beat in eggs one at a time, then mix in vanilla extract and lemon zest if using. Scrape down sides to combine.
- Gradually add dry ingredients to wet ingredients, mixing on low speed just until combined. Chill dough 15-20 minutes if too sticky.
- Drop dough by tablespoonfuls onto prepared baking sheets, spacing 2 inches apart. Flatten slightly with palm or sugar-dusted glass bottom.
- Bake 10-12 minutes until edges are golden but centers remain soft. Do not overbake.
- Cool cookies on baking sheet 5 minutes, then transfer to wire racks to cool completely.
- Prepare icing by mixing powdered sugar, milk, corn syrup, and vanilla extract until smooth. Adjust milk for spreadable consistency.
- Divide icing into small bowls and tint with gel food coloring to desired pastel shades.
- Decorate cooled cookies using piping bags or squeeze bottles with pastel icing designs. Let icing set at room temperature for at least 1 hour before storing.
Notes
Do not overmix dough after adding flour to keep cookies soft. Chill dough if sticky for easier shaping. Use gel food coloring for vibrant pastel icing without thinning. If icing dries while decorating, add a teaspoon of milk to refresh. Store cookies in airtight container at room temperature up to 4 days or freeze up to 3 months with parchment paper between layers.
Nutrition
- Serving Size: 1 cookie
- Calories: 150
- Fat: 7
- Carbohydrates: 20
- Protein: 2
Keywords: soft sugar cookies, spring cookies, pastel icing, Easter cookies, homemade sugar cookies, easy sugar cookies, buttery cookies, vanilla cookies