Introduction
Let me tell you, the moment the scent of rich chocolate, cool peppermint, and buttery cookie dough starts swirling around my kitchen, I know the holidays are here. That first time I pulled a tray of Peppermint Bark Cookies from the oven, the air was tinged with that unmistakable minty sweetness and a hint of nostalgia—honestly, it was like Christmas morning all over again. I remember standing there, waiting (not so patiently) for the chocolate drizzle to set, and sneaking a taste before anyone else could get their hands on them. It was the kind of moment where you pause, take a deep breath, and just smile because you know you’re onto something truly special.
These Peppermint Bark Cookies aren’t just another seasonal treat—they’re packed with pure, nostalgic comfort and a little bit of holiday magic. Years ago, when I was knee-high to a grasshopper, my grandma used to make peppermint bark for every winter gathering. I wanted that same classic flavor, but in a handheld cookie you could sneak from the cooling rack (and trust me, my family does just that—no shame here). The first time I brought a batch to a bake sale, they vanished faster than you can say “peppermint.” Honestly, I wish I’d stumbled onto this recipe ages ago; it’s now a staple for family gatherings, gifting, and even those random Tuesday afternoons when you just need a pick-me-up.
Let’s face it, these cookies are dangerously easy, perfect for potlucks, sweet treats for your kids, or just to brighten up your Pinterest cookie board. I’ve tested this Peppermint Bark Cookies recipe more times than I’d care to admit (in the name of research, of course), and it never fails to deliver that warm hug feeling. If you’re hunting for a festive, crowd-pleasing cookie that’ll make your kitchen the coziest spot around, you’re going to want to bookmark this one.
Why You’ll Love This Peppermint Bark Cookies Recipe
When it comes to holiday baking, you want a recipe that’s reliable, impressive, and—let’s be real—doesn’t make you sweat. After countless batches, holiday swaps, and taste tests (my family is nothing if not honest), these Peppermint Bark Cookies have earned their spot at the top of my festive favorites. Here’s why they’re going to win you over:
- Quick & Easy: These cookies come together in under an hour, so you can whip up a batch even on busy weeknights or when the holiday chaos hits full swing.
- Simple Ingredients: No need to hunt down fancy grocery store items—most of the ingredients are pantry staples. You probably have everything you need right now.
- Perfect for Holiday Gatherings: Whether it’s a cookie exchange, a classroom party, or just cozying up by the fire, these Peppermint Bark Cookies fit the bill. They’re festive, pretty, and totally giftable.
- Crowd-Pleaser: I’ve never met a kid (or adult) who didn’t sneak seconds. The blend of chocolate, peppermint, and buttery cookie is next-level comfort food.
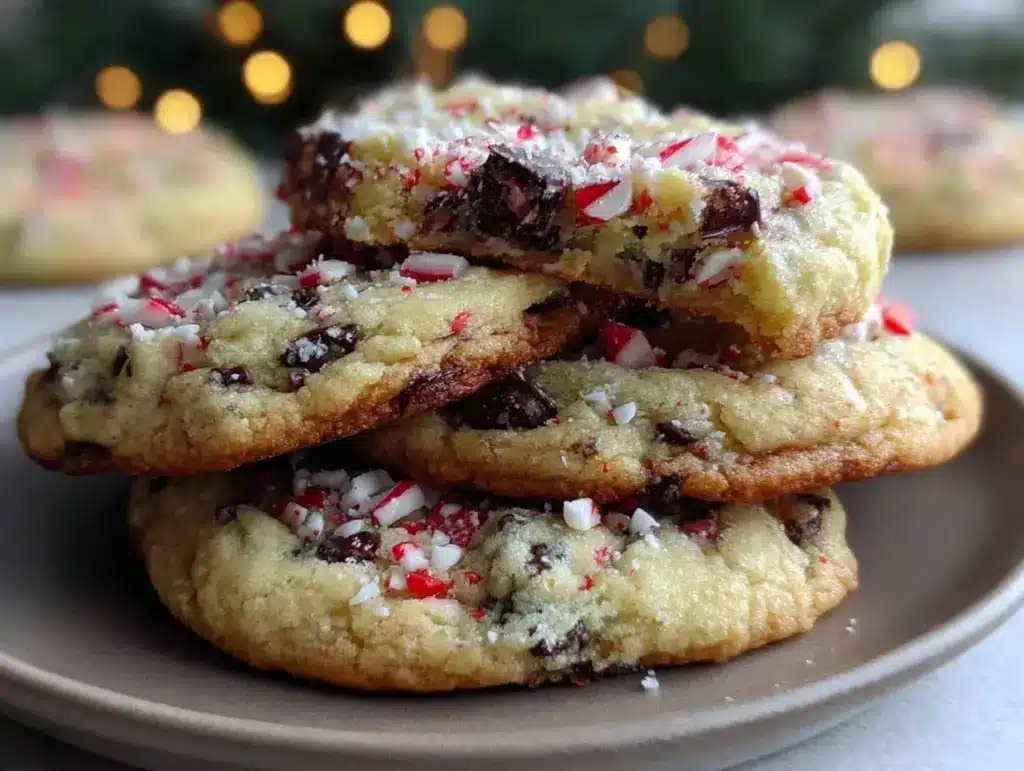
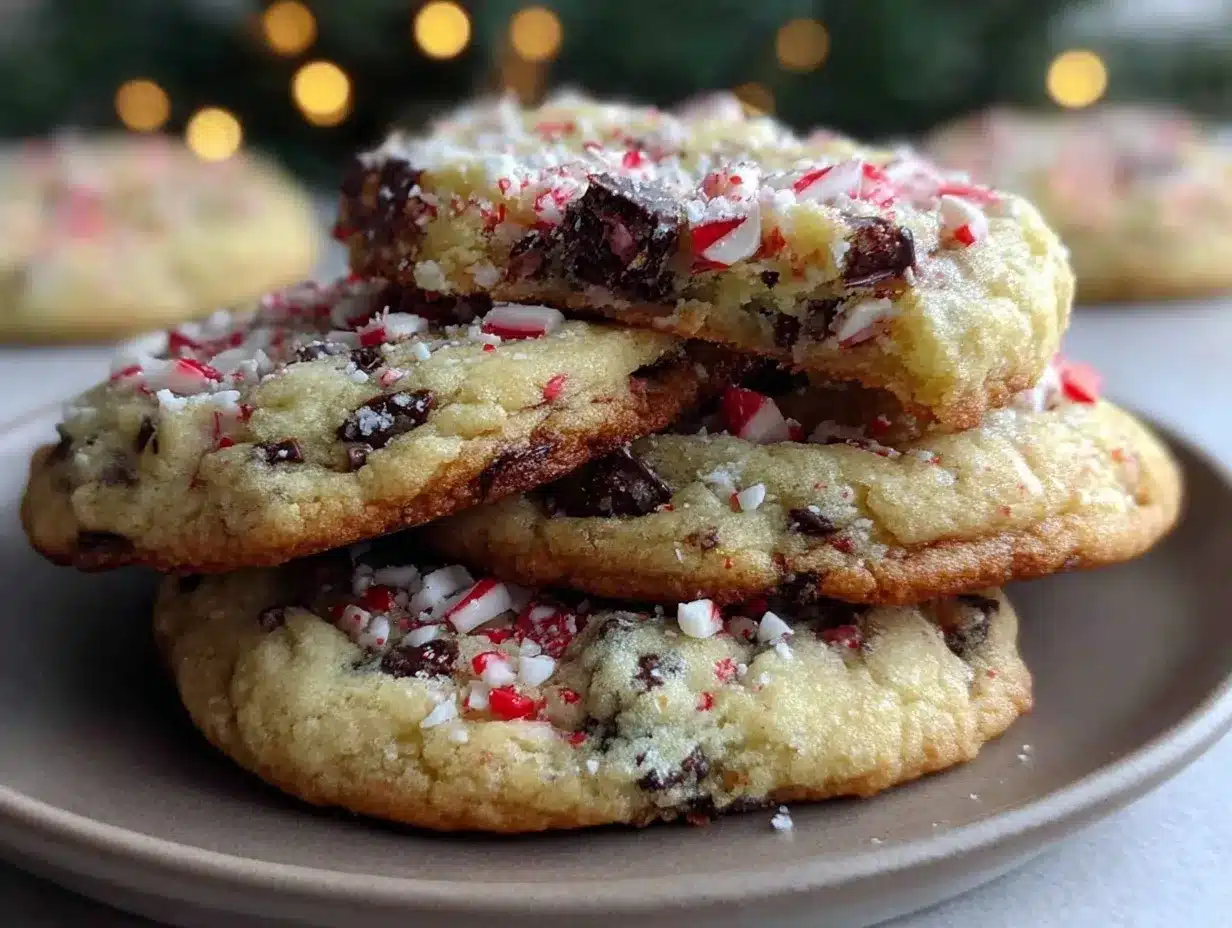
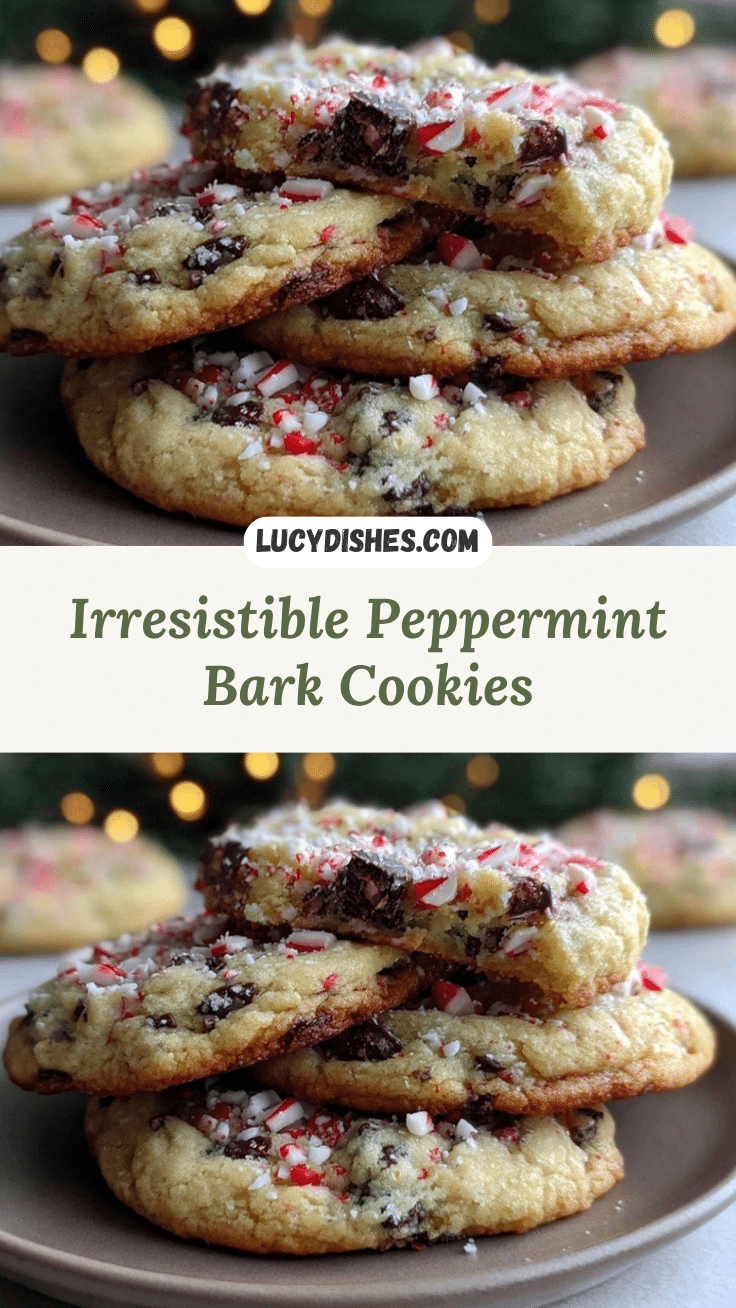
- Unbelievably Delicious: The crisp cookie base, creamy chocolate topping, and crunchy peppermint bits hit all the right texture notes. It’s classic peppermint bark—reinvented.
What sets this recipe apart? Blending white and semi-sweet chocolate on top gives a rich flavor without overwhelming sweetness, and using crushed candy canes adds genuine crunch and pop. I learned (the hard way) that chilling the dough before baking helps keep the cookies thick and chewy—no sad, flat cookies here. This Peppermint Bark Cookies recipe isn’t just another spin-off; it’s a well-tested, family-approved version that brings together old-school flavor with modern ease.
You’ll love the way these cookies turn a simple afternoon into a festive celebration. They’re the kind of treat that makes people close their eyes and savor the moment. If you want holiday baking that’s easy, memorable, and Instagram-worthy, this is the recipe to reach for again and again.
What Ingredients You Will Need
This Peppermint Bark Cookies recipe uses simple, wholesome ingredients to deliver bold flavor and that classic festive crunch—without any fuss. Most are pantry staples, and a few can be tweaked for dietary needs or flavor swaps. Here’s what you’ll need:
- For the Cookie Base:
- 1 cup (226g) unsalted butter, softened (adds richness and keeps the cookies tender)
- 1 cup (200g) granulated sugar (for classic sweetness)
- 1/2 cup (100g) light brown sugar, packed (brings a touch of caramel flavor)
- 2 large eggs, room temperature (binds everything together)
- 2 teaspoons pure vanilla extract (for depth)
- 2 3/4 cups (345g) all-purpose flour (I like King Arthur for consistent results)
- 1 teaspoon baking soda (helps with spread)
- 1/2 teaspoon baking powder (for lift)
- 1/2 teaspoon salt (balances the sweetness)
- For the Peppermint Bark Topping:
- 1 cup (170g) semi-sweet chocolate chips (I recommend Guittard or Ghirardelli)
- 1 cup (170g) white chocolate chips (use a good-quality brand for best melt)
- 3/4 cup (about 6–7) peppermint candy canes, finely crushed (for crunch and color)
- 1/2 teaspoon peppermint extract (optional, amps up the mint flavor)
- Optional Garnishes:
- Festive sprinkles (for extra holiday flair)
- Dark chocolate drizzle (if you want a more intense chocolate pop)
Ingredient tips: For gluten-free cookies, swap all-purpose flour with a trusted 1:1 gluten-free blend (like Bob’s Red Mill). Dairy-free? Use Earth Balance buttery sticks and dairy-free chocolate chips. If you want less peppermint punch, skip the extract and just stick with the candy canes. In summer, you can even swap candy canes for crushed mint candies if you’re feeling extra.
Honestly, the ingredients are easy to adjust—just don’t skimp on the peppermint if you want that classic bark flavor. I always buy extra candy canes since someone inevitably sneaks a few before baking time!
Equipment Needed
You don’t need a fancy kitchen setup for these Peppermint Bark Cookies—just a few basics and maybe one or two optional tools. Here’s what I reach for every single batch:
- Large mixing bowls (for dough and melting chocolate)
- Electric hand mixer or stand mixer (hand mixing works, but a mixer makes creaming butter easier)
- Measuring cups and spoons (accuracy is key for baking!)
- Rubber spatula (to scrape down the bowl and fold ingredients)
- Baking sheets (I use two so I can rotate trays)
- Parchment paper or silicone baking mats (for easy cleanup and no sticking)
- Wire cooling racks (for faster cooling—crucial for chocolate topping)
- Microwave-safe bowls (for melting chocolate, unless you use a double boiler)
- Rolling pin (optional, for crushing candy canes—sometimes I just use a kitchen mallet!)
If you don’t have a stand mixer, don’t worry—an electric hand mixer works just fine (or some good old-fashioned elbow grease). For parchment paper, I’ve used wax paper in a pinch, but parchment is less likely to stick. My wire racks are from a thrift store, but any cooling rack will do. For melting chocolate, I usually opt for the microwave method (fewer dishes), but if you prefer a double boiler, go for it. Just keep everything clean—melted chocolate can seize up if there’s water or grease!
Preparation Method
Ready to bake up a batch of Peppermint Bark Cookies? Here’s the step-by-step method (with all the little tips and tricks I’ve picked up along the way):
-
Prep Your Ingredients:
Measure out all ingredients. Let butter and eggs come to room temperature. Crush candy canes by placing them in a zip-top bag and smashing with a rolling pin (or mallet) until you have fine and chunky bits. Line baking sheets with parchment paper. -
Cream Butter & Sugars:
In a large mixing bowl, beat 1 cup (226g) unsalted butter, 1 cup (200g) granulated sugar, and 1/2 cup (100g) light brown sugar on medium-high speed for 2–3 minutes until light and fluffy. Scrape down the sides as needed. -
Add Eggs & Vanilla:
Beat in 2 large eggs, one at a time, mixing well after each. Add 2 teaspoons vanilla extract and mix until fully combined. (If mixture looks a bit curdled, don’t worry—it’ll smooth out with the flour.) -
Combine Dry Ingredients:
In a separate bowl, whisk together 2 3/4 cups (345g) all-purpose flour, 1 teaspoon baking soda, 1/2 teaspoon baking powder, and 1/2 teaspoon salt. Gradually add dry ingredients to the wet mixture, mixing on low until just combined. (Overmixing = tough cookies, so go easy.) -
Chill the Dough:
Cover dough and refrigerate for 30 minutes. Chilling helps the cookies stay thick and chewy. If you skip this, cookies may spread too much. -
Preheat Oven & Shape Cookies:
Preheat oven to 350°F (175°C). Scoop dough into 1.5 tablespoon (about 30g) balls and place 2 inches apart on prepared sheets. Flatten slightly with the palm of your hand for even baking. -
Bake:
Bake for 10–12 minutes, until cookies are just set and edges are lightly golden. (They’ll look pale in the center—don’t overbake!) If cookies spread too much, gently reshape with a spatula while warm. -
Cool:
Transfer cookies to wire racks and let cool completely. If you rush the chocolate topping, it’ll melt right off. -
Make Peppermint Bark Topping:
Melt 1 cup (170g) semi-sweet chocolate chips in a microwave-safe bowl (30-second bursts, stirring between each, for about 1–2 minutes). Spread a thin layer over each cooled cookie. Let set for 10–15 minutes. -
Add White Chocolate & Peppermint:
Melt 1 cup (170g) white chocolate chips (same microwave method). Stir in 1/2 teaspoon peppermint extract if using. Drizzle or spread white chocolate over the semi-sweet layer, then immediately sprinkle crushed candy canes on top. Press gently so they stick. -
Set:
Allow cookies to sit at room temperature until chocolate sets (about 30–45 minutes). You can speed this up in the fridge. -
Optional Garnish:
Drizzle with more dark chocolate or add festive sprinkles before the chocolate sets for extra flair.
Troubleshooting: If chocolate seizes, add a teaspoon of coconut oil to smooth it out. If cookies are too crisp, check your oven temp—it can run hot (trust me, I learned the hard way). For chunkier peppermint bits, pulse candy canes less.
Personal tip: Make a double batch—these Peppermint Bark Cookies disappear fast, especially when you have little hands around!
Cooking Tips & Techniques
After baking dozens of batches, I’ve picked up a few tricks (and learned from a few disasters) to make Peppermint Bark Cookies foolproof:
- Chill the Dough: This step is key—chilled dough means thick, chewy cookies. If you skip it, cookies can spread thin and lose that perfect texture.
- Use Good Chocolate: Cheap white chocolate can get gritty or won’t melt smoothly. Stick with a trusted brand and melt gently—microwaving in short bursts helps prevent burning.
- Don’t Overbake: These cookies should be set at the edges but soft in the center when you pull them out. They’ll finish cooking on the tray, so don’t wait for deep golden color.
- Layering Chocolate: Let the first layer of chocolate set before adding the white chocolate. Rushing this makes a messy cookie (learned that after trying to finish too quickly one year!).
- Crushing Candy Canes: Use a sturdy zip-top bag and a rolling pin. Don’t pulverize—some bigger bits add crunch. If you don’t have candy canes, mint candies work in a pinch.
- Multitasking: While the dough chills, prep your toppings and crush your candy canes. Saves time and keeps the kitchen chaos under control.
- Consistency: Use a cookie scoop for even sizes. This helps every cookie bake at the same rate (and, let’s face it, makes them look great for those Pinterest photos!).
If you make a mistake (like I did once by skipping the dough chill), don’t panic! They’ll still taste great, just a bit crispier. These little tweaks and troubleshooting steps make this Peppermint Bark Cookies recipe a holiday go-to you can trust—year after year.
Variations & Adaptations
Peppermint Bark Cookies are super versatile—here are a few ways you can tweak the recipe for different tastes and dietary needs:
- Gluten-Free: Use a 1:1 gluten-free flour blend in place of the all-purpose flour. I’ve tried Bob’s Red Mill and Cup4Cup—both work well and keep the cookies soft.
- Dairy-Free: Swap the butter for a plant-based alternative (like Earth Balance) and use dairy-free chocolate chips. The cookies stay rich and flavorful.
- Extra Chocolate: For chocolate lovers, add 1/2 cup (85g) mini semi-sweet chips to the dough, or drizzle melted dark chocolate over the finished cookies.
- Seasonal Flavors: In spring, swap out peppermint for lemon zest and white chocolate for a fresh twist. In fall, add a pinch of cinnamon and use crushed ginger candies instead of candy canes.
- Nut-Free: This Peppermint Bark Cookies recipe is already nut-free, but check your chocolate and sprinkles for hidden allergens if you’re baking for sensitive folks.
My favorite twist? I sometimes add a sprinkle of flaky sea salt over the chocolate layer for an extra pop of flavor—it’s a little unexpected and totally delicious. Whether you swap flavors, adapt for allergies, or just toss in extra chocolate, these cookies can be customized to suit any crowd.
Serving & Storage Suggestions
For the best holiday presentation, serve Peppermint Bark Cookies at room temperature on a festive platter. They look gorgeous stacked or arranged in a circle, with extra crushed candy canes sprinkled around.
Pair these cookies with a mug of hot cocoa, peppermint tea, or even a cold glass of milk—kids especially love the combo. They also make a stunning addition to holiday cookie boxes, dessert buffets, or as a sweet thank-you for teachers and neighbors.
Storage is easy: Keep cookies in an airtight container at room temperature for up to 5 days. If you need to store them longer, layer with wax paper and freeze (up to 2 months). To thaw, let them sit at room temp for about 30 minutes. If the chocolate topping looks a little cloudy after freezing, don’t worry—it’s just the cocoa butter, and the flavor is still perfect.
Reheating tip: If you want that “fresh-from-the-oven” taste, microwave a cookie for about 10 seconds. The chocolate gets melty and the peppermint aroma fills the room. Over time, the peppermint flavor deepens a bit, so day-two cookies are especially yummy.
Nutritional Information & Benefits
Here’s an approximate breakdown (per cookie, recipe yields about 30 cookies):
Calories: 160
Fat: 8g
Carbs: 22g
Protein: 2g
Sugar: 14g
Sodium: 75mg
Key benefits: Peppermint contains menthol, which can help soothe digestion and freshen breath. Dark chocolate adds antioxidants, and the homemade aspect means you control the ingredients—no weird preservatives. These Peppermint Bark Cookies can be made gluten-free and dairy-free for most dietary needs, and they’re naturally nut-free (just double-check your chocolate brands).
From a wellness perspective, I love that you can share these cookies with almost anyone. They’re a treat, sure, but using real butter, chocolate, and peppermint gives you a festive boost—sometimes, that’s exactly what holiday baking is for.
Conclusion
If you’re searching for the ultimate festive treat, these Peppermint Bark Cookies are your answer. They’re easy, fun, and guaranteed to spark holiday joy—whether you’re baking with your kids, gifting to friends, or just sneaking a midnight snack. I love how adaptable they are; you can tweak them to suit any dietary need or flavor craving, and they always turn out delicious.
Honestly, this recipe has become a holiday tradition in my house. There’s something about the blend of chocolate, peppermint, and buttery cookie that brings folks together and makes memories. Give them a try, and don’t be shy—make them your own, share your tweaks in the comments, or tag me with your festive creations!
Happy baking and warm holiday wishes—may your kitchen be filled with laughter, peppermint, and plenty of cookies!
FAQs About Peppermint Bark Cookies Recipe
Can I make Peppermint Bark Cookies ahead of time?
Absolutely! You can bake the cookies a day or two in advance and add the chocolate and peppermint topping just before serving or gifting. They keep well for up to 5 days in an airtight container.
How do I crush candy canes without making a mess?
Place candy canes in a sturdy zip-top bag, seal, and use a rolling pin or kitchen mallet to crush. Do this over a towel to muffle the sound—trust me, it gets loud!
Can I freeze these cookies?
Yes, you can freeze Peppermint Bark Cookies. Layer them between sheets of wax paper and store in a freezer-safe container for up to 2 months. Thaw at room temperature before serving.
How do I keep the chocolate topping from cracking?
Let the cookies cool completely before adding the chocolate. If the chocolate cracks after setting, try letting cookies come to room temperature before eating—cold chocolate is more likely to crack.
What’s the best way to store leftover cookies?
Store in an airtight container at room temperature. If you live in a humid climate, place a sheet of parchment between layers to prevent sticking. For longer storage, freeze as described above.
Pin This Recipe!
Peppermint Bark Cookies
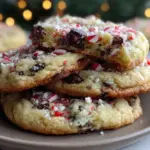
Peppermint Bark Cookies are a festive holiday treat featuring a buttery cookie base topped with layers of semi-sweet and white chocolate, finished with crunchy peppermint candy cane bits. These cookies are easy to make, crowd-pleasing, and perfect for gifting or holiday gatherings.
- Prep Time: 25 minutes
- Cook Time: 12 minutes
- Total Time: 1 hour 30 minutes
- Yield: 30 cookies 1x
- Category: Dessert
- Cuisine: American
Ingredients
- 1 cup (226g) unsalted butter, softened
- 1 cup (200g) granulated sugar
- 1/2 cup (100g) light brown sugar, packed
- 2 large eggs, room temperature
- 2 teaspoons pure vanilla extract
- 2 3/4 cups (345g) all-purpose flour
- 1 teaspoon baking soda
- 1/2 teaspoon baking powder
- 1/2 teaspoon salt
- 1 cup (170g) semi-sweet chocolate chips
- 1 cup (170g) white chocolate chips
- 3/4 cup (about 6–7) peppermint candy canes, finely crushed
- 1/2 teaspoon peppermint extract (optional)
- Festive sprinkles (optional garnish)
- Dark chocolate drizzle (optional garnish)
Instructions
- Measure out all ingredients. Let butter and eggs come to room temperature. Crush candy canes by placing them in a zip-top bag and smashing with a rolling pin or mallet until you have fine and chunky bits. Line baking sheets with parchment paper.
- In a large mixing bowl, beat unsalted butter, granulated sugar, and light brown sugar on medium-high speed for 2–3 minutes until light and fluffy. Scrape down the sides as needed.
- Beat in eggs, one at a time, mixing well after each. Add vanilla extract and mix until fully combined.
- In a separate bowl, whisk together flour, baking soda, baking powder, and salt. Gradually add dry ingredients to the wet mixture, mixing on low until just combined.
- Cover dough and refrigerate for 30 minutes.
- Preheat oven to 350°F (175°C). Scoop dough into 1.5 tablespoon balls and place 2 inches apart on prepared sheets. Flatten slightly with the palm of your hand.
- Bake for 10–12 minutes, until cookies are just set and edges are lightly golden. If cookies spread too much, gently reshape with a spatula while warm.
- Transfer cookies to wire racks and let cool completely.
- Melt semi-sweet chocolate chips in a microwave-safe bowl (30-second bursts, stirring between each, for about 1–2 minutes). Spread a thin layer over each cooled cookie. Let set for 10–15 minutes.
- Melt white chocolate chips (same microwave method). Stir in peppermint extract if using. Drizzle or spread white chocolate over the semi-sweet layer, then immediately sprinkle crushed candy canes on top. Press gently so they stick.
- Allow cookies to sit at room temperature until chocolate sets (about 30–45 minutes). You can speed this up in the fridge.
- Drizzle with more dark chocolate or add festive sprinkles before the chocolate sets for extra flair (optional).
Notes
Chilling the dough is key for thick, chewy cookies. Use high-quality chocolate for best results. For gluten-free or dairy-free adaptations, substitute flour and butter as needed. Cookies can be stored in an airtight container for up to 5 days or frozen for up to 2 months. Let cookies cool completely before adding chocolate topping to prevent cracking.
Nutrition
- Serving Size: 1 cookie
- Calories: 160
- Sugar: 14
- Sodium: 75
- Fat: 8
- Saturated Fat: 5
- Carbohydrates: 22
- Fiber: 1
- Protein: 2
Keywords: peppermint bark cookies, holiday cookies, Christmas cookies, festive dessert, chocolate peppermint cookies, easy cookie recipe, nut-free cookies, cookie exchange, edible gifts