Let me tell you, the aroma of warm peanut butter swirling with rich chocolate in my kitchen is the kind of scent that makes neighbors peek in, hoping for a taste. The first time I pulled a tray of homemade Peanut Butter Blossom Cookies from the oven, those iconic chocolate kisses perched on their golden, crackled tops—well, I was instantly hooked. It’s funny, you know, how one bite can transport you straight back to childhood. These cookies are pure, nostalgic comfort: soft centers, chewy edges, and that burst of chocolate right at the end.
I still remember being knee-high to a grasshopper, watching my grandma roll little dough balls in sugar and press a chocolate kiss into each one. She’d wink, telling me, “Don’t eat too many before dinner!”—but, honestly, who could resist? Years ago, I tried recreating her version for a rainy holiday weekend, and after a couple of test batches (in the name of research, of course), I landed on this recipe. It’s dangerously easy, and every time I make them, my family can’t stop sneaking cookies off the cooling rack. I really can’t blame them.
This peanut butter blossom cookies recipe is just the thing to brighten up your Pinterest baking board. They’re perfect for potlucks, cookie swaps, gifting, or as a sweet treat for your kids after school. The dough comes together in a flash—no chilling required!—and the results are always soft, chewy, and absolutely irresistible. If you’re looking for a holiday staple that feels like a warm hug, you’re going to want to bookmark this one. Trust me, these cookies have become a must for our family gatherings, and I’m betting they’ll be a hit in your home too.
Why You’ll Love This Recipe
After years of baking and plenty of peanut butter cookie mishaps, I can say with confidence this peanut butter blossom cookies recipe stands out from the crowd. Here’s why:
- Quick & Easy: Comes together in under 30 minutes. No chilling, no fuss—just scoop, roll, and bake. Perfect for busy weeknights or last-minute holiday cravings.
- Simple Ingredients: You probably have everything you need in your pantry already. No fancy grocery trips required.
- Perfect for Holidays: These cookies are a classic for Christmas, but honestly, they’re a hit at any time—brunches, potlucks, bake sales, or just a cozy night in.
- Crowd-Pleaser: Kids and adults rave about these. They always disappear first from the cookie platter at our family parties.
- Unbelievably Delicious: Soft, chewy peanut butter base with that signature chocolate kiss—this is comfort food at its best.
Now, what makes this recipe different? I’ve tested and tweaked the ratios for extra softness and chewiness, and I use a special trick: rolling the dough balls in coarse sugar for a sparkly finish that adds a little crunch. The peanut butter flavor is bold but not overwhelming, and the texture stays perfect for days. Some recipes can be dry or crumbly, but not this one—thanks to the right combo of butter and brown sugar.
This isn’t just another peanut butter blossom. It’s the kind that makes you close your eyes after the first bite and think, “Wow, this is exactly what I needed.” It’s comfort food reimagined—quick, easy, but with all the soul-soothing flavor and texture you expect. Whether you’re impressing guests or just treating yourself, these cookies turn any moment into something memorable.
What Ingredients You Will Need
This peanut butter blossom cookies recipe uses straightforward ingredients to deliver bold flavor and that classic chewy texture. Most of these are pantry staples, and you can easily swap or substitute if needed. Here’s what you’ll need:
- For the dough:
- 1/2 cup (113g) unsalted butter, softened (adds richness; I like Land O’Lakes for a reliably soft crumb)
- 3/4 cup (192g) creamy peanut butter (Skippy or Jif work great—avoid natural peanut butter for best texture)
- 1/2 cup (100g) granulated sugar (for sweetness and structure)
- 1/2 cup (110g) packed light brown sugar (for extra chewiness and depth)
- 1 large egg, room temperature (binds everything together)
- 1 1/2 cups (190g) all-purpose flour (King Arthur Flour is my go-to for cookies)
- 1 tsp baking soda (helps with spread and rise)
- 1/2 tsp baking powder (for just a touch more lift)
- 1/4 tsp salt (balances the sweet and brings out the peanut butter flavor)
- 1 1/2 tsp pure vanilla extract (adds warmth and rounds out the flavors)
- For rolling:
- 1/4 cup (50g) granulated sugar (for coating the dough balls; coarse sugar gives a nice sparkle)
- For topping:
- About 36 milk chocolate kisses, unwrapped (Hershey’s Kisses are classic!)
Substitution tips:
- Use almond butter for a nutty twist (texture will change slightly).
- Swap in gluten-free 1:1 baking flour for a celiac-friendly version (I’ve tried Bob’s Red Mill—works like a charm).
- For dairy-free, use plant-based butter and check your chocolate for added milk ingredients.
- If you want a deeper flavor, use dark chocolate kisses instead of milk chocolate.
- In a pinch, you can use crunchy peanut butter for a bit of texture, but creamy gives the smoothest result.
Honestly, these ingredients are the backbone of a holiday cookie classic. I always keep an extra bag of kisses in the pantry “just in case.”
Equipment Needed
Here’s what you’ll need to make these peanut butter blossom cookies at home:
- Baking Sheet: A sturdy, rimmed baking sheet works best. I use a heavy-duty aluminum pan for even baking.
- Silicone Baking Mat or Parchment Paper: Makes cleanup easy and prevents sticking.
- Mixing Bowls: One large bowl for the dough and a small bowl for rolling sugar.
- Electric Mixer: Hand mixer or stand mixer (either works; I’ve used both). If mixing by hand, be ready for a workout!
- Measuring Cups and Spoons: For accuracy. I always double-check the flour with a kitchen scale for the best results.
- Cookie Scoop: Optional, but helps make uniform cookies. A tablespoon measure works in a pinch.
- Wire Cooling Rack: For cooling the cookies—trust me, letting them cool keeps the chocolate from melting everywhere!
If you don’t have a cookie scoop, just use your hands—kids love helping with this part. For cleaning, I find silicone mats wipe up way easier than parchment. And if you’re on a budget, you can skip the mixer and use a sturdy wooden spoon (just don’t skimp on the mixing time).
Preparation Method

- Preheat Oven:
Set your oven to 375°F (190°C). Line your baking sheet with parchment paper or a silicone mat. - Cream Butter & Sugars:
In a large bowl, beat together 1/2 cup (113g) unsalted butter, 3/4 cup (192g) creamy peanut butter, 1/2 cup (100g) granulated sugar, and 1/2 cup (110g) brown sugar with an electric mixer until light and fluffy—about 2 minutes. The mixture should look pale and creamy. (If mixing by hand, really get in there until everything is well combined.) - Add Egg & Vanilla:
Mix in 1 large egg and 1 1/2 tsp vanilla extract until fully incorporated. The dough will loosen up and look silky. - Combine Dry Ingredients:
In a separate bowl, whisk together 1 1/2 cups (190g) all-purpose flour, 1 tsp baking soda, 1/2 tsp baking powder, and 1/4 tsp salt. Pour the dry mixture into the wet ingredients and mix on low until just combined. Don’t overmix—stop when the flour streaks disappear. - Shape Dough Balls:
Scoop dough into 1-inch (about 22g) balls (a tablespoon measure works). Roll each ball lightly between your hands. If the dough feels sticky, chill in the fridge for 10 minutes. - Roll in Sugar:
Pour 1/4 cup (50g) granulated sugar into a small bowl. Roll each dough ball in the sugar to coat completely. This gives that signature crackle and sparkle. - Bake:
Place dough balls about 2 inches (5cm) apart on the prepared baking sheet. Bake in preheated oven for 9-11 minutes, or until edges are set and the tops are just beginning to crack. The centers will still look soft—don’t overbake! - Add Chocolate Kiss:
Immediately after baking, press a chocolate kiss gently into the center of each cookie. The cookie will crack around the edges (that’s normal!). - Cool:
Transfer cookies to a wire rack and let cool completely. The chocolate will stay soft for a while, so resist the urge to stack them until fully set.
Troubleshooting: If your cookies spread too much, chill the dough balls for 10-15 minutes before baking. If the dough feels dry, add a tablespoon of milk. If the chocolate kisses melt too much, let cookies cool for 2 minutes before pressing in the kisses.
Personal tip: I like to bake one test cookie first—sometimes oven temps can be sneaky! And if you want extra sparkle, roll the dough in coarse sanding sugar.
Cooking Tips & Techniques
Here are a few pro tricks I’ve learned (sometimes the hard way!) while making peanut butter blossom cookies:
- Don’t Overbake: The cookies should look soft in the center when you take them out. They’ll firm up as they cool. Overbaking is the #1 reason for dry cookies.
- Consistent Size: Use a cookie scoop for even baking. Uneven cookies cook at different rates, and the small ones get crunchy before the big ones are done.
- Chill If Needed: If your peanut butter is extra oily or your kitchen is warm, chilling the dough for 10-15 minutes helps prevent spreading.
- Press Kisses Gently: Push the chocolate kiss into the cookie right after baking, but don’t press too hard—it’ll crack more than you want.
- Batch Baking: Bake one tray at a time for even results. My oven has hot spots, so rotating the pan halfway through baking helps.
- Peanut Butter Choice: Skip natural or oily peanut butter. The cookies won’t hold together as well and can turn out crumbly.
- Personal Lesson: Once, I tried using mini kisses for “bite-size” blossoms. Cute, yes, but the chocolate ratio was off, and my kids were unimpressed. Stick with the classic size!
Timing matters, especially if you’re multitasking. I usually prep the dough while the oven preheats, roll balls as the first batch bakes, and unwrap kisses in between. It’s a rhythm that keeps holiday baking stress-free and fun.
Variations & Adaptations
One of the best things about peanut butter blossom cookies is how versatile they are. Here’s how you can mix things up:
- Dietary Variation: Make them gluten-free by swapping in a 1:1 gluten-free flour blend. I’ve tried Bob’s Red Mill, and the texture stays soft and chewy.
- Seasonal Twist: Use dark chocolate or white chocolate kisses for a different flavor. Around Valentine’s Day, swap in heart-shaped chocolates or colored sprinkles for rolling.
- Flavor Boost: Add 1/4 teaspoon ground cinnamon or espresso powder to the dough for an extra layer of flavor. I’ve done this for adult parties—so good!
- Different Cooking Methods: Try making these as “cookie bars” by pressing the dough into a lined 8×8-inch (20x20cm) pan and baking for 18-20 minutes. Cut into squares and press a kiss into each piece.
- Allergen Substitutions: Use sunflower seed butter for a nut-free version. You’ll need to watch the texture and may want a touch more flour.
My favorite personal variation: swapping half the peanut butter for almond butter and using dark chocolate kisses. It’s a grown-up twist but still totally kid-approved. Don’t be afraid to get creative—these cookies are forgiving!
Serving & Storage Suggestions
For best flavor, serve peanut butter blossom cookies at room temperature. The chocolate will be set but not hard, and the cookie—well, it’s perfectly soft and chewy.
- Presentation: Stack them on a festive platter, or line up in neat rows for a Pinterest-worthy photo. Sprinkle with extra sugar for sparkle.
- Pairings: These cookies go beautifully with a glass of cold milk, hot cocoa, or even a mug of coffee. Add them to a holiday cookie tray with snickerdoodles and chocolate crinkles for variety.
- Storage: Store in an airtight container at room temperature for up to 5 days. If you need to keep them longer, freeze in layers with wax paper between cookies for up to 2 months.
- Reheating: To refresh cookies, microwave for 5-10 seconds—just enough to soften the chocolate slightly and bring out the aroma.
- Flavor Development: The peanut butter flavor deepens after a day or two, so if you can resist, they’re even better the next day!
For gifting, wrap stacks in cellophane bags with a festive ribbon. They travel well and make sweet holiday presents.
Nutritional Information & Benefits
Here’s a quick look at what you get in each peanut butter blossom cookie (estimated for a batch of 36):
- Calories: 110
- Fat: 6g
- Carbohydrates: 13g
- Sugar: 8g
- Protein: 2g
The main health benefit comes from the peanut butter, which adds a little protein and healthy fats. Using dark chocolate kisses can add antioxidants and lower sugar per serving. If you opt for a gluten-free flour blend, these work for celiac diets, and almond butter or sunflower seed butter swaps help with nut allergies.
Personal wellness note: While these are a treat, I love knowing each cookie has a bit of protein and isn’t just empty calories. Always check ingredient labels for potential allergens like peanuts, dairy, or wheat.
Conclusion
So, why try this peanut butter blossom cookies recipe? Because it’s a classic with just the right amount of comfort and nostalgia—plus, it’s fast, easy, and you don’t need fancy ingredients or equipment. You can make these your own with fun twists and substitutions, but the base recipe is truly the best version I’ve tested.
Honestly, these cookies have brought a lot of smiles to my kitchen—whether for holiday gatherings, gifting, or a sweet afternoon treat. I hope they’ll do the same for you. Let me know in the comments how you customized your batch, or share a photo on Pinterest (I love seeing everyone’s creations!).
Happy baking, and may your cookie jar always be full of soft, chewy, chocolate-topped goodness!
FAQs
Can I use natural peanut butter for these cookies?
I don’t recommend it—the oil separates and the cookies turn out crumbly. Stick with classic creamy peanut butter for best results.
How do I stop my cookies from spreading too much?
If your dough is really soft, chill it for 10-15 minutes before rolling and baking. Also, use parchment or silicone mats for even baking.
Can I freeze peanut butter blossom cookies?
Absolutely! Freeze them in layers with wax paper in an airtight container for up to 2 months. Thaw at room temperature before serving.
What kind of chocolate works best?
Hershey’s Kisses are classic, but you can use dark chocolate, white chocolate, or even caramel-filled kisses for a fun twist.
Why do my cookies crack when I press the kiss on top?
That’s totally normal! The crackle is part of their charm. Just press gently and they’ll look perfect.
Pin This Recipe!
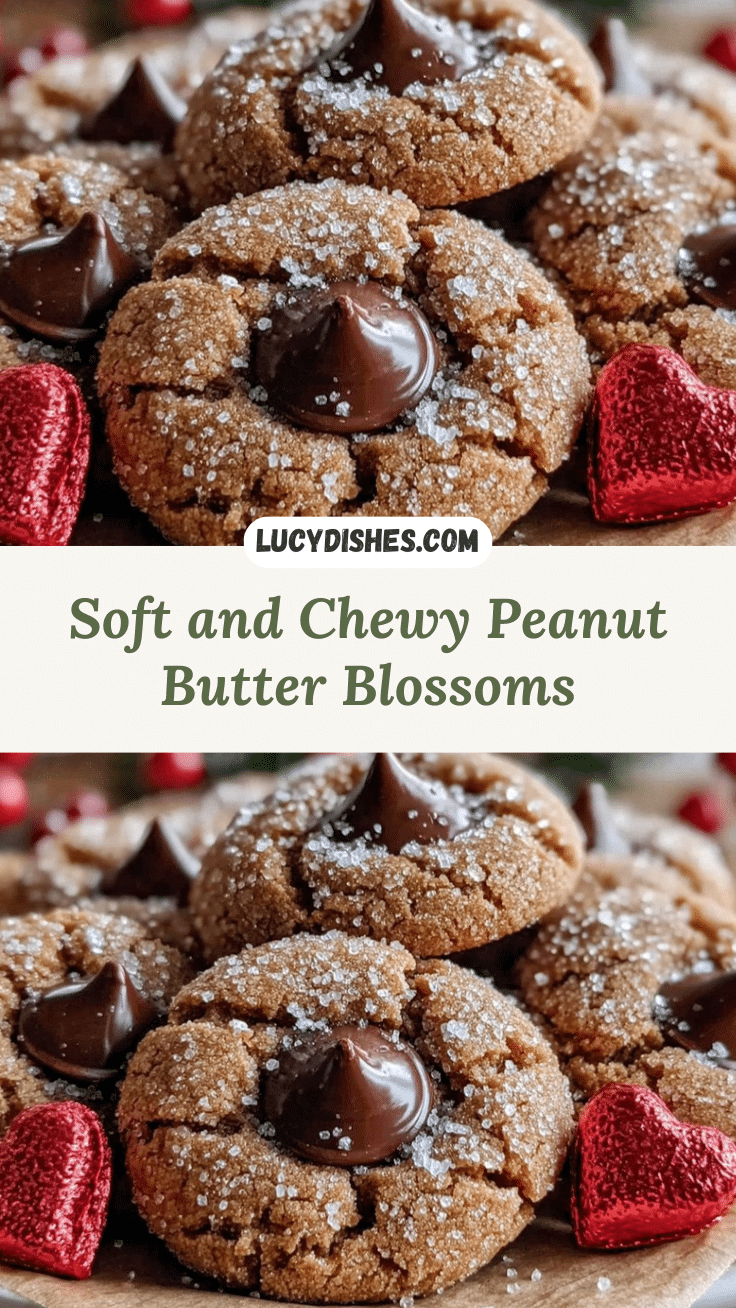
Peanut Butter Blossom Cookies

Soft, chewy peanut butter cookies rolled in sugar and topped with a classic chocolate kiss. These nostalgic holiday treats are quick to make and always a crowd-pleaser.
- Prep Time: 15 minutes
- Cook Time: 10 minutes
- Total Time: 25 minutes
- Yield: 36 cookies 1x
- Category: Dessert
- Cuisine: American
Ingredients
- 1/2 cup (113g) unsalted butter, softened
- 3/4 cup (192g) creamy peanut butter
- 1/2 cup (100g) granulated sugar
- 1/2 cup (110g) packed light brown sugar
- 1 large egg, room temperature
- 1 1/2 cups (190g) all-purpose flour
- 1 tsp baking soda
- 1/2 tsp baking powder
- 1/4 tsp salt
- 1 1/2 tsp pure vanilla extract
- 1/4 cup (50g) granulated sugar (for rolling)
- 36 milk chocolate kisses, unwrapped
Instructions
- Preheat oven to 375°F (190°C). Line a baking sheet with parchment paper or a silicone baking mat.
- In a large bowl, beat together butter, peanut butter, granulated sugar, and brown sugar until light and fluffy (about 2 minutes).
- Mix in the egg and vanilla extract until fully incorporated.
- In a separate bowl, whisk together flour, baking soda, baking powder, and salt.
- Add the dry ingredients to the wet mixture and mix on low until just combined. Do not overmix.
- Scoop dough into 1-inch balls (about 22g each). Roll each ball lightly between your hands.
- Pour 1/4 cup granulated sugar into a small bowl and roll each dough ball in the sugar to coat.
- Place dough balls about 2 inches apart on the prepared baking sheet.
- Bake for 9-11 minutes, until edges are set and tops begin to crack. Centers should still look soft.
- Immediately after baking, press a chocolate kiss gently into the center of each cookie.
- Transfer cookies to a wire rack and let cool completely before stacking or serving.
Notes
For best results, use classic creamy peanut butter (not natural). Chill dough for 10-15 minutes if your kitchen is warm or dough is sticky. Roll in coarse sugar for extra sparkle. Cookies are best served at room temperature and can be frozen for up to 2 months.
Nutrition
- Serving Size: 1 cookie
- Calories: 110
- Sugar: 8
- Sodium: 70
- Fat: 6
- Saturated Fat: 2
- Carbohydrates: 13
- Fiber: 0.5
- Protein: 2
Keywords: peanut butter blossom cookies, holiday cookies, Christmas cookies, chocolate kiss cookies, easy cookie recipe, classic cookies, peanut butter cookies