
“You really brought the best sliders,” my cousin whispered across the kitchen at the last family gathering, eyes bright with surprise. Honestly, I wasn’t expecting much when I tossed together these ham sliders on a whim, mostly because I was scrambling to get something edible on the table after a long day. The recipe started as a bit of a shortcut, a “let’s see if this works” sort of moment with leftover ham and a neglected pack of slider buns sitting on the counter.
The smell of buttery, slightly sweet rolls warming up alongside the tangy glaze—oh, it was like a tiny party happening right there in the oven. People started gathering around the pan, plates in hand, and before I knew it, the sliders were nearly gone, leaving me wondering why I hadn’t made these before. There’s something about a recipe that comes together fast but tastes like you spent hours crafting it, you know?
These sheet pan ham sliders aren’t just a quick fix; they’re that reliable friend who’s always ready to show up and impress without fuss. They’ve stuck around in my rotation because they’re easy enough to whip up on a busy night but fancy enough to make guests feel special. And the best part? They clean up in a snap, which means more time laughing and less time scrubbing.
So yeah, I get a little excited when I pull these out at parties or casual get-togethers. It’s like sharing a little secret that everyone ends up loving. If you’re anything like me—juggling a million things but wanting to keep your hosting game strong—these sliders might just become your new go-to.
Why You’ll Love This Recipe
After making these Easy Crowd-Pleasing Sheet Pan Ham Sliders multiple times (sometimes twice in a week, honestly), I’ve learned why they’re such a hit:
- Quick & Easy: Ready in under 30 minutes, perfect for last-minute parties or casual snacks.
- Simple Ingredients: Uses everyday items like ham, slider buns, cheese, and a simple glaze—no specialty store runs needed.
- Perfect for Parties: Ideal finger food for game days, potlucks, or any gathering where you want to feed a crowd effortlessly.
- Crowd-Pleaser: Kids and adults alike can’t get enough of these—always requests for seconds!
- Unbelievably Delicious: The combo of sweet, tangy glaze and melty cheese over tender ham on soft buns hits all the right comfort food notes.
What sets this recipe apart? It’s all about the sheet pan method—everything bakes together, which means the flavors meld perfectly without constant babysitting. Plus, the glaze is a little secret I tweak each time, balancing sweet and savory just right. I’ve tried versions with Dijon mustard, a hint of garlic powder, and even a dash of cayenne for heat, depending on the crowd.
Honestly, this isn’t just another ham slider recipe—it’s the one I trust when I want fuss-free, tasty results that impress. It’s the kind of snack that makes you close your eyes and smile after the first bite, whether you’re hosting or just hungry for something satisfying.
What Ingredients You Will Need
This recipe uses simple, wholesome ingredients to deliver bold flavor and satisfying texture without the fuss. Most are pantry staples, and you can easily swap a few items based on what you have or dietary needs.
- Slider buns (12 count, soft dinner rolls work best for that pillowy texture)
- Deli ham (about 1 pound thinly sliced—go for quality ham from the deli counter for best flavor)
- Swiss cheese slices (12 slices, or substitute with provolone or cheddar if preferred)
- Unsalted butter (1/2 cup or 1 stick, melted; adds richness and helps the glaze soak in)
- Dijon mustard (2 tablespoons; provides a gentle tang and depth)
- Honey (2 tablespoons; balances the mustard with a touch of sweetness)
- Worcestershire sauce (1 teaspoon, optional but recommended for savory umami notes)
- Garlic powder (1/2 teaspoon; subtle warmth and flavor)
- Poppy seeds (1 tablespoon; classic slider topping that adds a slight crunch and visual appeal)
- Black pepper (freshly ground, to taste)
Pro tip: I recommend checking the slider buns for freshness; if they’re a day old, they soak up the glaze even better without falling apart. Also, if you want a gluten-free option, there are great slider buns available at most grocery stores now.
For a dairy-free twist, swap the butter with a plant-based alternative and use dairy-free cheese slices. The glaze still works beautifully!
Equipment Needed
- Sheet pan: A standard 9×13 inch pan is perfect for holding the sliders snugly; it allows even baking and easy cleanup.
- Basting brush: To spread the glaze evenly over the sliders without making a mess.
- Mixing bowl: For combining the glaze ingredients quickly.
- Sharp knife: To slice the slider buns cleanly if you want to separate them before assembling.
- Aluminum foil: Optional, but covering the pan helps the cheese melt perfectly without drying out the buns.
If you don’t have a basting brush, a spoon works fine to drizzle the glaze, though I find the brush helps control how much you apply. For budget-friendly options, a simple rimmed baking sheet can substitute if a 9×13 pan isn’t handy; just arrange the sliders a bit closer.
Preparation Method
- Preheat your oven to 350°F (175°C). This temperature gently warms the sliders through and melts the cheese without drying the buns.
- Prepare the sliders: Slice the slider buns horizontally in half if not pre-sliced. Arrange the bottom halves snugly on the sheet pan.
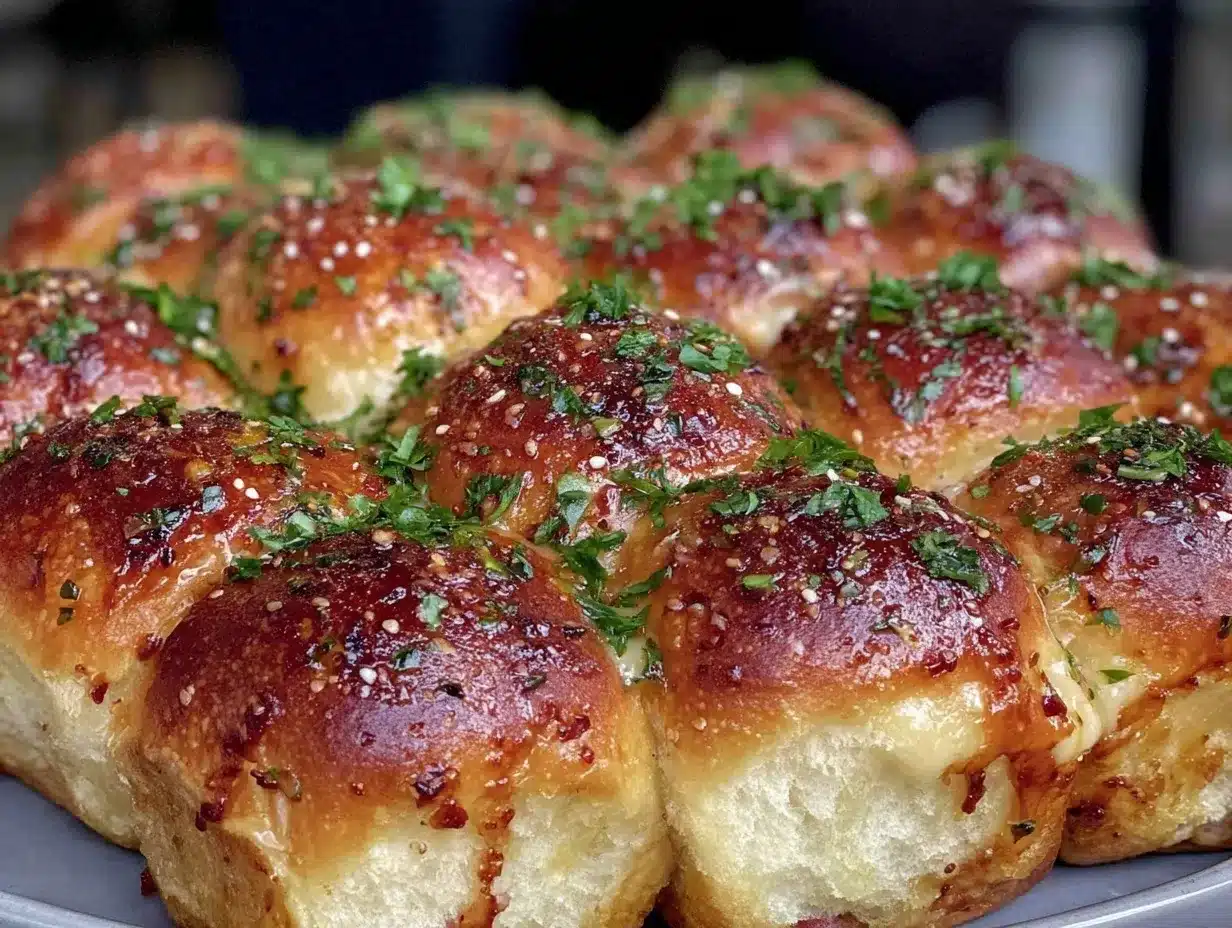
- Add ham and cheese: Layer the deli ham evenly over the bottom buns, then top each with a slice of Swiss cheese. The cheese melts beautifully and binds the ham to the bun.
- Top with buns: Place the top halves of the slider buns over the ham and cheese layers, pressing down gently to compact them slightly.
- Mix the glaze: In a mixing bowl, combine melted butter, Dijon mustard, honey, Worcestershire sauce, garlic powder, poppy seeds, and a pinch of black pepper. Whisk until smooth and well blended.
- Brush the glaze: Generously spread the glaze over the tops of the buns. This step is crucial as it delivers flavor and helps the buns brown nicely.
- Cover with foil: Tent the sheet pan loosely with aluminum foil. This keeps the sliders moist while the cheese melts.
- Bake: Place the pan in the oven and bake for 15 minutes. Then remove the foil and bake for an additional 5-7 minutes until the tops are golden and slightly crisp.
- Serve warm: Use a sharp knife to cut the sliders apart if they’re still connected. Serve immediately for best texture and flavor.
Tip: If you notice the buns getting too dark before the cheese melts, lower the oven temperature slightly or keep the foil on a bit longer. The sliders should smell fragrant and look bubbly when done.
Cooking Tips & Techniques
One thing I’ve learned is not to rush the melting process—those 15 minutes under foil make all the difference in getting gooey cheese and tender ham without drying out the buns. Also, pressing the slider buns gently after assembling helps everything stay together without squashing the bread.
Watch your glaze closely! Too much butter can make the sliders soggy, but too little leaves them dry. I usually stick to the amount in the recipe and brush on a thin, even coat for that perfect balance.
For neat slicing, wait a couple of minutes after baking to let everything set slightly; otherwise, the cheese might ooze too much. I’ve had guests try to grab sliders fresh out of the oven and burn their fingers, so a little patience goes a long way.
Multitasking tip: While the sliders bake, prepare a simple side like a fresh salad or quick chips—something like the Mediterranean chickpea salad adds a fresh, healthy contrast to these rich snacks.
Variations & Adaptations
If you want to switch things up, here are a few ways I’ve customized these ham sliders:
- Spicy Kick: Add a thin spread of Sriracha mayo inside the buns before layering the ham for a subtle heat.
- Different Cheese: Swap Swiss for pepper jack or smoked gouda for a smoky, melty twist.
- Vegetarian Version: Replace ham with grilled portobello mushrooms or roasted vegetables and use vegan cheese for an easy plant-based option.
- Seasonal Toppings: In fall, I like tossing in thin slices of apple or pear to add sweetness and crunch.
For an alternative cooking method, these sliders work well in an air fryer at 320°F (160°C) for about 12 minutes, though you’ll need to cover loosely with foil to prevent drying. I’ve also made a batch in a slow cooker, layering everything and cooking on low for 2 hours—great for hands-off party prep.
Serving & Storage Suggestions
Serve these ham sliders warm for that gooey, melty experience. They’re perfect finger foods, so no need for plates if you’re hosting a casual party. Pair with crunchy pickles, chips, or a simple vegetable platter for a balanced snack spread.
If you want to set up ahead, assemble the sliders on the sheet pan, cover tightly with plastic wrap, and refrigerate for up to 8 hours before baking. This makes party prep a breeze.
Leftovers keep well in the fridge for 2-3 days in an airtight container. To reheat, cover with foil and warm in a 325°F (160°C) oven for 10-15 minutes to revive that fresh-baked feel without drying out.
The flavors deepen slightly after resting, so sometimes I actually prefer making them a few hours in advance when time allows. Just don’t skip the reheating step—cold sliders lose their magic!
Nutritional Information & Benefits
Each slider contains approximately 220 calories, 12 grams of fat, 18 grams of carbohydrates, and 10 grams of protein, making it a satisfying snack or appetizer. The ham provides a good source of protein and essential minerals like zinc and iron.
The use of Swiss cheese offers calcium and vitamin B12, while the Dijon mustard and honey glaze adds flavor with minimal added sugars. For those watching sodium intake, choosing low-sodium deli ham can reduce salt levels without sacrificing taste.
This recipe can fit into various diets with simple swaps, such as gluten-free buns or dairy-free cheese, making it accessible for many guests. It’s a comfort food that doesn’t feel heavy or overdone, so it’s easy to enjoy without guilt.
Conclusion
This Easy Crowd-Pleasing Sheet Pan Ham Sliders recipe is a keeper because it hits that sweet spot between fuss-free prep and big flavor impact. Whether you’re throwing a casual party or just want a quick snack that feels special, these sliders deliver every time.
Feel free to tweak the glaze or cheese to suit your taste, or try one of the variations to keep things fun. I love how these bring people together—there’s something about sharing warm, melty sliders that just sparks good conversation and smiles.
Give them a try at your next gathering—you might find yourself making them way more often than you expected. And hey, if you’re ever in need of another crowd-friendly dish, you might enjoy the creamy, cheesy comfort of cheesy loaded baked rigatoni with Italian sausage. It’s another recipe that’s all about easy prep and big flavor.
FAQs
Can I make these sliders ahead of time?
Yes! Assemble the sliders on the sheet pan, cover tightly with plastic wrap, and refrigerate for up to 8 hours before baking. Bake as directed when ready to serve.
What can I substitute for Swiss cheese?
Provolone, cheddar, or pepper jack all work great depending on your flavor preference. For a smoky twist, try smoked gouda.
Can I use pre-sliced ham or leftover ham?
Absolutely. Deli-sliced ham is convenient and works perfectly, but leftover cooked ham can be chopped or sliced thinly and used as well.
How do I keep the sliders from getting soggy?
Don’t over-glaze the buns with butter mixture—use a thin, even layer. Also, covering the pan with foil during baking helps retain moisture without drying out the bread.
Are these sliders freezer-friendly?
Yes. You can freeze assembled sliders before baking by wrapping the pan tightly in foil and plastic wrap. Bake from frozen, adding extra baking time as needed.
Pin This Recipe!

Easy Crowd-Pleasing Sheet Pan Ham Sliders

These sheet pan ham sliders are quick, easy, and perfect for parties or casual snacks. They combine tender ham, melty cheese, and a sweet-tangy glaze on soft slider buns for a crowd-pleasing treat.
- Prep Time: 10 minutes
- Cook Time: 22 minutes
- Total Time: 32 minutes
- Yield: 12 sliders 1x
- Category: Appetizer
- Cuisine: American
Ingredients
- 12 slider buns (soft dinner rolls)
- 1 pound deli ham, thinly sliced
- 12 slices Swiss cheese (or provolone, cheddar)
- 1/2 cup unsalted butter, melted
- 2 tablespoons Dijon mustard
- 2 tablespoons honey
- 1 teaspoon Worcestershire sauce (optional)
- 1/2 teaspoon garlic powder
- 1 tablespoon poppy seeds
- Freshly ground black pepper, to taste
Instructions
- Preheat your oven to 350°F (175°C).
- Slice the slider buns horizontally in half if not pre-sliced. Arrange the bottom halves snugly on a 9×13 inch sheet pan.
- Layer the deli ham evenly over the bottom buns, then top each with a slice of Swiss cheese.
- Place the top halves of the slider buns over the ham and cheese layers, pressing down gently to compact them slightly.
- In a mixing bowl, combine melted butter, Dijon mustard, honey, Worcestershire sauce, garlic powder, poppy seeds, and a pinch of black pepper. Whisk until smooth and well blended.
- Generously brush the glaze over the tops of the buns.
- Tent the sheet pan loosely with aluminum foil to keep the sliders moist while the cheese melts.
- Bake for 15 minutes, then remove the foil and bake for an additional 5-7 minutes until the tops are golden and slightly crisp.
- Use a sharp knife to cut the sliders apart if they’re still connected. Serve warm immediately.
Notes
Check slider buns for freshness; day-old buns soak up glaze better without falling apart. For gluten-free, use gluten-free slider buns. For dairy-free, substitute butter and cheese with plant-based alternatives. Avoid over-glazing to prevent sogginess. Let sliders rest a few minutes after baking for easier slicing.
Nutrition
- Serving Size: 1 slider
- Calories: 220
- Fat: 12
- Carbohydrates: 18
- Protein: 10
Keywords: ham sliders, sheet pan sliders, party snacks, easy appetizers, crowd-pleaser, quick recipe