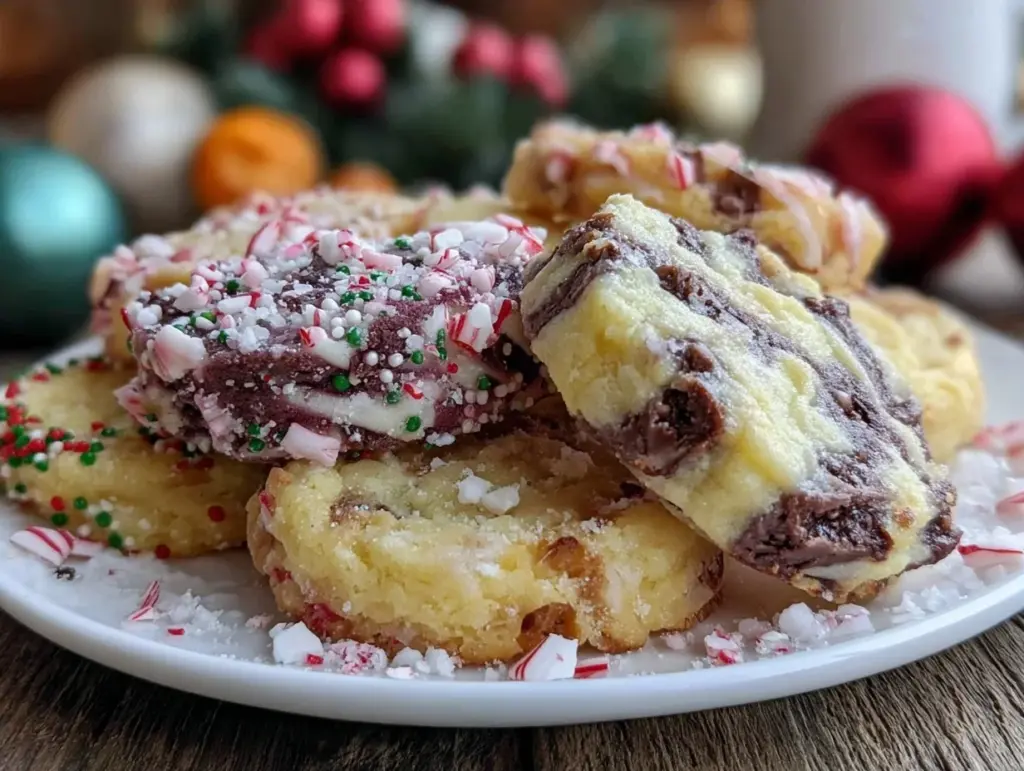
The sweet, buttery aroma of Christmas slice & bake cookies swirling through my kitchen is pure holiday magic. You know that feeling when the oven timer dings and you catch a whiff of vanilla and sugar mingling with the cozy scent of winter spices? It’s the kind of moment you want to bottle up and save for a rainy day—or, let’s be honest, for every day leading up to Christmas. The first time I made these cookies, I was knee-high to a grasshopper, standing on a rickety stool next to my grandma as she sliced perfect rounds from a log of dough flecked with festive sprinkles. I was instantly hooked by the simplicity and the promise of endless flavor combinations.
Honestly, when I think back to that first batch, it’s the memory of those colorful cookie boxes—packed tight with neat stacks of slice & bake cookies—that makes me smile. There’s something so satisfying about seeing your handiwork nestled among other treats at a holiday potluck, especially when the cookies disappear faster than you can say “Merry Christmas!” My family couldn’t stop sneaking them off the cooling rack (and I can’t really blame them). These cookies are dangerously easy, and they deliver pure, nostalgic comfort in every bite.
Perfect for potlucks, sweet treat exchanges, or just to brighten up your Pinterest cookie board, these Christmas slice & bake cookies are a holiday staple. I wish I’d discovered the versatility of this recipe years ago—seriously, you’ll want to keep a log in your freezer all season long. After testing this recipe more times than I care to admit (in the name of research, of course), I can say it’s become the go-to for family gatherings and gifting. It feels like a warm hug, and you’re going to want to bookmark this one for every festive occasion.
Why You’ll Love This Recipe
If you’ve ever tried to whip up a batch of holiday cookies at the last minute, you know the struggle is real. These Christmas slice & bake cookies solve all those problems with a recipe that’s been tested, tweaked, and polished until it’s foolproof. Here’s why you’ll be making them on repeat—trust me, I’ve been baking these for years, and they’re always a hit:
- Quick & Easy: Comes together in under 15 minutes of prep time, plus chilling—perfect for busy weeknights or spontaneous cookie cravings.
- Simple Ingredients: No fancy grocery trips needed; you probably already have everything in your kitchen pantry.
- Perfect for Holiday Cookie Boxes: These cookies slice up into perfectly uniform rounds, making them ideal for gifting, party platters, or sharing with neighbors.
- Crowd-Pleaser: Kids love the fun colors, adults love the buttery melt-in-your-mouth texture. There’s never a crumb left.
- Unbelievably Delicious: Crispy edges, tender centers, and bursts of vanilla—plus the crunch of festive sprinkles. It’s next-level comfort in every bite.
What sets this recipe apart? First, the dough base is just right—not too sweet, not too rich—so your mix-ins and decorations shine. Unlike other slice & bake cookies, the texture holds up beautifully for days (thanks to a hint of cornstarch and a trick I learned from a pastry chef friend). You can roll the dough in colored sugar, dip the edges in chocolate, or layer in citrus zest for a creative twist. It’s not just another Christmas cookie—it’s the one you’ll want in your box every year.
And honestly, there’s something magical about closing your eyes after that first bite. It’s a festive tradition that’s healthier and faster than most, but with the same soul-soothing satisfaction. Perfect for impressing guests without stress, or just turning a simple afternoon into something memorable. If you’re looking for a showstopper that still feels homey, Christmas slice & bake cookies are your ticket.
What Ingredients You Will Need
This recipe uses simple, wholesome ingredients to deliver bold flavor and satisfyingly tender texture without the fuss. Most are pantry staples, and I love that you can mix and match depending on what you have. Here’s what you’ll need for these Christmas slice & bake cookies:
- For the Dough:
- Unsalted butter, softened (1 cup / 226g) – brings richness and helps the cookies hold their shape
- Granulated sugar (3/4 cup / 150g) – sweetens just right, not overpowering
- Large egg (1, room temperature) – binds everything together
- Pure vanilla extract (2 tsp / 10ml) – don’t skimp, it makes a difference
- All-purpose flour (2 1/4 cups / 280g) – gives the cookies structure
- Cornstarch (2 tbsp / 16g) – for a delicate, meltaway texture (optional, but recommended)
- Fine sea salt (1/2 tsp / 3g) – balances the sweetness and enhances the flavor
- For Festive Mix-Ins:
- Red and green sprinkles (1/3 cup / 50g) – classic, but use what you like
- Mini chocolate chips (1/4 cup / 40g) – optional, for extra decadence
- Finely grated orange zest (1 tbsp / 6g) – for a citrusy twist (if you want to feel fancy)
- For Decorating:
- Colored sanding sugar (for rolling the edges, about 1/4 cup / 50g)
- Melted white or dark chocolate (for dipping, optional)
- Crushed candy canes or edible glitter (for topping, optional)
Ingredient selection tips: I recommend using European-style butter for richer flavor, but honestly, any unsalted butter works wonders. For flour, King Arthur or Bob’s Red Mill are my go-tos for consistent texture. If you need a gluten-free version, swap the all-purpose flour with a 1:1 baking blend (make sure it’s a trusted brand). Dairy-free? Substitute the butter with a plant-based stick—Earth Balance is reliable. For mix-ins, go wild; chopped dried cranberries, pistachios, or rainbow sprinkles all work. And if you’re feeling adventurous, a pinch of cinnamon or nutmeg never hurts.
In summer, you can swap in lemon zest and blue sprinkles for a fresh twist. When I’m baking for little ones, I skip the nuts and double the chocolate chips. Whatever you choose, these Christmas slice & bake cookies are forgiving and flex to fit your pantry—just don’t forget the holiday spirit!
Equipment Needed
One of the things I love about Christmas slice & bake cookies is how little equipment you actually need. Even if your kitchen isn’t stocked like a bakery, you can pull these together with the basics. Here’s what you’ll need:
- Electric mixer: Stand mixer or hand mixer (either works, but a stand mixer saves your arm!)
- Mixing bowls: At least two—one for dry, one for wet ingredients
- Measuring cups and spoons: Accuracy matters, especially for baking
- Plastic wrap or parchment paper: For rolling and chilling the dough logs
- Sharp knife: For slicing neat rounds (serrated works best for mix-ins)
- Baking sheets: Standard rimmed sheets—line with parchment for easy cleanup
- Wire cooling rack: To cool cookies evenly
If you don’t have a stand mixer, a hand mixer and a sturdy spatula do the job just fine (I used to mix dough by hand, but let’s face it, my arms aren’t what they used to be). For slicing, a thin, sharp chef’s knife gives the cleanest rounds—if you’re using lots of chocolate chips or nuts, a serrated bread knife helps avoid squishing. Maintenance tip: Always wash your mixer attachments and knives right after use to prevent dough from hardening.
Budget-friendly option? Dollar store mixing bowls and a simple hand whisk work in a pinch. I’ve even shaped and wrapped dough with a clean towel instead of plastic wrap when I ran out—resourceful baking is part of the fun!
Preparation Method

Step-by-Step Instructions for Christmas Slice & Bake Cookies
- Cream the butter and sugar: In a large mixing bowl, beat 1 cup (226g) unsalted butter with 3/4 cup (150g) granulated sugar using an electric mixer on medium speed for 2-3 minutes until light and fluffy. The mixture should look pale and creamy—if it’s grainy, keep mixing.
- Add egg and vanilla: Crack in 1 large egg (room temperature) and pour in 2 tsp (10ml) vanilla extract. Beat for another 1 minute until fully combined. Tip: Scrape down the sides of the bowl so everything mixes evenly.
- Combine dry ingredients: In a separate bowl, whisk together 2 1/4 cups (280g) all-purpose flour, 2 tbsp (16g) cornstarch, and 1/2 tsp (3g) fine sea salt. Gradually add to the wet mixture, beating on low speed until just incorporated. Warning: Don’t overmix—stop as soon as the flour disappears.
- Mix in festive add-ins: Fold in 1/3 cup (50g) red and green sprinkles, 1/4 cup (40g) mini chocolate chips, and 1 tbsp (6g) orange zest if using. The dough will feel soft but sturdy.
- Shape and chill the dough: Divide dough in half. Place each half on a sheet of plastic wrap or parchment paper. Roll into a log about 10 inches (25cm) long and 2 inches (5cm) thick. Wrap tightly and chill in the refrigerator for at least 2 hours (or up to 3 days). Tip: For sharper edges, gently reshape the logs after 30 minutes of chilling.
- Preheat oven and prepare pans: When ready to bake, preheat oven to 350°F (180°C). Line baking sheets with parchment paper.
- Slice the dough: Using a sharp knife, slice chilled dough into 1/4-inch (6mm) thick rounds. If the dough crumbles, let it sit at room temperature for 5 minutes to soften slightly.
- Decorate (optional): Roll edges of each slice in colored sanding sugar or dip halfway into melted chocolate, then sprinkle with crushed candy canes or edible glitter.
- Bake: Arrange cookies at least 1 inch (2.5cm) apart on prepared sheets. Bake for 10-12 minutes until edges are set and just starting to turn golden. The centers will look pale—don’t overbake!
- Cool: Let cookies cool on the pan for 2 minutes before transferring to a wire rack. They’ll firm up as they cool.
Troubleshooting: If your dough feels too sticky to slice, chill it longer. If slices spread too much, your butter may have been too soft—next time, chill the logs overnight. Sensory cues: The cookies should smell buttery and sweet, and the edges will be just barely golden. Efficiency tip: Make double batches and freeze extra logs for spontaneous baking all season!
Cooking Tips & Techniques
There’s an art to getting Christmas slice & bake cookies just right, and I’ve had my share of kitchen mishaps along the way. Here’s what I’ve learned—so you don’t end up with a tray of sad, wonky cookies:
- Chill thoroughly: Don’t rush the chilling step. Cold dough ensures perfect slices and prevents spreading. If you’re impatient (I get it!), pop the logs in the freezer for 45 minutes instead.
- Sharp knife matters: Slicing with a dull knife will squish your cookies, especially if you’ve loaded up on mix-ins. Always use a freshly sharpened blade or a serrated knife for clean cuts.
- Keep cookies uniform: Even thickness means even baking. I once ended up with half-burned, half-underbaked cookies because I got sloppy. Eyeballing is fine, but a ruler helps if you want Pinterest-perfect rounds.
- Fixing sticky dough: If the dough gets too soft, toss it back into the fridge for 15 minutes. Soft dough is a recipe for disaster (ask me how I know!).
- Batch baking: If you’re making multiple logs, stagger your baking sheets so one is cooling while the next is baking. Saves time and keeps your workflow moving.
- Multitasking: Prep your decorations while the dough chills—set up bowls of sanding sugar, melted chocolate, and sprinkles so you can decorate as soon as the cookies are sliced.
- Consistency tip: If you want every batch to taste the same, weigh your ingredients instead of measuring by cups. It’s the baker’s secret to success.
Honestly, my biggest failures came from rushing—either skipping the chilling or overbaking. Don’t be afraid to peek at the cookies a minute before the timer dings. If you’re new to slice & bake cookies, start with a simple log and add more mix-ins as you get comfortable. These tips will help guarantee every batch is holiday-ready!
Variations & Adaptations
One of the joys of Christmas slice & bake cookies is how easily you can make them your own. Over the years, I’ve tried all sorts of tweaks—some successful, some not so much (let’s just say rosemary and chocolate aren’t a match made in cookie heaven). Here are my favorite variations:
- Gluten-Free: Swap the all-purpose flour for a 1:1 gluten-free blend (Bob’s Red Mill or King Arthur). The texture stays remarkably close to the original.
- Vegan: Use a plant-based butter and replace the egg with a “flax egg” (1 tbsp ground flax + 2.5 tbsp water, mixed and set for 5 minutes). Still slices beautifully and bakes up tender.
- Low-Sugar: Reduce granulated sugar to 1/2 cup (100g) and add 1/4 cup (60ml) pure maple syrup for a subtle twist. I’ve tried this for my dad, and he loves the hint of caramel.
- Seasonal Flavor: For autumn, mix in 1 tsp ground cinnamon and 1/4 cup chopped pecans. For spring, swap sprinkles for pastel colors and add lemon zest.
- Chocolate Lovers: Add 2 tbsp unsweetened cocoa powder to the flour and double the chocolate chips. Dip finished cookies in dark chocolate for extra indulgence.
- Nut-Free: Simply skip any nuts, and use allergy-safe sprinkles. My nephew is allergic to tree nuts, so I stick with classic rainbow or chocolate chips.
My personal favorite? Pistachio and cranberry, rolled in orange sugar—festive, colorful, and a little grown-up. You can bake the logs in a mini loaf pan for square cookies or shape into stars for something different. There’s no wrong way to adapt these cookies, so let your creativity shine!
Serving & Storage Suggestions
Serve Christmas slice & bake cookies at room temperature for the best flavor and texture—crisp edges, soft centers, and all those pretty decorations pop. I love stacking them in clear glass jars or arranging them in colorful paper liners for cookie boxes. They look gorgeous on a festive platter, especially alongside hot cocoa or mulled wine.
Pair these cookies with other holiday classics like gingerbread, shortbread, or spiced nuts for a complete cookie box. They also go well with fruity teas or creamy eggnog (my personal favorite!).
For storage, keep cookies in an airtight container at room temperature for up to 1 week. If you want to make ahead, store dough logs in the fridge for up to 3 days or freeze for 2 months—just slice and bake as needed. Reheat baked cookies in a 300°F (150°C) oven for 2-3 minutes to refresh that just-baked taste. Flavors deepen if you let the cookies rest a day after baking, so don’t be afraid to prep early. Pro tip: Layer parchment between cookies to keep decorations intact!
Nutritional Information & Benefits
Here’s the scoop on the nutritional profile for these Christmas slice & bake cookies. Each cookie (based on a batch of 36) contains approximately:
| Calories | Fat | Carbs | Protein | Sugar |
|---|---|---|---|---|
| 95 | 5g | 12g | 1g | 6g |
Key health benefits: Butter and eggs offer vitamin A and D, while festive mix-ins like cranberries or pistachios add antioxidants and healthy fats. Using whole-grain or gluten-free flour boosts fiber. These cookies can be adapted for low-carb or vegan diets, making them accessible for most holiday guests.
Potential allergens: Contains wheat (gluten), egg, and dairy. Always check your mix-ins for hidden allergens. My personal wellness tip—enjoy in moderation and savor every bite. Cookies are meant for celebration, after all!
Conclusion
Christmas slice & bake cookies are more than just a festive treat—they’re a little slice of holiday joy. They’re easy, versatile, and packed with buttery flavor and cheerful color. Whether you’re filling cookie boxes, impressing friends, or simply treating yourself, this recipe is worth trying for the memories alone.
Don’t be afraid to tweak the flavors, switch up the decorations, or try new mix-ins. That’s half the fun! I love this recipe because it brings people together—every batch feels like a celebration. So, go ahead and bake, share, and make them your own.
If you try these cookies, leave a comment below, share your favorite adaptation, or tag me on social media. I can’t wait to see how these Christmas slice & bake cookies brighten up your holiday season. Wishing you lots of sweet moments and even sweeter cookies!
FAQs
How far in advance can I make Christmas slice & bake cookies?
You can make the dough logs up to 2 months ahead and freeze them. Just slice and bake straight from the freezer (add 1-2 minutes to baking time).
Can I use gluten-free flour in this recipe?
Absolutely! Use a 1:1 gluten-free baking blend for best results—texture stays soft and tender.
Why are my cookies spreading too much?
Usually, the dough wasn’t chilled enough. Make sure your logs are very cold before slicing and baking for neat rounds.
How can I make these cookies nut-free?
Just skip any nuts and use allergy-safe decorations like colored sugar or chocolate chips. The recipe works perfectly without nuts.
Can I decorate these cookies after baking?
Yes! Dip cooled cookies in melted chocolate or glaze, then sprinkle with candy or edible glitter for extra festive flair.
Pin This Recipe!

Christmas Slice & Bake Cookies: Easy Festive Recipe for Holiday Cookie Boxes

These Christmas slice & bake cookies are buttery, tender, and packed with festive sprinkles. Perfect for holiday cookie boxes, potlucks, or gifting, they come together quickly and can be customized with your favorite mix-ins and decorations.
- Prep Time: 15 minutes
- Cook Time: 10-12 minutes
- Total Time: 2 hours 30 minutes (including chilling)
- Yield: 36 cookies 1x
- Category: Dessert
- Cuisine: American
Ingredients
- 1 cup unsalted butter, softened
- 3/4 cup granulated sugar
- 1 large egg, room temperature
- 2 teaspoons pure vanilla extract
- 2 1/4 cups all-purpose flour
- 2 tablespoons cornstarch (optional, but recommended)
- 1/2 teaspoon fine sea salt
- 1/3 cup red and green sprinkles
- 1/4 cup mini chocolate chips (optional)
- 1 tablespoon finely grated orange zest (optional)
- 1/4 cup colored sanding sugar (for rolling edges, optional)
- Melted white or dark chocolate (for dipping, optional)
- Crushed candy canes or edible glitter (for topping, optional)
Instructions
- In a large mixing bowl, beat unsalted butter and granulated sugar with an electric mixer on medium speed for 2-3 minutes until light and fluffy.
- Add the egg and vanilla extract; beat for another minute until fully combined. Scrape down the sides of the bowl as needed.
- In a separate bowl, whisk together flour, cornstarch, and salt. Gradually add to the wet mixture, beating on low speed until just incorporated. Do not overmix.
- Fold in sprinkles, mini chocolate chips, and orange zest if using.
- Divide dough in half. Place each half on plastic wrap or parchment paper and roll into a log about 10 inches long and 2 inches thick. Wrap tightly and chill in the refrigerator for at least 2 hours (or up to 3 days).
- Preheat oven to 350°F. Line baking sheets with parchment paper.
- Slice chilled dough into 1/4-inch thick rounds. If dough crumbles, let it sit at room temperature for 5 minutes.
- Roll edges of each slice in colored sanding sugar or dip halfway into melted chocolate, then sprinkle with crushed candy canes or edible glitter, if desired.
- Arrange cookies at least 1 inch apart on prepared sheets. Bake for 10-12 minutes until edges are set and just starting to turn golden.
- Let cookies cool on the pan for 2 minutes before transferring to a wire rack to cool completely.
Notes
Chill dough thoroughly for best results. Use a sharp knife for clean slices, especially with mix-ins. Dough logs can be frozen for up to 2 months; slice and bake straight from the freezer, adding 1-2 minutes to baking time. For gluten-free, use a 1:1 baking blend. For vegan, substitute butter and use a flax egg. Decorate cookies before or after baking for extra festive flair.
Nutrition
- Serving Size: 1 cookie
- Calories: 95
- Sugar: 6
- Sodium: 40
- Fat: 5
- Saturated Fat: 3
- Carbohydrates: 12
- Protein: 1
Keywords: Christmas cookies, slice and bake, holiday cookies, festive cookies, cookie box, easy cookies, butter cookies, sprinkles, make ahead, gifting