Introduction
Let me just say, the sweet scent of vanilla and almond wafting from my kitchen as these Candy Cane Cookies bake is the kind of holiday magic that makes you want to stop everything and savor the moment. The first time I shaped those red and white ropes into candy canes, I felt like a kid again, completely swept up in the Christmas spirit. You know that feeling when you’re knee-high to a grasshopper and the world is filled with twinkling lights and the promise of treats? That’s exactly what these cookies bring to the table.
I stumbled upon this festive recipe years ago when I was trying to recreate the classic cookies my grandma used to make for our Christmas Eve gatherings. Honestly, I wish I’d found this one sooner—it’s dangerously easy, with just the right amount of nostalgia and cheer packed into every bite. My family couldn’t stop sneaking them off the cooling rack (and I can’t really blame them). It’s the kind of moment where you pause, take a deep breath, and just smile because you know you’re onto something truly special.
Every year, these Candy Cane Cookies become the centerpiece of our holiday baking lineup. They’re perfect for potlucks, holiday cookie exchanges, or just brightening up your Pinterest board with their playful shapes and colors. I’ve tested and tweaked this recipe more times than I can count—in the name of research, of course—and it’s become our go-to for gifting, sharing, and celebrating. Honestly, it feels like a warm hug on a cold winter day. If you love festive holiday sweets, you’re going to want to bookmark this one.
Why You’ll Love This Candy Cane Cookies Recipe
After baking more batches of these Christmas treats than I care to admit, I can promise you this Candy Cane Cookies recipe is a keeper. There’s something about the cheerful stripes and buttery almond flavor that puts everyone in a good mood. Here’s why these cookies are destined to become a new holiday favorite in your home:
- Quick & Easy: These cookies come together in about 40 minutes—perfect for busy holiday schedules or last-minute baking cravings.
- Simple Ingredients: No fancy grocery runs required. You probably have everything you need in your pantry right now.
- Perfect for Christmas Parties: They’re a hit at cookie exchanges, school events, and cozy nights in with family.
- Crowd-Pleaser: Kids and adults alike can’t resist the fun candy cane shapes and buttery taste.
- Unbelievably Delicious: The combo of vanilla and almond extracts gives these cookies a next-level festive flavor.
What really sets this recipe apart is the shaping technique. You twist together red and white dough ropes for that classic candy cane look—no cookie cutters needed! The dough is easy to work with, and the colors hold up beautifully, so you can get creative with your presentation. I’ve tried a bunch of recipes, but this one always comes out with the perfect balance of tenderness and snap.
And let’s be honest, nothing says “holiday baking” quite like the aroma of butter, sugar, and almond drifting through the house. These cookies aren’t just good—they’re the kind that make you close your eyes after the first bite. They’re comfort food, but a little fancier, and still super approachable. Whether you want to impress guests or just enjoy a few moments of Christmas cheer, this recipe delivers every time.
What Ingredients You Will Need
This recipe uses a handful of classic ingredients to create bold flavor and festive color without a lot of fuss. Most are pantry staples, and there’s room for a few easy swaps if you need them.
- For the Dough:
- 1 cup (226g) unsalted butter, softened (adds richness and helps with tender texture)
- 1 cup (200g) granulated sugar (for sweetness and structure)
- 1 large egg, room temperature (binds everything together)
- 1 1/2 teaspoons vanilla extract (pure vanilla flavor—use a good quality, trust me)
- 1/2 teaspoon almond extract (don’t skip this! It gives that classic candy cane vibe)
- 2 1/2 cups (315g) all-purpose flour (I recommend King Arthur for best results)
- 1/4 teaspoon salt (balances the sweetness)
- For Coloring & Shaping:
- Red gel food coloring (Wilton or AmeriColor work great for vibrant color)
- Extra flour, for dusting (helps with shaping the ropes)
- Optional Topping:
- Crushed peppermint candies or candy canes (for extra crunch and festive look)
- Granulated sugar, for sprinkling (adds sparkle)
If you need to swap out ingredients, here are a few tried-and-true options:
- Use vegan butter and a flaxseed egg for a dairy-free, egg-free version (texture will be a bit softer, but still delicious)
- Substitute gluten-free all-purpose flour—Bob’s Red Mill 1-to-1 works well
- For nut allergies, skip the almond extract and double the vanilla
In summer, you might swap in pastel colors for a different vibe, or use natural food coloring if you prefer. The dough is pretty forgiving, so feel free to experiment—just don’t forget the almond extract unless you absolutely must!
Equipment Needed

You don’t need a fancy kitchen setup to make these Candy Cane Cookies. Here’s what I always reach for:
- Large mixing bowl (a sturdy ceramic or glass bowl works best)
- Hand mixer or stand mixer (either one—just use what you’ve got)
- Measuring cups and spoons (accuracy matters for the dough texture)
- Rubber spatula (for scraping down the sides and mixing in color)
- Baking sheets (heavy-duty ones prevent over-browning)
- Parchment paper or silicone baking mats (keeps cookies from sticking and makes cleanup easy)
- Small bowls (for dividing and coloring the dough)
- Plastic wrap (for chilling the dough, if needed)
- Rolling surface (a clean countertop or pastry board)
If you don’t own a stand mixer, no worries—a sturdy wooden spoon and some elbow grease will do the trick. I’ve made these cookies with dollar-store baking sheets and silicone mats from Amazon; both work just fine. A little parchment paper goes a long way, too (and saves you from scrubbing later). If your baking sheets are old and warped, just rotate them halfway through baking for more even results.
Preparation Method
- Prep the Ingredients: Pull out 1 cup (226g) unsalted butter and let it soften. Gather all other ingredients and set up your mixing station. Preheat your oven to 350°F (180°C) and line two baking sheets with parchment paper.
- Make the Dough: In a large bowl, cream together the softened butter and 1 cup (200g) granulated sugar until light and fluffy (about 2-3 minutes using a hand mixer on medium speed). Add 1 large egg, 1 1/2 teaspoons vanilla extract, and 1/2 teaspoon almond extract. Beat until combined, scraping down the bowl as needed.
- Add Dry Ingredients: Gradually mix in 2 1/2 cups (315g) all-purpose flour and 1/4 teaspoon salt. Start on low speed or by hand to avoid flour clouds. The dough should be soft but not sticky. If it’s too soft, add 1 tablespoon extra flour at a time.
- Divide and Color the Dough: Split the dough evenly into two bowls. In one bowl, knead in red gel food coloring (start with 1/4 teaspoon and add more as needed for a bold red). Leave the other half plain. If you’re using natural coloring, you might need a bit more for vibrancy.
- Shape the Ropes: Scoop out about 1 tablespoon (15g) of each color. Roll each into a rope about 5 inches (13cm) long. (Tip: Dust your hands and surface lightly with flour if the dough sticks!)
- Twist and Shape: Gently twist one red and one white rope together, then curve the top to form a candy cane shape. Place on the prepared baking sheet, spacing cookies at least 1 inch (2.5cm) apart.
- Optional Topping: Sprinkle crushed peppermint candies or sugar on top for a festive touch. (If adding peppermint, gently press it into the dough so it sticks.)
- Bake: Bake for 9-12 minutes, until the edges are just starting to turn golden. Watch closely—these cookies can brown quickly! Rotate baking sheets halfway for even coloring.
- Cool: Let cookies cool on the pan for 2 minutes, then transfer to a wire rack. (They’ll firm up as they cool.)
- Store: Once fully cool, store in an airtight container at room temperature for up to a week.
If your dough cracks while shaping, just press it back together—imperfections add charm! If colors bleed, chill the ropes in the fridge for 10 minutes before shaping. I like to prep all the ropes first, then shape them in a batch for efficiency. The smell in your kitchen will be irresistible at this stage, so be prepared for “taste testers” to appear.
Cooking Tips & Techniques
I’ve baked these Candy Cane Cookies more times than I can count, and a few key tips make all the difference. These techniques will help your cookies look and taste their best:
- Chill the Dough: If your kitchen is warm or the dough feels sticky, chill it for 15-20 minutes before shaping. This prevents the ropes from stretching too thin or breaking.
- Use Gel Food Coloring: Liquid colors can make the dough too soft and pale. Gel gives bold color without messing up the texture.
- Twisting Technique: Don’t overwork the ropes or they’ll get tough. Twist gently and don’t worry if each candy cane isn’t perfect—quirky shapes add personality!
- Even Baking: Rotate your pans halfway through to keep coloring uniform. Older ovens can have hot spots, so keep an eye on the first batch.
- Batch Prep: Shape all the ropes before twisting and forming the canes. It speeds things up and helps you keep the cookies the same size.
- Prevent Spreading: Space cookies out and don’t flatten them—this keeps the shape crisp.
Common mistakes? Overbaking is a big one—watch closely, because these go from golden to brown in a flash. If you’re new to shaping cookies, practice with a couple before baking the full batch. (My early attempts looked more like candy squiggles, but everyone still loved them!) Multi-task by cleaning up between batches or prepping toppings while cookies bake. For consistent results, measure your dough scoops and ropes as evenly as possible—eyeballing works, but a small kitchen scale is even better.
Variations & Adaptations
One of the best things about Candy Cane Cookies is how easy they are to customize for every taste, season, or dietary need. Here are a few favorite twists and tested adaptations:
- Gluten-Free: Swap all-purpose flour for a gluten-free blend—Bob’s Red Mill 1-to-1 is my go-to. Texture stays tender, though colors may spread a bit more.
- Vegan: Use vegan butter and a flaxseed egg (1 tablespoon ground flaxseed + 2.5 tablespoons water, mixed and set for 5 minutes). Skip the almond extract if needed for nut allergies.
- Flavor Twists: Add a drop of peppermint extract to half the dough for a minty kick, or swap almond extract for orange zest if you want a citrus note.
- Different Holidays: Make pastel “Easter Cane” cookies with pink and yellow food coloring, or swap red for green for St. Patrick’s Day!
- Allergen-Friendly: Omit almond extract for nut-free cookies; vanilla alone is still delicious.
I’ve even tried making mini candy cane cookies for party favors—they bake up faster and are perfect for snacking. Don’t be afraid to get creative with toppings—colored sugar, sprinkles, or even a drizzle of white chocolate make fun additions. My personal favorite adaptation? Peppermint and chocolate—half the dough gets cocoa powder, the other half peppermint. It’s a hit with my kids every year!
Serving & Storage Suggestions
Candy Cane Cookies are best served at room temperature, displayed on a festive platter or nestled in a cookie tin lined with parchment. They pair perfectly with hot cocoa, mulled cider, or even a cup of coffee for grown-ups.
For parties, arrange them in a candy cane shape on your serving tray, or tuck a few into cellophane bags tied with ribbon for gifting. These cookies hold their shape and flavor for several days, making them ideal for holiday prep.
- Storage: Store in an airtight container at room temperature for up to 1 week. Layer with parchment paper to prevent sticking.
- Freezing: Freeze shaped, unbaked dough on a tray, then transfer to a zip-top bag. Bake straight from frozen, adding 1-2 minutes to the time.
- Reheating: If cookies lose their crunch, warm in a 300°F (150°C) oven for 3-4 minutes.
- Flavor Development: The almond and vanilla flavors deepen after a day or two—so if you can wait, they’re even better!
Let’s face it, these cookies rarely last long enough for leftovers. But if you’re planning ahead for a party or cookie exchange, they’re super low-maintenance and easy to transport.
Nutritional Information & Benefits
Each Candy Cane Cookie is estimated to provide around 110 calories, with 6g fat, 13g carbohydrates, and 1g protein (values may vary by brand and size). They’re low in sodium, and can be made nut-free or gluten-free with a few swaps.
The almond and vanilla extracts offer a touch of antioxidants, and using vegan or gluten-free ingredients can fit a variety of diets. Be mindful of potential allergens—almond extract and eggs are common triggers, but both can be omitted or swapped easily.
From a wellness perspective, I love that you can control the ingredients—no preservatives, just real butter and flour. While these cookies are definitely a treat, they’re perfect for celebrating and sharing joy with loved ones (which is good for the soul, you know?).
Conclusion
So, why should you make these Candy Cane Cookies? They’re festive, fun, and deliver the kind of holiday cheer you can taste. This recipe is easy enough for beginners, yet special enough to impress even the pickiest cookie connoisseurs.
I encourage you to get creative—change up the colors, try a new flavor, or make mini versions for gifting. Every batch I bake reminds me of family traditions, laughter, and the simple pleasure of holiday baking together. Honestly, there’s nothing better than sharing these treats (and maybe sneaking one warm from the oven).
If you give these a try, I’d love to hear how you make them your own! Drop a comment below, share your photos, or let me know your favorite holiday cookie memories. Happy baking—and may your kitchen be filled with the scent of Christmas magic!
FAQs
Can I freeze Candy Cane Cookies?
Yes! You can freeze the shaped, unbaked dough for up to 2 months. Just bake straight from the freezer, adding a couple extra minutes to the baking time.
Do I have to use almond extract?
No, if you have a nut allergy or just prefer a milder flavor, double the vanilla extract instead. The cookies will still taste delicious!
Why did my cookies lose their shape?
If the dough is too warm or soft, the ropes might spread during baking. Chill the dough before shaping and make sure your oven is fully preheated.
Can I make these cookies gluten-free?
Absolutely! Swap in a 1-to-1 gluten-free baking flour. The texture is a little softer, but the cookies hold their shape and taste great.
How do I get bright red color in my dough?
Gel food coloring works best. Add a little at a time until you reach the desired shade. Avoid liquid coloring, as it can make the dough sticky and pale.
Pin This Recipe!

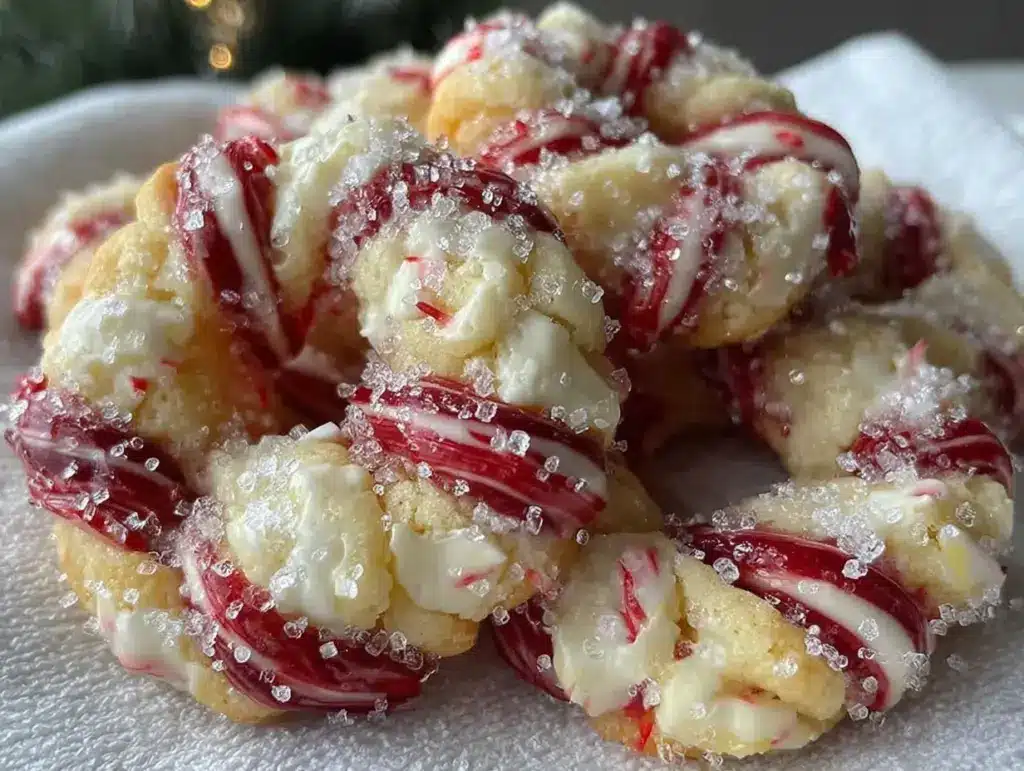
Candy Cane Cookies

Festive, buttery cookies twisted into classic candy cane shapes with red and white dough, flavored with vanilla and almond. These easy Christmas treats are perfect for holiday baking, gifting, and cookie exchanges.
- Prep Time: 20 minutes
- Cook Time: 12 minutes
- Total Time: 40 minutes
- Yield: 24 cookies 1x
- Category: Dessert
- Cuisine: American
Ingredients
- 1 cup (226g) unsalted butter, softened
- 1 cup (200g) granulated sugar
- 1 large egg, room temperature
- 1 1/2 teaspoons vanilla extract
- 1/2 teaspoon almond extract
- 2 1/2 cups (315g) all-purpose flour
- 1/4 teaspoon salt
- Red gel food coloring
- Extra flour, for dusting
- Crushed peppermint candies or candy canes (optional, for topping)
- Granulated sugar, for sprinkling (optional)
Instructions
- Pull out butter and let it soften. Gather all ingredients and set up your mixing station. Preheat oven to 350°F (180°C) and line two baking sheets with parchment paper.
- In a large bowl, cream together softened butter and granulated sugar until light and fluffy (about 2-3 minutes with a hand mixer on medium speed).
- Add egg, vanilla extract, and almond extract. Beat until combined, scraping down the bowl as needed.
- Gradually mix in flour and salt. Start on low speed or by hand. The dough should be soft but not sticky. If too soft, add extra flour 1 tablespoon at a time.
- Divide dough evenly into two bowls. In one bowl, knead in red gel food coloring until desired color is reached. Leave the other half plain.
- Scoop about 1 tablespoon of each color and roll into ropes about 5 inches long. Dust hands and surface lightly with flour if needed.
- Twist one red and one white rope together, then curve the top to form a candy cane shape. Place on prepared baking sheet, spacing cookies at least 1 inch apart.
- Sprinkle crushed peppermint candies or sugar on top if desired, gently pressing into the dough.
- Bake for 9-12 minutes, until edges are just starting to turn golden. Rotate baking sheets halfway for even coloring.
- Let cookies cool on the pan for 2 minutes, then transfer to a wire rack to cool completely.
- Once fully cool, store in an airtight container at room temperature for up to a week.
Notes
Chill dough if sticky for easier shaping. Use gel food coloring for vibrant color. Twist ropes gently for best results. Rotate pans halfway through baking for even color. Cookies can be made gluten-free or vegan with substitutions. Store in airtight container for up to 1 week or freeze unbaked dough for up to 2 months.
Nutrition
- Serving Size: 1 cookie
- Calories: 110
- Sugar: 7
- Sodium: 30
- Fat: 6
- Saturated Fat: 4
- Carbohydrates: 13
- Protein: 1
Keywords: candy cane cookies, Christmas cookies, holiday baking, almond cookies, vanilla cookies, festive treats, cookie exchange, easy cookies, butter cookies, Christmas dessert