Let me tell you, the moment the aroma of toasted nuts and buttery caramel filled my kitchen while baking these Crispy Spring Bars with Pistachio and Caramel Topping, I was hooked. The scent alone could lure anyone from another room! The first time I baked these bars, I was knee-high to a grasshopper compared to my current kitchen adventures, but honestly, even then, the magic was undeniable. It was one of those moments where you pause, take a deep breath, and just smile because you know you’re onto something truly special. Years ago, I stumbled upon a similar recipe at a local bake sale, and since then, I’ve been tweaking it to get this dangerously easy, crunchy-sweet treat just right.
My family couldn’t stop sneaking these bars off the cooling rack (and I can’t really blame them). There’s something about the crispy base paired with that luscious pistachio caramel topping that feels like a warm hug in dessert form. Let’s face it, you don’t often find a recipe that’s both a crowd-pleaser and a sweet treat that brightens up your Pinterest cookie board in equal measure. Whether you’re craving a treat to impress at potlucks or want a sweet surprise for your kids after school, these spring bars fit the bill perfectly.
I’ve tested this recipe more times than I can count — in the name of research, of course — and it’s become a staple for family gatherings and gifting. If you haven’t tried this crispy, nutty, caramel-topped dream, you’re going to want to bookmark this one.
Why You’ll Love This Crispy Spring Bars Recipe with Pistachio Caramel Topping
Honestly, this recipe is a keeper. Not only have I perfected it through countless kitchen sessions, but it also stands out because of a few key reasons that make it a go-to when you want something quick, tasty, and impressive.
- Quick & Easy: You can whip these bars up in under 45 minutes — perfect for those busy evenings or last-minute dessert needs.
- Simple Ingredients: No need to hunt down exotic items. Most of what you need is probably already sitting in your pantry or fridge.
- Perfect for Any Occasion: Whether it’s a cozy family night, a festive gathering, or a casual potluck, these bars fit right in.
- Crowd-Pleaser: From kids to adults, everyone loves the crunchy texture combined with the sweet, nutty topping.
- Unbelievably Delicious: The blend of the crispy base and rich pistachio caramel topping is pure comfort food with a twist.
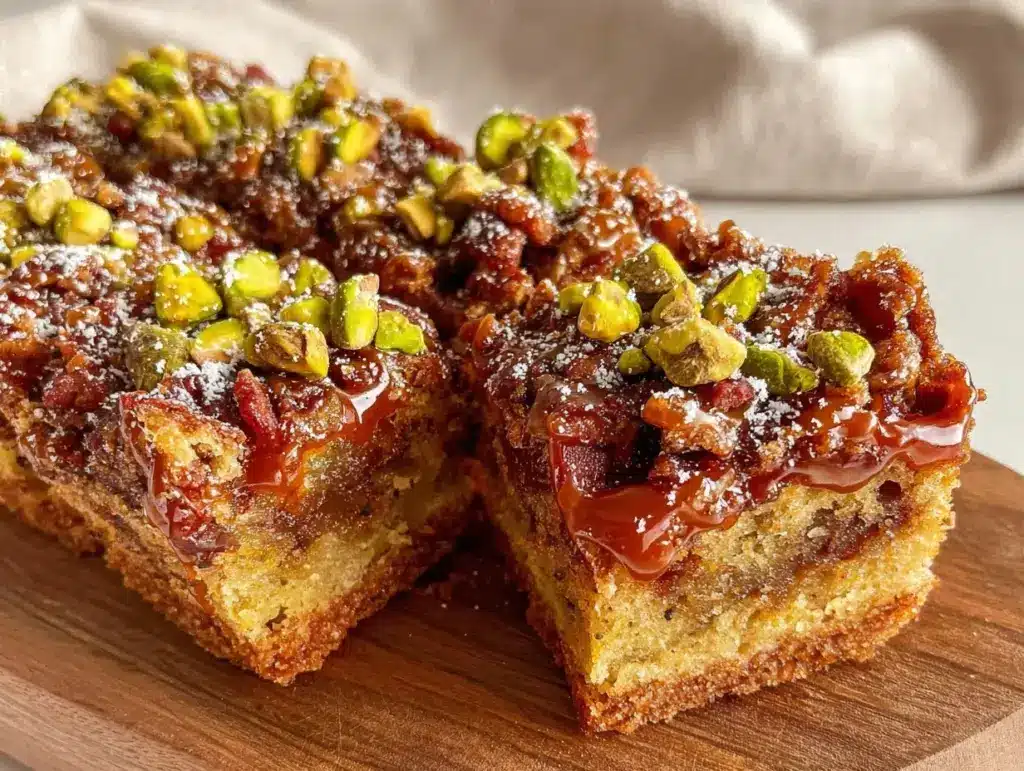
What makes these Crispy Spring Bars with Pistachio and Caramel Topping so special is the perfect balance of textures and flavors. The secret lies in the caramel, which is cooked just right to get that golden hue and silky smoothness, then folded with toasted pistachios for crunch and a hint of earthiness. Plus, the bars themselves bring a buttery crispness that holds everything together without being too heavy.
It’s not just another caramel bar — it’s my best version, tried and tested with a few insider tips that I’m excited to share with you. You know that feeling when you take a bite and just close your eyes because it’s that good? Yeah, that’s the magic here. It’s comfort food reborn — simple, satisfying, and guaranteed to impress.
What Ingredients You Will Need
This recipe uses simple, wholesome ingredients to deliver bold flavor and satisfying texture without the fuss. Most are pantry staples, and a few fresh items add that special touch. If you’re looking for ingredient swaps or sourcing tips, I’ve sprinkled those in below too.
- For the Base:
- 1 cup (225g) unsalted butter, softened (adds richness and helps crispness)
- 1 cup (200g) granulated sugar
- 1 large egg, room temperature
- 2 teaspoons vanilla extract (I love Nielsen-Massey for flavor)
- 2 ½ cups (315g) all-purpose flour
- ½ teaspoon salt
- ½ teaspoon baking powder
- For the Pistachio Caramel Topping:
- 1 cup (200g) granulated sugar
- 6 tablespoons (90g) unsalted butter, cut into pieces
- ½ cup (120ml) heavy cream, warmed (use coconut cream for dairy-free)
- 1 teaspoon sea salt (balances the sweetness)
- 1 cup (120g) shelled pistachios, roughly chopped and toasted (toasting brings out that nutty aroma)
If you want to switch things up, you can use almond flour for a gluten-free base or swap pistachios with toasted pecans or walnuts for a different nutty flavor. And if you’re dairy-free, coconut oil and coconut cream work like a charm!
Equipment Needed
- 9×13-inch (23×33 cm) baking pan – I prefer glass pans for even baking, but metal works well too
- Mixing bowls – one large for the base and one medium for the caramel
- Electric mixer or sturdy wooden spoon for creaming butter and sugar
- Heavy-bottomed saucepan for caramel (prevents burning)
- Rubber spatula for stirring and scraping
- Measuring cups and spoons – precise measurements make all the difference here
- Cooling rack to let the bars set properly and crisp up
If you don’t have an electric mixer, no worries — just give it a bit more elbow grease. For the caramel, a heavy-bottomed pan is a must; thinner pans tend to heat unevenly and can scorch the sugar. I also keep a candy thermometer handy for perfect caramel temp but fingers crossed you won’t need it!
Preparation Method

- Preheat your oven to 350°F (175°C). Lightly grease your 9×13 inch (23×33 cm) baking pan or line it with parchment paper for easy removal.
- Make the base: In a large bowl, cream together 1 cup (225g) softened unsalted butter and 1 cup (200g) granulated sugar until light and fluffy — about 3-4 minutes with an electric mixer. This step is key to a tender, crispy base.
- Add 1 large egg and 2 teaspoons vanilla extract to the butter mixture and beat until combined.
- In a separate bowl, whisk together 2 ½ cups (315g) all-purpose flour, ½ teaspoon salt, and ½ teaspoon baking powder.
- Gradually add the dry ingredients to the wet, mixing just until combined. Overmixing can lead to tough bars, so stop as soon as it’s all incorporated.
- Press the dough evenly into the prepared pan, making sure to smooth the surface. It should be about ½ inch (1.3 cm) thick. Pop it into the oven and bake for 20-25 minutes, or until lightly golden around the edges.
- While the base bakes, prepare the pistachio caramel topping. In a heavy-bottomed saucepan, melt 1 cup (200g) granulated sugar over medium heat. Stir constantly with a rubber spatula as it melts and turns a rich amber color — this takes about 8-10 minutes. Be patient; rushing can cause burning.
- Once sugar is melted, add 6 tablespoons (90g) unsalted butter piece by piece, stirring to combine.
- Carefully pour in ½ cup (120ml) warm heavy cream while stirring continuously. The mixture will bubble up, so watch your fingers!
- Stir in 1 teaspoon sea salt. Remove from heat and mix in the toasted pistachios.
- When the base comes out of the oven, immediately pour the caramel topping evenly over it. Use a spatula to spread if needed.
- Let the bars cool completely in the pan on a wire rack, about 2 hours. This wait is tough but necessary for the caramel to set and the bars to crisp up.
- Once cool, cut into squares or rectangles. A sharp knife warmed under hot water makes cleaner cuts.
If your caramel hardens too quickly while spreading, just warm it gently again on low heat. If the base feels undercooked, give it a few more minutes, but keep an eye so it doesn’t burn. The smell and a light golden color are your best cues.
Cooking Tips & Techniques
One of the trickiest parts is getting the caramel just right — you want that perfect amber color without a burnt taste. Stirring constantly and using a heavy-bottom pan really helps. I’ve learned the hard way that rushing this step leads to bitterness, so patience pays off.
Also, don’t skip toasting the pistachios! Raw nuts won’t have the same depth of flavor. Toss them in a dry pan for about 3-5 minutes until fragrant but not burnt — your kitchen will smell amazing.
When pressing the base dough into the pan, make sure it’s even. Uneven thickness means uneven baking, which can leave some parts soggy. I like to use the bottom of a glass cup to gently press the dough flat and smooth.
Cutting the bars while completely cool is key. Warm bars are gooey and fall apart, but if you wait too long, the caramel gets super hard. Find a sweet spot around 2 hours — I usually do a test cut at 90 minutes.
Multitasking tip: Prepare the topping while the base bakes to save time. Just keep an eye on the caramel, because it waits for no one!
Variations & Adaptations
- Nut Variations: Swap pistachios for toasted almonds, pecans, or walnuts for a flavor twist.
- Gluten-Free Option: Use almond flour or a gluten-free all-purpose blend for the base. Note that texture will be slightly different but still delicious.
- Dairy-Free Version: Replace butter with coconut oil and heavy cream with full-fat coconut cream. The caramel will have a subtle coconut undertone that’s really nice.
- Flavor Additions: Add a pinch of cinnamon or cardamom to the base dough for a warm spice note.
- Chocolate Lovers: Drizzle melted dark chocolate over the cooled bars for an extra indulgent finish.
One of my favorite personal twists was adding a sprinkle of flaky sea salt on top just before the caramel sets — it contrasts the sweetness beautifully.
Serving & Storage Suggestions
Serve these Crispy Spring Bars with Pistachio and Caramel Topping at room temperature for the best crunch and flavor balance. They pair wonderfully with a cup of strong coffee or a light herbal tea. For an extra treat, try alongside vanilla ice cream or whipped cream.
To store, keep the bars in an airtight container at room temperature for up to 3 days. If your kitchen is warm, refrigerate to prevent the caramel from becoming too soft. Bars stored in the fridge will firm up nicely but might lose a bit of crispness.
You can also freeze these bars wrapped tightly in plastic wrap and foil for up to 2 months. Thaw at room temperature before serving, and if the caramel feels too firm, let them sit a few minutes to soften.
Flavors actually deepen after resting for a day, so if you can wait, the bars taste even better the next day. Just be sure to keep them covered so they don’t dry out.
Nutritional Information & Benefits
Each serving of these Crispy Spring Bars (based on 12 bars) contains approximately:
| Calories | 320 |
|---|---|
| Fat | 18g |
| Carbohydrates | 36g |
| Protein | 5g |
| Sugar | 22g |
Pistachios bring heart-healthy fats and are a good source of protein and fiber. The caramel does add sugar, so these bars are definitely a treat best enjoyed in moderation. For those with gluten sensitivities, the almond flour adaptation keeps it friendly. Just note the presence of nuts and dairy allergens in the classic recipe.
From my perspective, this recipe strikes a nice balance by combining wholesome nuts with a sweet indulgence — perfect when you want a little comfort without going overboard.
Conclusion
If you’re looking for a recipe that’s easy, quick, and downright delicious, these Crispy Spring Bars with Pistachio and Caramel Topping check all the boxes. The combination of textures and flavors is just right to brighten up any day or occasion. I love how customizable it is — whether you stick to the classic or try a new variation, it’s always a hit.
Give it a go, tweak it to your taste, and don’t be shy about sharing how it turns out. Your family and friends will thank you for bringing this crunchy, nutty, caramel delight to the table. Honestly, once you try it, these bars might just become your new favorite sweet treat.
Drop a comment below if you have questions, or share your own twists — I love hearing from you! And hey, if you enjoyed this recipe, sharing it with your fellow food lovers would make my day.
Happy baking, friends!
Frequently Asked Questions About Crispy Spring Bars with Pistachio and Caramel Topping
Can I make the base dough ahead of time?
Yes! You can prepare the base dough up to a day ahead, keep it wrapped tightly in the fridge, and bake it fresh when ready. Just let it sit at room temperature for 15 minutes before pressing into the pan.
How do I keep the caramel from hardening too much?
Make sure to pour the caramel over the warm base right after baking and spread it evenly. Storing bars at room temperature also helps keep the caramel soft and chewy.
Can I use salted butter instead of unsalted?
You can, but reduce or omit the added salt in the recipe to avoid oversalting. Unsalted butter gives you more control over the flavor.
What’s the best way to toast pistachios?
Place them in a dry skillet over medium heat, stirring frequently for 3-5 minutes until they smell nutty and turn slightly golden. Watch closely to prevent burning.
Can I freeze the finished bars?
Absolutely! Wrap them tightly and freeze for up to 2 months. Thaw at room temperature before serving, and give them a few minutes to soften if the caramel feels too firm.
Pin This Recipe!
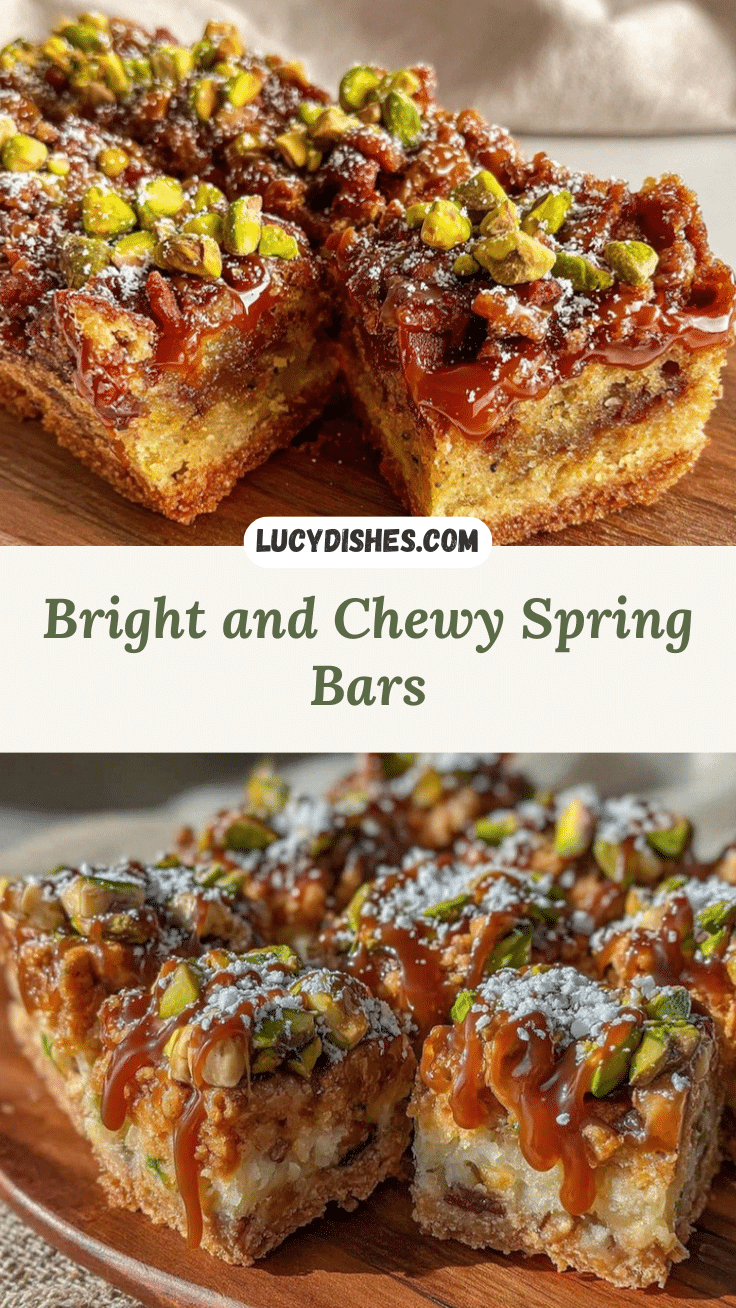
Crispy Spring Bars Recipe with Pistachio Caramel Topping
These crispy spring bars feature a buttery, tender base topped with a luscious pistachio caramel, creating a crunchy-sweet treat perfect for any occasion.
- Prep Time: 15 minutes
- Cook Time: 25 minutes
- Total Time: 2 hours 40 minutes
- Yield: 12 bars 1x
- Category: Dessert
- Cuisine: American
Ingredients
- 1 cup (225g) unsalted butter, softened
- 1 cup (200g) granulated sugar
- 1 large egg, room temperature
- 2 teaspoons vanilla extract
- 2 ½ cups (315g) all-purpose flour
- ½ teaspoon salt
- ½ teaspoon baking powder
- 1 cup (200g) granulated sugar (for caramel)
- 6 tablespoons (90g) unsalted butter, cut into pieces (for caramel)
- ½ cup (120ml) heavy cream, warmed (use coconut cream for dairy-free)
- 1 teaspoon sea salt
- 1 cup (120g) shelled pistachios, roughly chopped and toasted
Instructions
- Preheat oven to 350°F (175°C). Lightly grease a 9×13 inch (23×33 cm) baking pan or line with parchment paper.
- In a large bowl, cream together 1 cup softened unsalted butter and 1 cup granulated sugar until light and fluffy, about 3-4 minutes.
- Add 1 large egg and 2 teaspoons vanilla extract to the butter mixture and beat until combined.
- In a separate bowl, whisk together 2 ½ cups all-purpose flour, ½ teaspoon salt, and ½ teaspoon baking powder.
- Gradually add the dry ingredients to the wet, mixing just until combined. Avoid overmixing.
- Press the dough evenly into the prepared pan, smoothing the surface to about ½ inch (1.3 cm) thick.
- Bake for 20-25 minutes or until lightly golden around the edges.
- While the base bakes, prepare the pistachio caramel topping: In a heavy-bottomed saucepan, melt 1 cup granulated sugar over medium heat, stirring constantly until it turns a rich amber color (8-10 minutes).
- Add 6 tablespoons unsalted butter piece by piece, stirring to combine.
- Carefully pour in ½ cup warm heavy cream while stirring continuously; mixture will bubble up.
- Stir in 1 teaspoon sea salt, then remove from heat and mix in toasted pistachios.
- When the base is out of the oven, immediately pour the caramel topping evenly over it and spread with a spatula if needed.
- Let the bars cool completely in the pan on a wire rack for about 2 hours to set and crisp up.
- Cut into squares or rectangles with a sharp knife warmed under hot water for cleaner cuts.
Notes
Use a heavy-bottomed pan for caramel to prevent burning. Toast pistachios in a dry pan for 3-5 minutes for best flavor. Press dough evenly to avoid soggy spots. Cut bars only when completely cool for clean slices. Warm caramel gently if it hardens too quickly while spreading.
Nutrition
- Serving Size: 1 bar
- Calories: 320
- Sugar: 22
- Fat: 18
- Carbohydrates: 36
- Protein: 5
Keywords: crispy spring bars, pistachio caramel, caramel bars, nutty dessert, easy dessert, crowd-pleaser, buttery bars


