
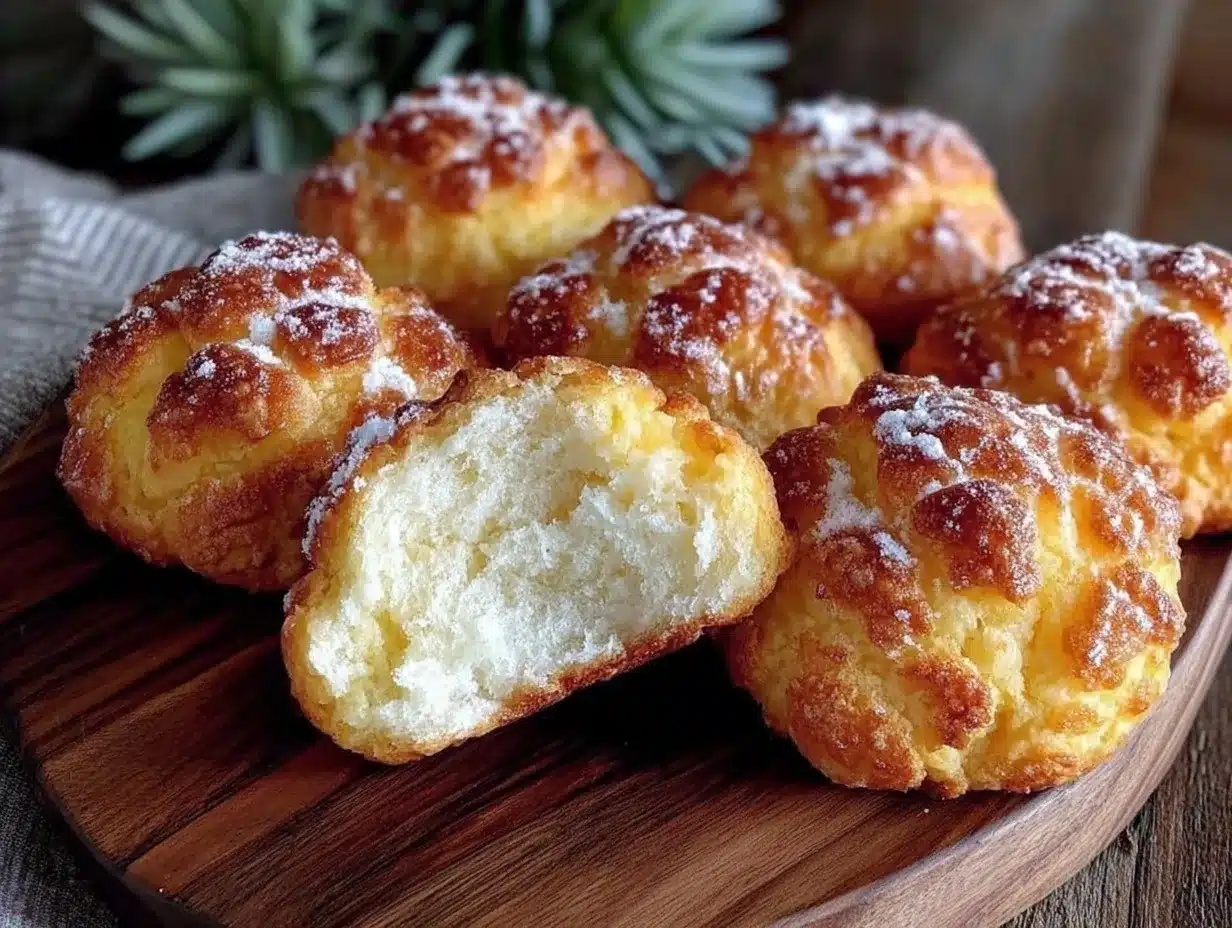
Let me tell you, the scent of freshly baked soft pineapple buns wafting from my kitchen is enough to make anyone’s mouth water. That golden, buttery crust crackling gently as you break it open, revealing the pillowy, tender inside—it’s honestly one of those small joys that feels like a warm hug on a lazy afternoon. The first time I baked these soft pineapple buns with a sweet, buttery crust, I was instantly hooked. It was the kind of moment where you pause, take a deep breath, and just smile because you know you’re onto something truly special.
Years ago, when I was knee-high to a grasshopper, my grandma used to bring home these pineapple buns from the local bakery. Back then, I never thought I could make them myself, but after a rainy weekend spent experimenting, I stumbled upon this recipe. I wish I had discovered it years ago because it’s dangerously easy and brings pure, nostalgic comfort with every bite. My family couldn’t stop sneaking them off the cooling rack (and I can’t really blame them). Honestly, these buns are perfect for potlucks, a sweet treat for your kids’ lunchboxes, or just brightening up your Pinterest cookie board with a soft, buttery delight.
After testing this recipe multiple times (in the name of research, of course), it’s become a staple for family gatherings and gifting. If you love the idea of soft, sweet bread with a buttery crust, you’re going to want to bookmark this one.
Why You’ll Love This Recipe
Here’s why this soft pineapple buns recipe with a sweet, buttery crust has quickly become a favorite in my kitchen — and I bet it will be in yours too:
- Quick & Easy: Comes together in under 2 hours, perfect for busy weeknights or last-minute cravings.
- Simple Ingredients: No fancy grocery trips needed; you likely already have everything in your pantry and fridge.
- Perfect for Any Occasion: Great for breakfast, afternoon tea, or a cozy dinner side.
- Crowd-Pleaser: Always gets rave reviews from kids and adults alike—there’s just something about that buttery crust!
- Unbelievably Delicious: The soft, fluffy interior paired with the sweet, slightly crisp topping delivers next-level comfort food.
What sets this pineapple buns recipe apart? It’s all about the crust—a buttery, sugary topping that cracks just right, giving you that signature texture and flavor without needing a complicated process. Plus, the dough is enriched with just enough sweetness and fat to keep it tender and soft without being heavy. This isn’t just another version; it’s the best version I’ve made after plenty of tweaking. It’s comfort food made smarter and easier, with the same soul-soothing satisfaction you crave.
Get ready to impress guests without stress or turn a simple snack into something memorable. Honestly, after the first bite, you might just close your eyes and savor it like it’s your favorite childhood treat all over again.
What Ingredients You Will Need
This recipe uses simple, wholesome ingredients to deliver bold flavor and satisfying texture without the fuss. Most of these are pantry staples, and substitutions are easy if needed.
- For the Dough:
- All-purpose flour – 3 cups (360g) (I recommend King Arthur for best texture)
- Instant yeast – 2 1/4 teaspoons (one packet)
- Granulated sugar – 1/4 cup (50g)
- Salt – 1/2 teaspoon
- Whole milk – 3/4 cup (180ml), warm (about 110°F/43°C)
- Unsalted butter – 4 tablespoons (56g), softened (adds richness)
- Large egg – 1, room temperature
- For the Sweet, Buttery Crust:
- All-purpose flour – 1 cup (120g)
- Granulated sugar – 1/2 cup (100g)
- Unsalted butter – 1/2 cup (113g), cold and cubed (key for that crisp texture)
- Baking powder – 1 teaspoon (helps with the crust rise)
- Egg yolk – 1, for brushing
- Optional:
- Vanilla extract – 1 teaspoon (for a subtle aroma in the dough)
- Milk powder – 2 tablespoons (adds softness, but not mandatory)
Looking for gluten-free? You can swap the all-purpose flour for a high-quality gluten-free blend, but results may vary in texture. If dairy is a concern, use plant-based milk and vegan butter alternatives with similar fat content. For a seasonal twist, sometimes I sprinkle a bit of finely chopped dried pineapple in the dough, just to keep true to the name!
Equipment Needed
- Stand mixer with dough hook attachment (optional but helpful for kneading; you can also knead by hand)
- Mixing bowls (medium and large sizes)
- Baking sheet or tray (lined with parchment paper)
- Measuring cups and spoons (accuracy helps, especially with yeast and baking powder)
- Pastry cutter or fork (for cutting butter into the crust mixture)
- Pastry brush (to brush egg yolk on crust)
- Cooling rack (to let buns rest and cool evenly)
If you don’t have a stand mixer, no worries—just be prepared for a 10-15 minute hand kneading session. I’ve done it both ways, and while the mixer saves time, kneading by hand gives you a great feel for dough texture. For budget-friendly options, silicone baking mats can replace parchment paper and are reusable. Also, keep your butter cold for the crust by chilling your pastry cutter or fork in the fridge before use—it makes mixing the topping much easier.
Preparation Method
- Activate the Yeast: In a small bowl, combine the warm milk (about 110°F/43°C) with 1 tablespoon of sugar and the instant yeast. Stir gently and let it sit for 5-7 minutes until foamy. If it doesn’t foam, your yeast might be old—better to start fresh.
- Make the Dough: In a large mixing bowl or stand mixer, whisk together the flour, remaining sugar, salt, and milk powder (if using). Add the softened butter, egg, vanilla extract (if using), and the activated yeast mixture. Mix with the dough hook or a wooden spoon until it starts to come together.
- Knead the Dough: Knead for about 8-10 minutes in a mixer or 10-15 minutes by hand on a lightly floured surface. The dough should be smooth, elastic, and slightly tacky but not sticky. If it’s too sticky, add a bit more flour, a tablespoon at a time.
- First Rise: Shape the dough into a ball and place it in a lightly greased bowl. Cover with a clean kitchen towel or plastic wrap and let it rise in a warm, draft-free spot for 1 to 1.5 hours, or until doubled in size.
- Prepare the Sweet Crust Topping: While the dough rises, combine the flour, sugar, and baking powder in a medium bowl. Add the cold, cubed butter and use a pastry cutter or fork to cut it into the dry ingredients until the mixture resembles coarse crumbs. Don’t overmix—it’s okay to have small butter pieces. Set aside.
- Shape the Buns: Once the dough has doubled, punch it down gently and divide it into 10 equal portions (about 75g/2.6oz each). Roll each piece into a smooth ball and place on a baking sheet lined with parchment paper, spacing them about 2 inches apart.
- Apply the Crust: Take a portion of the crust mixture (roughly 2 tablespoons per bun) and flatten it into a disc about 3 inches in diameter. Gently place each disc on top of a dough ball and press lightly to adhere. Using a knife, score the topping gently in a crisscross pattern to mimic the pineapple look.
- Second Rise: Cover the buns loosely with plastic wrap or a damp cloth and let them rise for another 30-40 minutes until puffy.
- Preheat Oven & Egg Wash: Preheat your oven to 350°F (175°C). Brush the crust topping lightly with beaten egg yolk to give it that beautiful glossy finish.
- Bake: Bake the buns for 15-18 minutes until golden brown and the crust is crisp. Keep an eye on them after 15 minutes to avoid over-browning.
- Cool: Remove from the oven and transfer buns to a cooling rack. Let them cool slightly before serving to enjoy that soft interior and buttery crust at its best.
Quick tip: if you want an extra buttery top, brush a little melted butter on the buns right after baking. It keeps the crust tender and shiny. If you notice your crust topping spreading too much, chill the dough balls and crust discs briefly before baking—they’ll hold their shape better.
Cooking Tips & Techniques
Making the perfect soft pineapple buns with a sweet, buttery crust is a bit of an art, but a few tricks can really help you nail it every time.
- Don’t Overwork the Dough: Knead until smooth and elastic, but don’t go past the point where it feels tough. This keeps the buns tender and soft.
- Butter Temperature Matters: For the crust, keep your butter cold. This creates pockets of flaky goodness as it bakes, giving you that crackly texture.
- Score the Topping Lightly: The crisscross pattern isn’t just for looks—it helps the crust crack open beautifully. But don’t cut too deep, or it might split too much.
- Watch Your Oven: Every oven bakes differently. Set a timer a few minutes before the suggested baking time and check often to prevent burning.
- Second Rise Is Key: Skipping or shortening the second rise means denser buns without that perfect airy crumb. Patience here pays off!
- Multitask Smartly: While the dough is rising, prepare the crust topping to save time. You can even chill the crust mixture if your kitchen’s warm.
- Personal Experience: I once rushed the first rise on a cold day and ended up with dense buns. Now, I always warm my oven to 100°F (38°C), turn it off, and place dough inside to rise in chilly months.
Variations & Adaptations
Want to customize these soft pineapple buns? Here are some tasty ideas to switch things up or suit dietary needs:
- Flavor Variations: Add 1 teaspoon of cinnamon or finely grated lemon zest to the dough for a subtly different aroma and flavor.
- Filling Options: Stuff the buns with a spoonful of sweetened red bean paste or cream cheese before the second rise for a surprise inside.
- Gluten-Free: Use a gluten-free all-purpose flour blend and add 1 teaspoon xanthan gum if not included. Texture will be a bit different but still delicious.
- Dairy-Free: Swap whole milk with coconut or almond milk and use vegan butter in the dough and crust.
- Baking Method: You can bake these buns in a convection oven at 325°F (163°C) for 12-15 minutes, but keep a close eye to avoid drying out.
- Personal Twist: Once, I tried sprinkling toasted sesame seeds on the crust before baking—adds a nutty crunch that was surprisingly good!
Serving & Storage Suggestions
Serve these soft pineapple buns warm or at room temperature to enjoy that tender crumb and buttery crust at its best. They pair beautifully with a cup of hot tea or coffee—perfect for breakfast or afternoon snack.
If you want to make a meal of it, consider serving alongside fresh fruit or a mild cheese platter to balance the sweetness.
Store leftover buns in an airtight container at room temperature for up to 2 days. For longer storage, wrap buns individually in plastic wrap and freeze for up to 3 months. To reheat, thaw at room temperature and warm in a 300°F (150°C) oven for 5-7 minutes to refresh the crust’s crispness.
Flavors develop nicely when stored overnight—sometimes I find the crust softens a bit, making the bun even easier to bite into. Just a heads-up: if you like a crispier crust, reheat before serving.
Nutritional Information & Benefits
Each soft pineapple bun contains approximately 220 calories, with 7 grams of fat, 33 grams of carbohydrates, and 5 grams of protein. The recipe uses whole milk and butter, providing calcium and vitamin A.
While these buns are a treat, they include simple ingredients without preservatives or artificial additives, making them a wholesome homemade option compared to store-bought varieties. The moderate sugar content satisfies sweet cravings without going overboard.
For those monitoring gluten or dairy, substitutions are easy to make, allowing this recipe to fit into many dietary lifestyles. I appreciate this recipe because it balances indulgence with simplicity—a way to enjoy comfort food that doesn’t feel too heavy or complicated.
Conclusion
Soft pineapple buns with a sweet, buttery crust are truly a delight worth making at home. Their tender crumb paired with that signature crackly crust brings a nostalgic comfort that’s hard to beat. Whether you’re baking for family, friends, or just yourself, this recipe offers a sweet, satisfying treat you can trust.
Feel free to customize with your favorite flavors or dietary needs—this recipe is flexible and forgiving. Honestly, I love how it brings a little sunshine and warmth to any day.
Give it a try, and don’t forget to share your thoughts and any fun twists you add in the comments below! There’s nothing better than swapping baking stories and tips. Happy baking, and may your kitchen always smell like freshly baked pineapple buns!
FAQs
Can I use fresh pineapple in the buns?
This recipe doesn’t actually include pineapple inside the dough—the name comes from the crust’s cracked appearance resembling pineapple skin. However, you can add finely chopped or crushed pineapple as a filling if you like, just reduce added sugar to balance sweetness.
How do I keep the crust from getting too hard?
Brush the crust with egg yolk before baking and avoid overbaking. You can also brush melted butter on warm buns after baking to keep the crust tender.
Can I make the dough ahead of time?
Yes! After the first rise, punch down the dough, cover tightly, and refrigerate overnight. Let it come to room temperature before shaping and applying the crust.
What’s the best way to store leftover buns?
Keep them in an airtight container at room temperature for up to 2 days or freeze individually wrapped for up to 3 months. Reheat in a warm oven to refresh.
Is it possible to make these buns vegan?
Absolutely! Use plant-based milk and vegan butter substitutes, and replace the egg wash with a little plant milk mixed with maple syrup for brushing the crust.
Pin This Recipe!

Soft Pineapple Buns Recipe Easy Homemade Sweet Buttery Crust Tutorial

Soft pineapple buns with a sweet, buttery crust that crackles gently, revealing a pillowy, tender inside. This easy homemade recipe delivers nostalgic comfort with a soft, fluffy interior and a crisp, buttery topping.
- Prep Time: 30 minutes
- Cook Time: 15-18 minutes
- Total Time: 1 hour 45 minutes
- Yield: 10 buns 1x
- Category: Breakfast, Snack
- Cuisine: Chinese Bakery Style
Ingredients
- 3 cups (360g) all-purpose flour
- 2 1/4 teaspoons instant yeast (one packet)
- 1/4 cup (50g) granulated sugar
- 1/2 teaspoon salt
- 3/4 cup (180ml) whole milk, warm (about 110°F/43°C)
- 4 tablespoons (56g) unsalted butter, softened
- 1 large egg, room temperature
- 1 cup (120g) all-purpose flour (for crust)
- 1/2 cup (100g) granulated sugar (for crust)
- 1/2 cup (113g) unsalted butter, cold and cubed (for crust)
- 1 teaspoon baking powder (for crust)
- 1 egg yolk (for brushing crust)
- Optional: 1 teaspoon vanilla extract (for dough)
- Optional: 2 tablespoons milk powder (for dough)
Instructions
- Activate the yeast by combining warm milk (110°F/43°C) with 1 tablespoon sugar and instant yeast in a small bowl. Let sit 5-7 minutes until foamy.
- In a large bowl or stand mixer, whisk together flour, remaining sugar, salt, and milk powder if using. Add softened butter, egg, vanilla extract if using, and activated yeast mixture. Mix until dough starts to come together.
- Knead dough for 8-10 minutes in mixer or 10-15 minutes by hand until smooth, elastic, and slightly tacky but not sticky. Add flour if too sticky.
- Shape dough into a ball, place in greased bowl, cover, and let rise in warm spot for 1 to 1.5 hours until doubled.
- Prepare crust topping by combining flour, sugar, and baking powder in medium bowl. Cut in cold cubed butter with pastry cutter or fork until mixture resembles coarse crumbs. Set aside.
- Punch down risen dough and divide into 10 equal portions (~75g each). Roll each into smooth balls and place on parchment-lined baking sheet, spaced 2 inches apart.
- Flatten about 2 tablespoons of crust mixture into 3-inch discs. Place each disc on dough balls and press lightly to adhere. Score topping with crisscross pattern.
- Cover buns loosely and let rise for 30-40 minutes until puffy.
- Preheat oven to 350°F (175°C). Brush crust topping with beaten egg yolk.
- Bake buns for 15-18 minutes until golden brown and crust is crisp. Watch closely after 15 minutes to avoid over-browning.
- Remove from oven and transfer to cooling rack. Let cool slightly before serving.
- Optional: Brush buns with melted butter after baking for extra buttery top.
Notes
Keep butter cold for crust to achieve flaky texture. Score topping lightly to mimic pineapple pattern without cutting too deep. Avoid overbaking to keep crust tender. Dough can be kneaded by hand if no mixer is available. Dough can be refrigerated overnight after first rise. For vegan version, use plant-based milk and butter and replace egg wash with plant milk and maple syrup.
Nutrition
- Serving Size: 1 bun
- Calories: 220
- Fat: 7
- Carbohydrates: 33
- Protein: 5
Keywords: pineapple buns, soft buns, sweet buns, buttery crust, homemade bread, easy baking, Asian bakery, sweet bread


