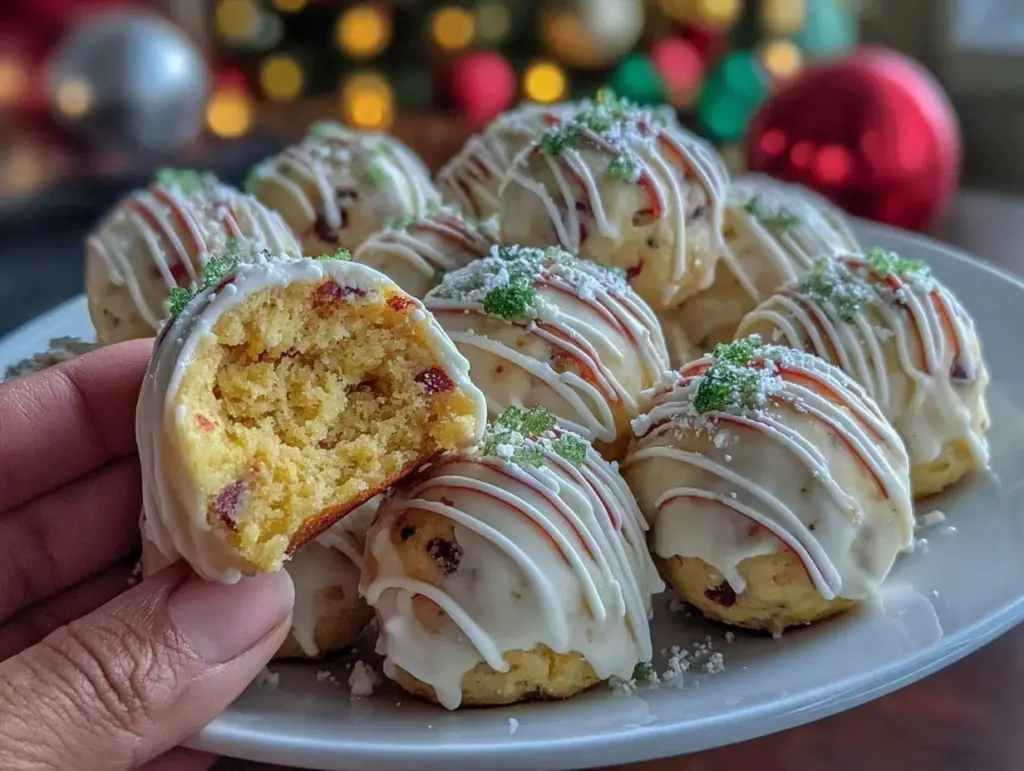
Just imagine the sweet aroma of freshly baked cake mingling with creamy frosting and a hint of rich chocolate—filling your kitchen with pure, holiday magic. The first time I made these Christmas Cake Balls, I remember the kitchen sparkling with twinkly lights and the sound of carols drifting in from the living room. My hands were dusted with powdered sugar, and the cake crumbs clung to my fingers in the most delightful way. Honestly, the moment I dipped that first cake ball into glossy chocolate and sprinkled it with red and green jimmies, I paused, took a breath, and thought: “Yep, this is the kind of simple joy the holidays are all about.”
There’s a special nostalgia here—these cake balls remind me of sneaking bites of leftover cake batter as a kid, standing on tiptoes next to my grandma at her old Formica countertop. (Back then, I was knee-high to a grasshopper, and licking the spoon was the highlight of every family baking day.) Years ago, we’d make batches for church bake sales and wrap them up as sweet little gifts for neighbors. I only wish I’d discovered this shortcut sooner—because, let’s face it, cake balls are dangerously easy and way less fussy than traditional holiday desserts.
My family can’t stop sneaking them off the cooling rack (and who could blame them?). These treats disappear faster than you’d believe—between cookie swaps, after-dinner snacks, or just a little midnight nibble. They brighten up your Pinterest board and holiday table with their festive colors and bite-sized perfection. Each batch has been tested more times than I’d like to admit (all in the name of research, of course!) and now, this recipe is a staple for family gatherings, gifting, and cozy evenings. It’s pure, nostalgic comfort—like a warm hug from someone you love. You’re definitely going to want to bookmark this one for every holiday season!
Why You’ll Love This Christmas Cake Balls Recipe
Let me spill the sprinkles—these Christmas Cake Balls are more than just cute treats; they’re a tried-and-true favorite in my holiday baking repertoire. After years of baking for crowds, picky eaters, and even the occasional gluten-free guest, I can tell you these cake balls always get rave reviews. Here’s why you’ll keep coming back to this Christmas Cake Balls recipe:
- Quick & Easy: You can whip these up in under an hour, which is a lifesaver for those last-minute party invites or sudden sweet cravings. No need to fuss with complicated steps—just mix, roll, dip, and decorate.
- Simple Ingredients: No specialty shopping required. You probably already have most of what you need—cake mix, frosting, chocolate coating, and festive sprinkles.
- Perfect for Holiday Parties: Whether it’s a school bake sale, office potluck, or your annual Christmas Eve bash, these cake balls add a pop of color and cheer to any dessert table.
- Crowd-Pleaser: Kids love the sprinkles, adults love the nostalgia, and everyone loves how easy they are to eat (no fork required!).
- Unbelievably Delicious: Soft, moist cake inside, creamy frosting, and a snappy chocolate shell—each bite is a little moment of holiday bliss.
What sets this Christmas Cake Balls recipe apart? It’s all about the balance—just enough frosting to hold the cake together without making it cloyingly sweet, the perfect melt-in-your-mouth chocolate coating, and a festive finish that looks Pinterest-ready (with zero fancy decorating skills required). I’ve tweaked and tested this method over the years, blending store-bought shortcuts with homemade touches for the best flavor and texture.
Honestly, these cake balls aren’t just another holiday treat—they’re the kind that makes you close your eyes after the first bite, maybe even sneak another when no one’s looking. They transform simple cake into something magical, turning ordinary moments into memorable celebrations. Whether you’re impressing guests or just making a quiet night feel a little more special, this recipe brings all the festive comfort you crave.
What Ingredients You Will Need
This Christmas Cake Balls recipe uses simple, wholesome ingredients to deliver big flavor and a festive pop of color—without any complicated steps. Most of these are pantry staples, and you can swap a few things if needed. Here’s what you’ll need (and a few tips for choosing the best):
- For the cake base:
- 1 box vanilla cake mix (about 15.25 oz / 432g; you can use yellow or chocolate for a twist)
- 3 large eggs, room temperature (for extra richness and structure)
- 1 cup (240ml) water
- 1/2 cup (113g) unsalted butter, melted (or use vegetable oil for a lighter crumb)
- For binding & flavor:
- 1 cup (240g) prepared vanilla frosting (store-bought is fine; I like Duncan Hines or homemade for a fresher taste)
- 1/2 tsp pure vanilla extract (adds depth—optional but recommended)
- For coating & decorating:
- 12 oz (340g) chocolate or candy melts (white, dark, or milk—Wilton and Ghirardelli are my go-tos)
- 2 tbsp coconut oil or shortening (helps the chocolate melt smoothly)
- Festive sprinkles—red, green, gold, silver, or nonpareils (for that Christmas sparkle)
- Optional: crushed peppermint candies or mini M&Ms (for extra crunch and color)
Ingredient Tips:
- If you’re gluten-free, swap in a GF cake mix—Betty Crocker’s version works well.
- For a dairy-free option, use vegan frosting and dairy-free chocolate chips.
- Want a seasonal twist? Try spice cake mix and add a pinch of cinnamon for warmth.
- Fresh sprinkles make a big difference—old ones get clumpy. I always stock up at the craft store after Halloween!
In summer, you can swap in pastel sprinkles and citrus zest, but for Christmas, stick with those classic reds and greens. If you’re in a pinch, any cake mix and frosting combo works—chocolate cake with peppermint frosting is a hit in my house. The ingredients are forgiving, so don’t stress if you need to improvise.
Equipment Needed
This Christmas Cake Balls recipe doesn’t require fancy tools—just a few kitchen basics and a couple of handy extras if you have them. Here’s what I use (and some budget-friendly tips):
- Baking sheet or rimmed tray (for cooling and setting the cake balls)
- Parchment paper or wax paper (helps prevent sticking—trust me, clean-up is a breeze)
- Mixing bowls—one medium for cake batter, one large for crumbling and mixing
- Hand mixer or stand mixer (makes blending cake and frosting much easier, but a sturdy wooden spoon works too)
- Cookie scoop or tablespoon (for uniform cake balls—you can also use your hands, but a scoop keeps things tidy)
- Microwave-safe bowl (for melting chocolate—glass bowls work best for even heating)
- Forks or dipping tools (for coating the cake balls in chocolate)
- Wire rack (optional, for letting excess chocolate drip off—paper towels work if you’re in a pinch)
If you don’t have a cookie scoop, just eyeball the size and roll by hand (honestly, they don’t need to be perfect). I’ve used everything from chopsticks to toothpicks for dipping, and they all get the job done. Budget tip: parchment paper from the dollar store works just as well as the fancy stuff. And if your mixer has seen better days, a little elbow grease will do the trick.
Preparation Method

-
Bake the cake:
Preheat your oven to 350°F (175°C). Grease a 9×13-inch (23x33cm) baking pan.
In a medium bowl, combine cake mix, eggs, water, and melted butter (or oil). Mix until smooth—about 2 minutes with a hand mixer, or a good 3 minutes by hand.
Pour into the pan and bake for 25-28 minutes, until a toothpick comes out clean and the top is golden. Let cool completely—this is important, or you’ll end up with mushy cake balls. -
Crumble the cake:
Once cool, break the cake into chunks and transfer to a large mixing bowl.
Use your hands (the best tool!) or a fork to crumble the cake into fine crumbs. It should look like damp sand and feel slightly sticky. -
Mix with frosting:
Add 1 cup (240g) frosting and 1/2 tsp vanilla extract to the crumbs.
Stir with a spatula or mixer until well combined. The mixture should hold together when pressed—if it’s too dry, add a tablespoon more frosting. -
Shape the cake balls:
Scoop out tablespoon-sized portions and roll into balls (about 1 inch / 2.5cm diameter).
Place on a parchment-lined baking sheet. If the mixture sticks to your hands, chill it for 10 minutes before rolling. -
Chill before coating:
Freeze the tray of cake balls for at least 20 minutes. This helps them hold together when you dip in chocolate. -
Melt the chocolate:
Combine chocolate/candy melts and coconut oil in a microwave-safe bowl. Heat in 30-second bursts, stirring each time, until smooth and glossy (usually takes 1-2 minutes).
Warning: don’t overheat or the chocolate will seize. -
Dip and decorate:
Using a fork or dipping tool, lower each cake ball into the melted chocolate. Tap off excess and place back on parchment.
Immediately sprinkle with festive jimmies or crushed candy before the chocolate sets. -
Let set:
Allow the cake balls to set at room temperature for 30 minutes, or refrigerate for 15 minutes for faster results.
Sensory cue: chocolate should be firm, not tacky, when touched.
Troubleshooting Tips:
- If the cake balls crack after dipping, they might be too cold—let them warm for a few minutes before coating.
- Chocolate too thick? Add a touch more coconut oil.
- Sticky hands? Lightly dust with powdered sugar or wear food-safe gloves.
Efficiency tip: Always line up your cake balls and sprinkles before melting chocolate—once you start dipping, you need to work quickly so the toppings stick.
Cooking Tips & Techniques
I’ve made more batches of Christmas Cake Balls than I care to admit—so here are some hard-earned tips and tricks for picture-perfect results every time (and a few lessons learned the hard way):
- Don’t skip chilling: Freezing the cake balls before dipping is key. If you rush this step, you’ll end up with gooey, falling-apart messes (trust me, I’ve tried). Twenty minutes in the freezer is the sweet spot.
- Use good chocolate: Cheap candy melts can taste waxy. If you want a richer flavor, splurge on Ghirardelli or melt your favorite chocolate chips with a bit of coconut oil. The smoother the chocolate, the nicer the finish.
- Work in batches: Dip a few cake balls at a time, then decorate. If you try to do too many at once, the chocolate can set before you add sprinkles.
- Avoid overmixing: When combining cake crumbs and frosting, mix just until it holds together. Overmixing makes it dense and gummy.
- Multitasking: While the cake is baking, gather your decorations and prep your workspace. It makes assembly much faster.
- Consistency matters: Use a cookie scoop for even sizing. Uniform cake balls look better and set more evenly.
- Personal failure story: One year, I forgot the coconut oil and ended up with chocolate that was thick and lumpy—not great for dipping. Now, I always keep a backup jar on hand!
- Don’t sweat imperfections: If the coating isn’t perfectly smooth, just add more sprinkles. Imperfect cake balls taste just as good (maybe better because you made them yourself).
These strategies keep your Christmas Cake Balls looking as festive as they taste. I’ve learned that a little preparation goes a long way—and sometimes, the “oops” moments turn into the best holiday stories.
Variations & Adaptations
One of my favorite things about this Christmas Cake Balls recipe is how easy it is to switch up for different tastes, diets, and seasons. Here are some delicious ways to make it your own:
- Gluten-Free Variation: Use a gluten-free cake mix and certified GF frosting. The texture stays light, and nobody ever notices the difference (my sister swears by this version for her celiac-friendly parties).
- Vegan Option: Swap in a vegan cake mix, plant-based frosting, and dairy-free chocolate chips. Coconut oil is naturally vegan, so you’re good there. Even the sprinkles can be vegan if you check the label.
- Seasonal Twist: Want something cozy? Try a spice cake mix with cinnamon frosting, then top with gold and silver sprinkles for New Year’s. For Valentine’s Day, use strawberry cake and pink jimmies.
- Flavor Customization: Mix in crushed peppermint candies or mini chocolate chips for a burst of flavor. Try almond extract instead of vanilla for a nutty undertone (a personal favorite in my house!).
- Cooking Method Adaptation: If you don’t want to bake, use store-bought pound cake—just crumble and mix with frosting. It’s not quite the same, but it works in a pinch.
- Allergen Substitutions: For nut allergies, avoid almond extract and check your sprinkles for cross-contamination. For dairy allergies, use coconut yogurt-based frosting.
- Personal Variation: Last Christmas, I made a batch with chocolate cake, orange zest, and dark chocolate coating—everyone went nuts for the citrusy twist!
So, don’t be afraid to experiment. These cake balls are forgiving, and every batch is a chance to create something uniquely yours.
Serving & Storage Suggestions
These Christmas Cake Balls are best served at room temperature, where their flavors and textures shine. Arrange them on a festive platter, in mini cupcake liners, or stack them into a holiday “tree” for a show-stopping centerpiece. Pair with a mug of hot cocoa, mulled wine, or a bubbly glass of prosecco for a merry treat.
- Serving Suggestions:
- Place cake balls on a tiered dessert stand for easy snacking at parties.
- Wrap a dozen in cellophane bags with ribbon for a homemade gift.
- Serve alongside other holiday desserts like sugar cookies and peppermint bark.
- Storage Instructions:
- Store in an airtight container at room temperature for up to 5 days. Keep away from direct sunlight or heat sources (the chocolate will melt!).
- Refrigerate for up to 2 weeks—just let them come to room temp before serving for best texture.
- Freeze for up to 2 months. Place in a single layer on a baking sheet, then transfer to a zip-top bag. Thaw in the fridge overnight before enjoying.
- Reheat gently in the microwave for 5-10 seconds if you like a warm, gooey center.
- Flavor Notes:
- The flavor deepens over time—the cake gets a little richer and the chocolate shell stays snappy.
- If gifting, layer parchment between cake balls to prevent sticking.
Whether you’re serving at a party or saving for later, these cake balls keep their festive charm and delicious taste.
Nutritional Information & Benefits
Here’s a quick look at the nutrition for one Christmas Cake Ball (based on standard ingredients):
- Calories: ~120
- Fat: 6g
- Carbohydrates: 16g
- Sugar: 12g
- Protein: 1g
Health Benefits:
- Using real eggs and butter adds vitamin D and healthy fats.
- Choosing dark chocolate boosts antioxidants and can lower sugar content.
- You can easily adapt this recipe for gluten-free and dairy-free diets, making it accessible for more guests.
Be aware: cake balls contain wheat, eggs, and dairy (unless adapted), and sometimes nuts if you add almond extract. For wellness, I like that you can make these bite-sized—perfect for portion control and a holiday treat that doesn’t leave you feeling weighed down.
Conclusion
So, here’s why you’re going to love making these Christmas Cake Balls: they’re festive, fun, and incredibly satisfying—no culinary degree required. Whether you’re baking with family, prepping for a holiday party, or just looking to add cheer to your dessert table, this recipe is a guaranteed winner. You can tweak it for any dietary need, switch up the flavors, and decorate to your heart’s content.
Personally, I keep coming back to this recipe because it’s all about easy joy and shared memories. The best part? Watching everyone’s eyes light up when they bite into that soft, chocolate-covered center. So grab your sprinkles, get rolling, and let the holiday magic begin!
If you try these Christmas Cake Balls, leave a comment below with your favorite variation or tag me on social media! Share the recipe with friends, swap decorating ideas, and make it part of your holiday tradition. Wishing you a season full of sweet treats and laughter!
FAQs
How far in advance can I make Christmas Cake Balls?
You can make them up to two weeks ahead if you store them in the fridge, or freeze for up to two months. Just let them come to room temperature before serving for the best flavor and texture.
Can I use homemade cake instead of cake mix?
Absolutely! Any sturdy cake recipe works well. Just make sure it’s cooled before crumbling and mixing with frosting.
How do I keep the chocolate coating smooth?
Add a little coconut oil or shortening to the melted chocolate, and work quickly. If the coating is still lumpy, try microwaving in short bursts and stirring often.
What flavors work best for Christmas Cake Balls?
Classic vanilla or chocolate are always crowd-pleasers, but spice cake with cinnamon, peppermint, or citrus zest make great seasonal twists.
Can I make Christmas Cake Balls nut-free?
Yes! Just skip almond extract and check your chocolate and sprinkles for any nut allergens. Stick with basic vanilla or chocolate flavors for safety.
Pin This Recipe!
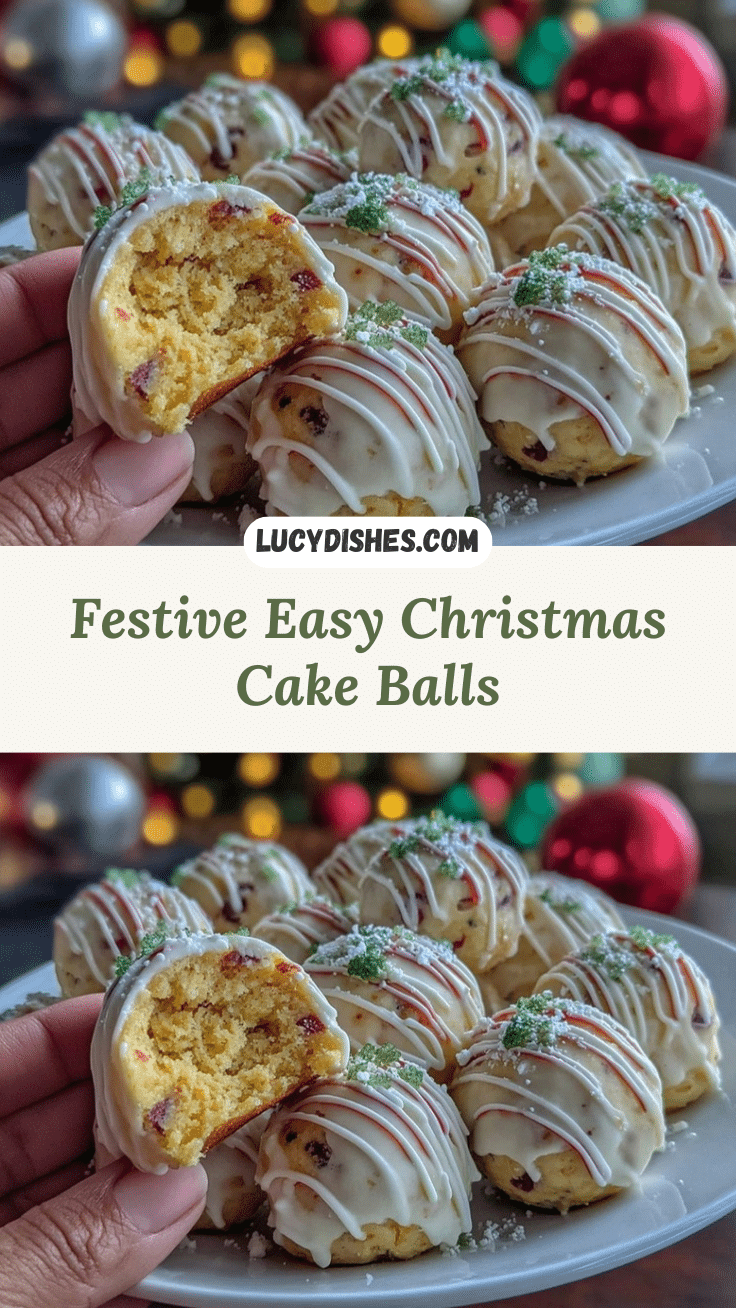
Christmas Cake Balls
These festive Christmas Cake Balls are a quick and easy holiday treat featuring moist cake, creamy frosting, and a snappy chocolate shell, all decorated with colorful sprinkles. Perfect for parties, gifting, or cozy family gatherings, they’re a nostalgic bite-sized dessert everyone will love.
- Prep Time: 20 minutes
- Cook Time: 28 minutes
- Total Time: 1 hour
- Yield: 36 cake balls 1x
- Category: Dessert
- Cuisine: American
Ingredients
- 1 box vanilla cake mix (15.25 oz)
- 3 large eggs, room temperature
- 1 cup water
- 1/2 cup unsalted butter, melted (or vegetable oil)
- 1 cup prepared vanilla frosting
- 1/2 tsp pure vanilla extract (optional)
- 12 oz chocolate or candy melts (white, dark, or milk)
- 2 tbsp coconut oil or shortening
- Festive sprinkles (red, green, gold, silver, or nonpareils)
- Optional: crushed peppermint candies or mini M&Ms
Instructions
- Preheat oven to 350°F. Grease a 9×13-inch baking pan.
- In a medium bowl, combine cake mix, eggs, water, and melted butter (or oil). Mix until smooth, about 2 minutes with a hand mixer or 3 minutes by hand.
- Pour batter into the pan and bake for 25-28 minutes, until a toothpick comes out clean and the top is golden. Let cool completely.
- Once cool, break cake into chunks and transfer to a large mixing bowl. Crumble cake into fine crumbs using your hands or a fork.
- Add 1 cup frosting and 1/2 tsp vanilla extract to the crumbs. Stir until well combined. The mixture should hold together when pressed; add more frosting if too dry.
- Scoop tablespoon-sized portions and roll into balls (about 1 inch diameter). Place on a parchment-lined baking sheet. Chill mixture for 10 minutes if sticky.
- Freeze tray of cake balls for at least 20 minutes.
- Combine chocolate/candy melts and coconut oil in a microwave-safe bowl. Heat in 30-second bursts, stirring each time, until smooth and glossy (1-2 minutes).
- Using a fork or dipping tool, dip each cake ball into melted chocolate. Tap off excess and place back on parchment. Immediately sprinkle with festive toppings.
- Allow cake balls to set at room temperature for 30 minutes, or refrigerate for 15 minutes until chocolate is firm.
Notes
Chilling the cake balls before dipping is essential for a smooth chocolate coating. Use high-quality chocolate for best flavor. Adapt for gluten-free or vegan diets by swapping cake mix, frosting, and chocolate. Store in an airtight container at room temperature for up to 5 days, refrigerate for 2 weeks, or freeze for 2 months. Decorate quickly after dipping for sprinkles to stick.
Nutrition
- Serving Size: 1 cake ball
- Calories: 120
- Sugar: 12
- Sodium: 90
- Fat: 6
- Saturated Fat: 4
- Carbohydrates: 16
- Protein: 1
Keywords: Christmas, cake balls, holiday dessert, easy, festive, party treats, chocolate, sprinkles, gift, baking


