
Let me tell you, the scent of buttery vanilla sugar wafting from my oven as these Christmas pinwheel cookies bake is pure holiday magic. The first time I made them, I stood by the oven door, nose pressed close, just waiting for that moment when the colors would swirl together and fill my kitchen with the warm, sweet aroma of Christmas. It’s the kind of moment where you pause, take a deep breath, and just smile because you know you’re onto something truly special.
Years ago, when I was knee-high to a grasshopper, my grandma would let me help roll out sugar cookie dough on her old wooden table. She had a knack for turning simple ingredients into something that felt like a celebration. I stumbled onto this recipe during a snowy weekend, trying to recreate her festive spirit. Honestly, I wish I’d discovered these Christmas pinwheel cookies sooner—they’re so much more fun than plain sugar cookies, and they look absolutely stunning on any holiday dessert tray.
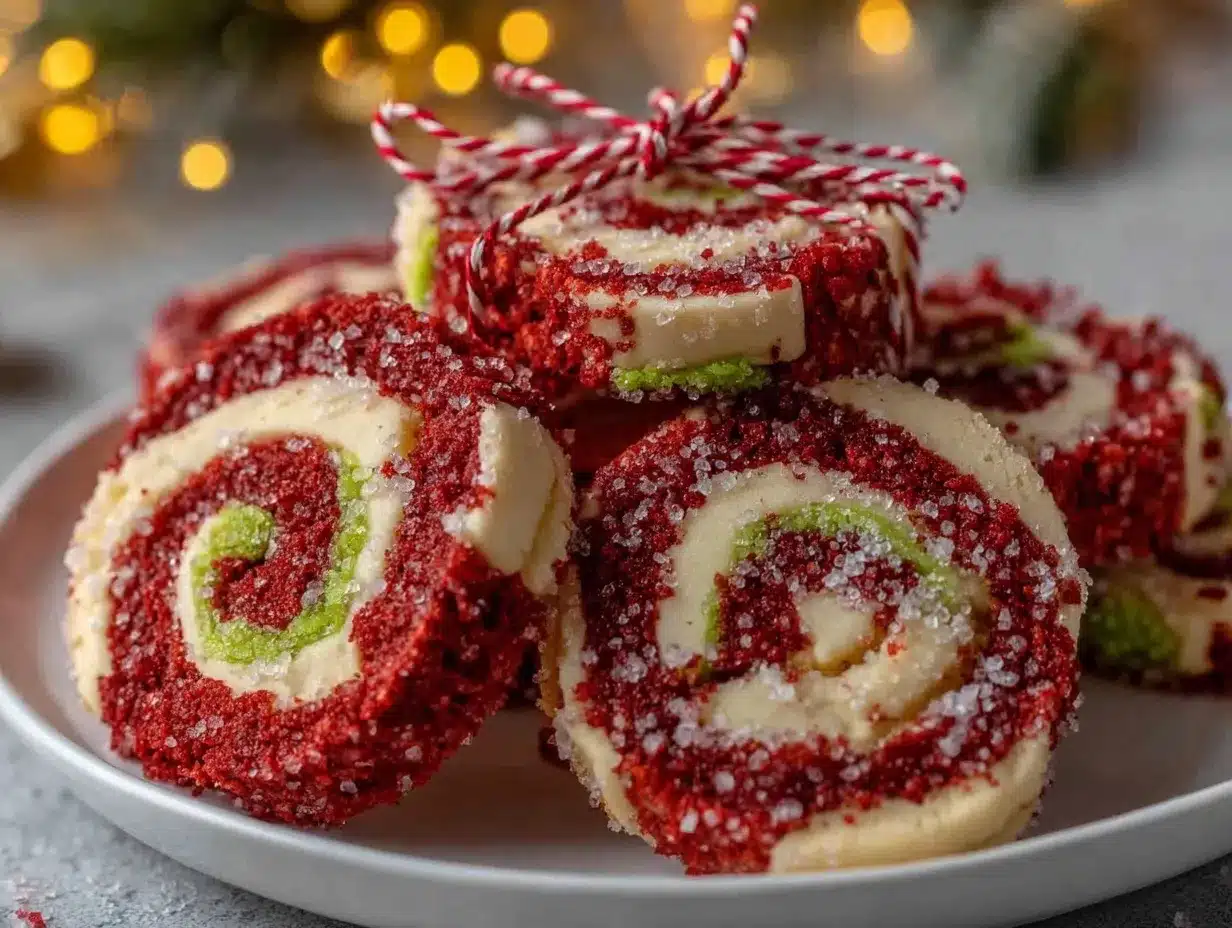
My family couldn’t stop sneaking these cookies off the cooling rack (and I can’t really blame them). The swirls of red and green are like a Christmas card in cookie form, and the texture is just right—crisp edges, soft centers, with a subtle hint of almond that sets them apart. These pinwheels bring out the kid in everyone; I’ve seen grown-ups try to “just taste one” and end up munching on three.
Honestly, you know what? These cookies are dangerously easy to make. They provide pure, nostalgic comfort without any fuss—perfect for potlucks, sweet treats for your kids, or to brighten up your Pinterest holiday dessert board. After testing this recipe more times than I care to admit (in the name of research, of course), it’s become a staple for family gatherings and gifting. If you want a dessert that feels like a warm hug and looks like Christmas cheer, you’re going to want to bookmark this one.
Why You’ll Love This Recipe
Okay, let’s face it: Christmas pinwheel cookies aren’t just pretty—they’re the kind of treat that delivers on every front. From years of holiday baking (and more than a few cookie exchanges), I promise these cookies check all the boxes. Here’s why you’ll be reaching for this recipe again and again:
- Quick & Easy: Comes together in under an hour (plus chilling time), perfect for last-minute baking or busy schedules.
- Simple Ingredients: No fancy grocery trips needed. Odds are, you already have everything on hand—flour, sugar, butter, eggs, and food coloring.
- Perfect for Holiday Gatherings: They’re showstoppers for dessert trays, cookie swaps, teacher gifts, or just for cozying up by the fire.
- Crowd-Pleaser: These cookies get rave reviews from kids, adults, and yes—even picky eaters. The swirled colors just scream “eat me!”
- Unbelievably Delicious: Crisp, buttery edges with a tender middle, and a hint of almond that makes them taste like they came straight from a bakery.
What makes my Christmas pinwheel cookies different from the rest? For starters, the dough is extra smooth (thanks to a touch of cornstarch), which means they roll out beautifully without cracking. The almond extract gives a subtle depth, transforming them from “just sugar cookies” into something memorable. And if you’ve ever struggled with cookies spreading too much, don’t worry—this dough holds its shape like a dream.
This isn’t just another holiday cookie—it’s the kind that makes you close your eyes after the first bite and feel that old-fashioned Christmas comfort. It’s festive without being fussy, easy enough for beginners, and sophisticated enough for holiday parties. Whether you want to impress your guests or just make your own kitchen feel a little more magical, these Christmas pinwheel cookies are your new go-to. Trust me, you’ll want to make a double batch.
What Ingredients You Will Need
This recipe uses simple, wholesome ingredients to deliver bold flavor and eye-catching swirls, without the fuss. Most are pantry staples, and a few quick substitutions make it easy to customize for any dietary need or flavor craving. Here’s the rundown:
- For the Dough:
- 2 1/2 cups (313g) all-purpose flour (make sure to spoon and level for accuracy)
- 1/2 cup (60g) cornstarch (for a tender, melt-in-your-mouth texture)
- 3/4 teaspoon baking powder
- 1/2 teaspoon salt
- 1 cup (226g) unsalted butter, softened (I recommend Plugrá or Kerrygold for best texture)
- 1 1/4 cups (250g) granulated sugar
- 2 large eggs, room temperature
- 1 1/2 teaspoons pure vanilla extract
- 3/4 teaspoon almond extract (optional, but trust me—it’s worth it!)
- For the Color:
- Red gel food coloring (gel works best for vibrant color without thinning the dough)
- Green gel food coloring
- Optional:
- Sprinkles for the edges (festive nonpareils or sanding sugar)
- Fine lemon or orange zest (add 1/2 teaspoon for a subtle citrus twist)
- Substitution Tips:
- Use gluten-free 1:1 flour blend for a gluten-free version (I’ve had good luck with Bob’s Red Mill)
- Swap butter for dairy-free margarine (like Earth Balance) for a vegan-friendly dough
- Skip the almond extract if anyone has nut allergies—vanilla alone is lovely
- For egg-free, use 1/4 cup unsweetened applesauce per egg (texture is a tad softer, but still delicious)
In summer, swap in pastel colors for a fun twist, or use chocolate extract instead of almond for a deeper flavor. And if you’re feeling fancy, add a touch of edible glitter for extra sparkle—my niece swears by it for “magic” cookies!
Equipment Needed
You don’t need fancy gadgets to make Christmas pinwheel cookies, but having the right tools makes things a whole lot easier. Here’s what you’ll need:
- Mixing bowls (at least two—one for wet, one for dry ingredients)
- Hand mixer or stand mixer (I’ve used both; a stand mixer is faster but a handheld works just fine)
- Measuring cups and spoons (accuracy matters for cookies!)
- Rubber spatula (for scraping down the bowl and folding dough)
- Plastic wrap or wax paper (for chilling and rolling the dough)
- Rolling pin (if you don’t have one, a clean wine bottle works in a pinch—been there, done that!)
- Baking sheets
- Parchment paper or silicone baking mats (helps prevent sticking and makes cleanup easy)
- Sharp knife or unflavored dental floss (for slicing clean pinwheel rounds)
If you’re big on specialty equipment, a dough scraper helps lift and roll the dough smoothly. Maintenance tip: always clean your rolling pin well after coloring dough, or the colors can transfer to your next batch (learned this the hard way!). For budget-friendly baking, most items can be found at any grocery store, and you absolutely don’t need top-of-the-line tools—just ones that feel comfortable in your hands.
Preparation Method
- Mix Dry Ingredients: In a large bowl, whisk together 2 1/2 cups (313g) flour, 1/2 cup (60g) cornstarch, 3/4 teaspoon baking powder, and 1/2 teaspoon salt. Set aside.
- Cream Butter & Sugar: In another bowl, beat 1 cup (226g) unsalted butter and 1 1/4 cups (250g) sugar until pale and fluffy (about 2-3 minutes). Don’t rush—this step is key for light cookies.
- Add Eggs & Flavor: Beat in 2 large eggs, mixing until incorporated. Stir in 1 1/2 teaspoons vanilla extract and 3/4 teaspoon almond extract (if using).
- Combine Wet & Dry: Gradually add the dry mixture to the wet ingredients, mixing on low speed until a soft dough forms. The dough should be smooth and just a bit sticky. If it’s too dry, add 1 tablespoon milk.
- Divide & Color Dough: Split dough evenly into three bowls. Leave one portion plain, tint one with red gel food coloring, and the third with green gel food coloring. Knead gently to distribute color (use gloves to avoid staining your hands!).
- Chill Dough: Wrap each colored dough in plastic wrap, flatten into disks, and chill for at least 1 hour (up to overnight). Chilling is crucial—it prevents spreading and helps the colors stay vibrant.
- Roll Out Dough: On a floured surface, roll each dough into a rectangle about 1/4-inch thick (roughly 8×10 inches/20×25 cm). Trim edges for neatness, if you like.
- Layer & Roll: Place the green dough on parchment, top with plain dough, then red dough. Gently roll with a rolling pin to fuse layers together. Starting from the long edge, roll up tightly into a log, using the parchment to guide you. If cracks form, pinch and smooth gently.
- Chill Again: Wrap the log in plastic wrap; chill 30-60 minutes. This helps the cookies slice cleanly and keeps the swirl intact.
- Slice & Bake: Preheat oven to 350°F (175°C). Line baking sheets with parchment. Slice log into 1/4-inch (6 mm) rounds, using a sharp knife or dental floss for clean cuts. Arrange cookies 2 inches apart.
- Optional: Roll edges in sprinkles for extra sparkle.
- Bake: Bake 10-12 minutes, or until edges are just golden. They’ll smell buttery and sweet. Let cool on pan 2 minutes, then transfer to wire rack. Resist snacking until they’re set (or don’t—I won’t judge!).
Troubleshooting: If dough cracks, let it soften for a few minutes before rolling. If colors look streaky, knead a bit more (but don’t overwork). For extra efficiency, prep colored doughs while the first is chilling—keeps momentum going and saves time.
Cooking Tips & Techniques
Years of holiday baking have taught me a few tricks for perfect Christmas pinwheel cookies every time. Here’s what works (and what doesn’t):
- Chill Is Key: Don’t rush chilling the dough. If you skip this step, cookies will spread and lose their beautiful swirls. I’ve made that mistake on a busy afternoon—trust me, patience pays off.
- Use Gel Food Coloring: Gel colors are more vibrant and won’t make your dough sticky. Liquid colors can throw off the texture and make rolling tricky.
- Roll Evenly: Uneven layers can lead to wonky pinwheels. Use a ruler if you’re a perfectionist, or just eyeball it for a more “rustic” look (honestly, both taste amazing).
- Slice with Care: A sharp knife or dental floss gives clean cuts. If slices squish, chill the log a bit longer.
- Multitasking: While the dough chills, prep your baking sheets, clean up, and set out sprinkles—makes the process smooth and keeps you in the holiday spirit.
- Consistency Matters: Measure flour by spooning and leveling, not scooping. Too much flour = tough cookies.
- Common Mistakes: Overmixing the dough makes it tough. Undermixing leaves streaks. Don’t panic—if you’re somewhere in the middle, cookies will still taste great.
I’ve had batches that spread too much or lost their color—usually when I got impatient or tried to shortcut the chilling. Now, I always chill twice, and the results are consistent, festive, and just plain delicious. If you’re baking with kids, let them help swirl the dough; it’s messy fun and builds great memories. Oh, and don’t forget to taste test (in the name of quality control, of course)!
Variations & Adaptations
Christmas pinwheel cookies are endlessly customizable. Here are some of my favorite twists (and a few reader favorites):
- Dietary Variations: Use gluten-free flour for a celiac-friendly treat. Swap butter for vegan margarine and eggs for flaxseed “eggs” if you need dairy- or egg-free cookies.
- Seasonal Colors: Try blue and white for winter wonderland pinwheels, pastel shades for Easter, or orange and black for Halloween.
- Flavor Boosts: Add lemon or orange zest to the dough for citrus pinwheels, or swap almond extract for peppermint for a classic holiday twist.
- Cooking Methods: If you have a convection oven, lower the bake time by a minute or two. Air fryers work for a small batch—just keep a close eye and use parchment liners.
- Allergen Substitutions: For nut allergies, skip almond extract or use imitation vanilla. For gluten allergies, stick with certified gluten-free flour blends.
My own favorite variation? Swapping half the flour for finely ground hazelnuts and adding a touch of cocoa powder for a Nutella-inspired holiday cookie. It’s a little unconventional but so good. Whatever you choose, these cookies are meant to be played with—so go wild and make them your own!
Serving & Storage Suggestions
For the best presentation, serve Christmas pinwheel cookies at room temperature on a festive platter. Stack them in clear jars or cellophane bags for homemade gifts—they look as good as they taste.
Pair these cookies with hot cocoa, spiced tea, or mulled wine for a cozy holiday vibe. They’re also perfect alongside a scoop of vanilla ice cream or a dollop of whipped cream for an extra treat.
To store, keep cookies in an airtight container at room temperature for up to 5 days. For longer storage, freeze in layers separated by parchment paper for up to 2 months. Thaw overnight before serving.
If reheating, pop cookies in a 300°F (150°C) oven for 2-3 minutes to refresh their crispness. The flavors actually deepen after a day or two, so don’t be afraid to make them ahead—just tuck them away where cookie thieves can’t find them!
Nutritional Information & Benefits
Each Christmas pinwheel cookie contains approximately 90 calories, 4g fat, 12g carbs, and 1g protein. They’re a treat, but using real butter and eggs means you get wholesome fats and a bit of protein in every bite.
Key ingredients like almond extract and citrus zest (if used) add antioxidants and flavor without extra sugar. For gluten-free or vegan versions, the nutritional content shifts a bit, but the cookies remain low in saturated fat and free from artificial additives.
Potential allergens include wheat, eggs, dairy, and nuts (almond extract). Always check labels if you’re baking for friends with sensitivities. Personally, I love that these cookies are festive without being loaded with artificial junk—you can actually pronounce every ingredient!
Conclusion
There’s just something about Christmas pinwheel cookies that makes every holiday gathering feel a little more special. They’re easy, cheerful, and absolutely delicious—truly the kind of recipe that’s worth trying (and sharing!). Whether you stick to classic red and green or invent your own color swirl, these cookies are made for customizing.
I love this recipe because it connects me to my childhood, brings smiles to everyone who tries them, and reminds me that simple, homemade treats are what make holidays memorable. So go ahead, make a batch, and let your creativity shine!
If you try these cookies, leave a comment below—share your favorite variations or holiday memories. Pin this recipe for later, and don’t forget to tag me if you post your creations online. Wishing you a warm, cookie-filled holiday season!
Frequently Asked Questions
How do I prevent my Christmas pinwheel cookies from spreading too much?
Chilling the dough before slicing and baking is key. If your cookies are spreading, try chilling the sliced rounds for 10 minutes before baking.
Can I make the dough ahead of time?
Absolutely! You can make and chill the dough up to 48 hours in advance. Just keep it well wrapped so it doesn’t dry out.
What’s the best way to get vibrant colors?
Use gel food coloring. It gives bright color without making the dough sticky. Add a bit at a time until you reach your desired shade.
Can I freeze Christmas pinwheel cookies?
Yes! Freeze baked cookies in airtight containers for up to 2 months or freeze the dough log and slice/bake fresh when needed.
Are these cookies safe for nut allergies?
Simply skip the almond extract or use vanilla instead. Always check your other ingredients for cross-contamination if allergies are a concern.
Pin This Recipe!
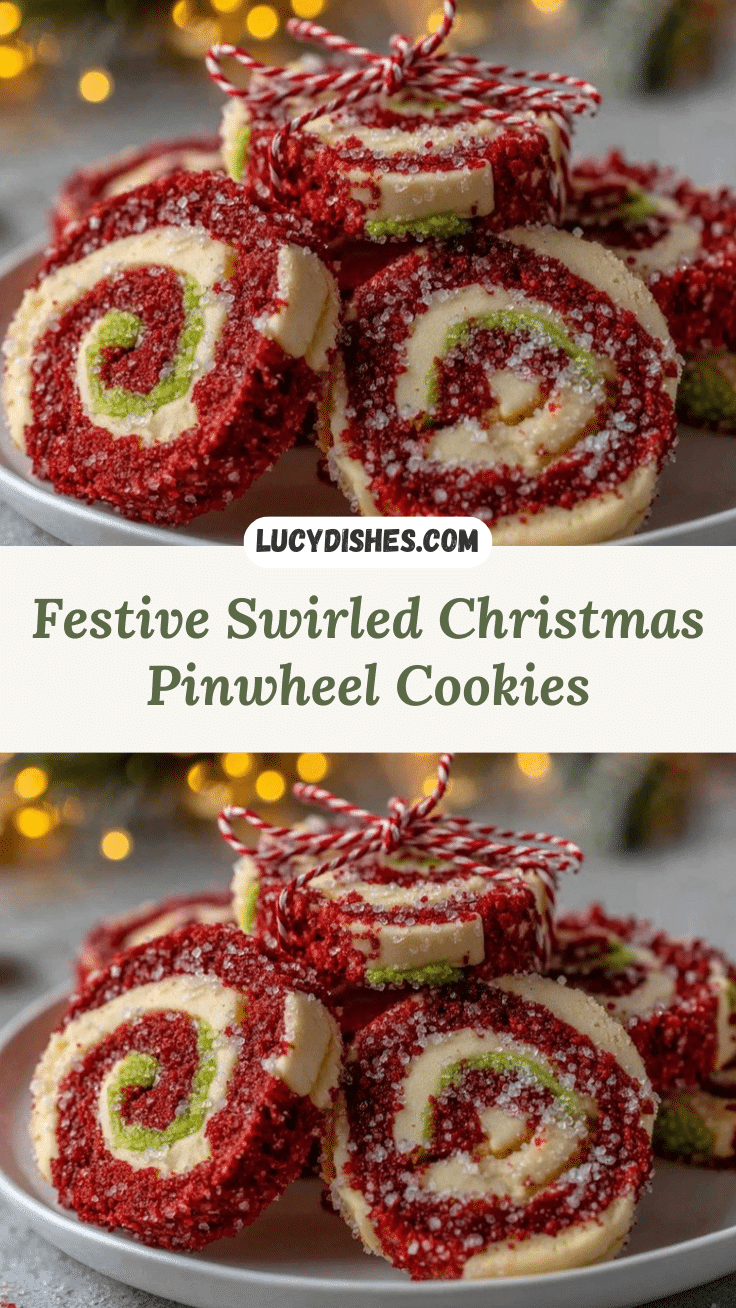
Christmas Pinwheel Cookies
These festive Christmas pinwheel cookies feature vibrant swirls of red and green in a buttery vanilla sugar cookie dough with a hint of almond. Easy to make and perfect for holiday dessert trays, gifting, or cozy gatherings.
- Prep Time: 25 minutes
- Cook Time: 12 minutes
- Total Time: 1 hour 45 minutes
- Yield: 36 cookies 1x
- Category: Dessert
- Cuisine: American
Ingredients
- 2 1/2 cups all-purpose flour
- 1/2 cup cornstarch
- 3/4 teaspoon baking powder
- 1/2 teaspoon salt
- 1 cup unsalted butter, softened
- 1 1/4 cups granulated sugar
- 2 large eggs, room temperature
- 1 1/2 teaspoons pure vanilla extract
- 3/4 teaspoon almond extract (optional)
- Red gel food coloring
- Green gel food coloring
- Sprinkles for edges (optional)
- 1/2 teaspoon fine lemon or orange zest (optional)
Instructions
- In a large bowl, whisk together flour, cornstarch, baking powder, and salt. Set aside.
- In another bowl, beat butter and sugar until pale and fluffy (about 2-3 minutes).
- Beat in eggs until incorporated. Stir in vanilla extract and almond extract (if using).
- Gradually add dry mixture to wet ingredients, mixing on low speed until a soft dough forms. If too dry, add 1 tablespoon milk.
- Divide dough evenly into three bowls. Leave one plain, tint one with red gel food coloring, and the third with green gel food coloring. Knead gently to distribute color.
- Wrap each colored dough in plastic wrap, flatten into disks, and chill for at least 1 hour (up to overnight).
- On a floured surface, roll each dough into a rectangle about 1/4-inch thick (roughly 8×10 inches). Trim edges for neatness.
- Layer green dough on parchment, top with plain dough, then red dough. Gently roll with a rolling pin to fuse layers together.
- Starting from the long edge, roll up tightly into a log, using parchment to guide you. Pinch and smooth cracks if needed.
- Wrap the log in plastic wrap and chill for 30-60 minutes.
- Preheat oven to 350°F (175°C). Line baking sheets with parchment.
- Slice log into 1/4-inch rounds using a sharp knife or dental floss. Arrange cookies 2 inches apart.
- Optional: Roll edges in sprinkles.
- Bake 10-12 minutes, or until edges are just golden. Let cool on pan 2 minutes, then transfer to wire rack.
Notes
Chilling the dough twice is crucial for vibrant swirls and preventing spreading. Use gel food coloring for best results. For gluten-free or vegan adaptations, substitute flour and butter as needed. Dough can be made ahead and chilled up to 48 hours. Freeze baked cookies for up to 2 months.
Nutrition
- Serving Size: 1 cookie
- Calories: 90
- Sugar: 6
- Sodium: 45
- Fat: 4
- Saturated Fat: 2.5
- Carbohydrates: 12
- Fiber: 0.3
- Protein: 1
Keywords: Christmas cookies, pinwheel cookies, holiday dessert, sugar cookies, festive cookies, easy cookies, almond cookies, butter cookies


